Windows Movie Maker: Get your film in the can
Whether you're stitching together pieces of your home movies for friends and relatives to enjoy, or have embarked on a budding career as a filmmaker, the first thing you need to do is get your footage out of the camera or off a videocassette and onto your hard disk.
Cut! Print it!
With Windows Movie Maker, it's easy to transfer your video footage to your hard disk so you can begin working with it.
First, make sure your video devices are properly attached to your computer. (Not sure how to do that? See Starting with Windows Movie Maker for more information.)
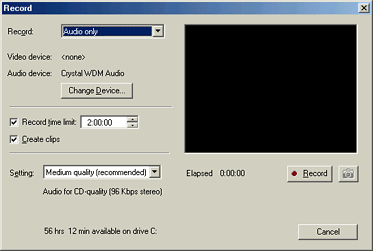
After your video devices have been configured and are ready to go, open Windows Movie Maker and click Record on the toolbar. The resulting Record dialog box offers you a variety of choices, including:
- Which device you want to record from, if more than one are connected.
- Record audio only, video only, or both.
- A recording time limit.
- A general quality level.
- Other recording qualities, such as brightness, contrast, saturation, and more.
The building blocks of your movie
When recording an hour or more of video from a single source, navigating the footage to find the clips you need can be time-consuming. The shot detection feature in Windows Movie Maker automatically creates separate clips every time an entirely different frame is detected (meaning each time the camera moves from one subject to another). Before you begin recording, select Create clips to enable shot detection.
Keep in mind that clips are the basic building blocks of your movie. The combination of clips, when added and arranged on the storyboard or timeline, will compose your movie.
When you have your settings the way you want them, click Record. The word "Recording" will blink to indicate that you are recording, and the time elapsed for your current recording shows next to it. After recording has begun, the Record button becomes a Stop button. Click Stop when you want to stop recording.
Dress up your production
You don't have to stop with just the original video that you've shot. Windows Movie Maker lets you include in your movie existing photos, audio clips, or other video files that you have stored on your computer. You can import many different file types, including:
- Video files with an .asf, .avi, or .wmv file extension.
- Movie files with an .mpeg, .mpg, .m1v, .mp2, .mpa, or .mpe file extension.
- Audio files with a .wav, .snd, .au, .aif, .aifc, .aiff, .wma, or .mp3 file extension.
- Windows Media-based files with an .asf, .wm, .wma, or .wmv file extension.
- Still images with a .bmp, .jpg, .jpeg, .jpe, .jfif, .gif, or .dib file extension.
- PowerPoint files and individual slides with a .ppt extension.
To add one of the above file types to your movie:
- On the File menu, click Import.
- Locate the file you want to add. When you import a file, a clip that refers to the file appears in the main window.
Once you have transferred the elements that you want to include in your movie, you can begin organizing and working with them on the storyboard—that's when the real fun starts.
Ready to start?
Please check back for more detailed, step-by-step guides to using Windows Movie Maker, coming soon.
|