Compaq ACMS for OpenVMS
Getting Started
7.3.2 Creating a Panel
Follow these instructions to access the Panel Editor and design a panel:
- Reenter FDE by issuing the FDE command and your form name:
DECforms displays the FDE Main Menu (see Figure 7-2).
- Press the down-arrow key to move the cursor to the third line (the
Panel line), and press [Select] at the first choice: Choose,
Create. DECforms superimposes another panel on the FDE Main Menu (see
Figure 7-3).
- Press [Select] at the menu choice: Create Panel.
DECforms displays the Create Panel screen (see Figure 7-4),
containing panel attributes and their default values marked by a
diamond.
Figure 7-3 Choose/Create Panel Menu
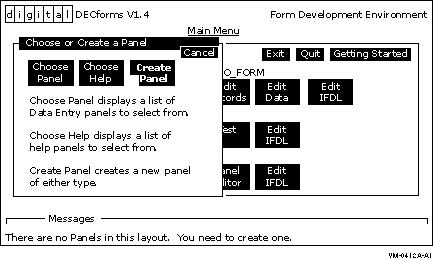
Figure 7-4 Create Panel Screen

- The Panel Name field is highlighted on your screen. Type the name
of the panel you are creating:
Panel Name: EMPLOYEE_INFO_PANEL
|
Press [Return]. The cursor moves to the Data Entry
field. The panel type specifies whether the panel is for entering data
or displaying help. The diamond before Data Entry indicates that the
panel is a data entry panel.
- Press the down-arrow key to move the cursor to Yes-Remove under
Erase on Exit. Press [Select]. This has the effect of
removing the panel from the screen when the user finishes entering data
and exits the panel.
- Press the up-arrow key to move the cursor to the OK option in the
top right-hand corner. Press [Select]. This means that you
accept all the values on the screen, including the default viewport
size.
Note
DECforms displays a panel within a viewport. To specify a viewport size
other than the default 24 X 80 dimension, you must first enter a
viewport name on the Create Panel screen and then specify line and
column numbers to indicate the size of the viewport in which the panel
is to be displayed.
|
After you select OK, DECforms redisplays the FDE Main Menu, shown in
Figure 7-2.
- Move to the Panel Editor menu choice and press
[Select]. DECforms invokes the Panel Editor and places the
cursor in the top left-hand corner of a blank screen. You are now ready
to format your panel.
Note
Always use the arrow keys to move the cursor within the panel. Do not
use the space bar to position the cursor; the space bar creates literal
spaces on the panel.
|
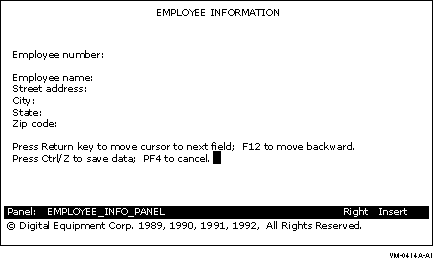
- Position the cursor with the arrow keys and type the literals on
the screen as shown in Figure 7-5. DECforms displays the panel to
users exactly as you format it.
Figure 7-5 is an example of a
data entry panel composed only of literals. The panel includes a
message to users indicating how to navigate between fields (using
[Return] and [F12] ), how to save the data (using
[Ctrl/Z] ), and how to quit the screen (using
[PF4] ). You define [PF4] later in this chapter.
Because [Return], [F12], and [Ctrl/Z]
are predefined in DECforms, you do not need to define them for use in
this tutorial application.
Figure 7-5 Sample DECforms Panel
You must now create the fields that correspond to the literals. A
field is that space following the literal in which the user enters the
information. For example, a defined space after the Employee name
literal is a field in which to enter the employee name.
- Use the arrow key to position the cursor two spaces after the
Employee number literal, and press [Do]. DECforms displays
the Command> prompt.
- Type CREATE FIELD after the Command> prompt and press
[Return]:
DECforms then displays the Create Field Menu (see Figure 7-6).
Figure 7-6 Create Field Menu
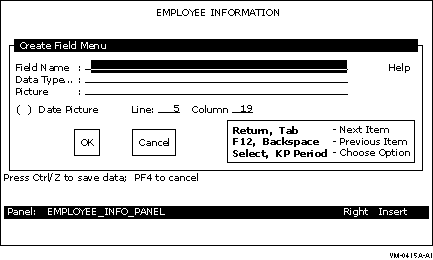
- Enter the field name and press [Return]:
Note
Field names that you specify must correspond to field names that you
entered in the CDD record definition. In the menu, the numbers that
appear after Line and Column indicate where the cursor was when you
began to create the field.
|
- Press [Select] at the Data Type prompt (the field is
highlighted) to display a list of valid data types: atomic, character,
and date/time. In the list of character types, move the cursor to
Character and press [Select] to register your choice.
DECforms then superimposes the Data Type Character window, shown in
Figure 7-7, on the menu.
Figure 7-7 Data Type Character Window
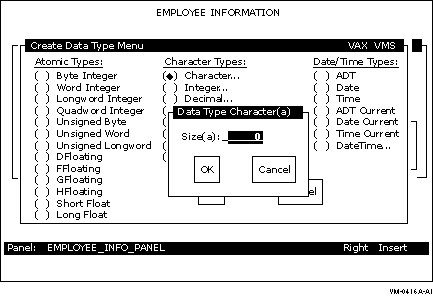
- Enter the size of the field:
Use the arrow keys to move the cursor to OK, and press
[Select] to confirm your entry.
DECforms again displays
the
Create Field Menu, shown in Figure 7-6.
- Enter the field picture:
- Move the cursor to the OK icon and press [Select].
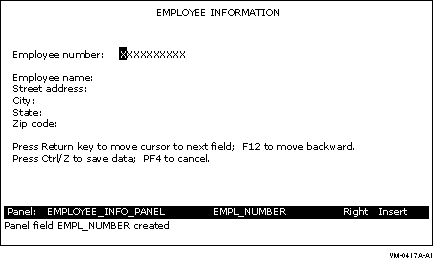
DECforms returns you to your panel and displays a success message
at the bottom of your screen. It also displays Xs to indicate the
length of the character picture for that field, as shown in
Figure 7-8.
Figure 7-8 Sample Panel with One Data Field Picture
- Create character fields of the following lengths and pictures in
the same manner as in steps 9 through 15:
EMPL_NAME              X(30)
EMPL_STREET_ADDRESS    X(30)
EMPL_CITY              X(20)
EMPL_STATE             X(2)
EMPL_ZIP_CODE          X(10)
|
Figure 7-9 shows the results of defining all the fields in the
panel.
Note
DECforms can validate a field of data as soon as the user exits that
field. For example, you can write DECforms code that checks whether the
user entered a valid zip code and, if not, prompts the user to reenter
the zip code. This tutorial application, however, does not perform
DECforms validation. For advanced DECforms design and programming, see
DECforms Guide to Commands and Utilities.
|
Figure 7-9 Sample Panel with Data Field Pictures

- Press [Ctrl/Z] to exit from the Panel Editor when you
finish creating the panel. DECforms displays the following message:
DECforms redisplays the FDE Main Menu, shown in Figure 7-2.
-
Test the form by selecting the Test option on the FDE Main Menu.
DECforms displays a Testing Menu with three more options.
- Press [Select] to choose the Test Panel option.
FDE
displays the panel and prompts you to enter a value for the Employee
number field.
- Type a sample entry for each field in the panel, pressing
[Return] after you complete each one. Press
[Ctrl/Z] when you complete the panel.
DECforms
redisplays the Main Menu, shown in Figure 7-2.
- Use the arrow keys to move the cursor to the Exit icon. Press
[Select]. DECforms displays messages indicating that it has
saved the IFDL and FORM files containing your panel.
7.3.3 Editing the Form IFDL Source File
You now edit the form IFDL source file to include other definitions and
special instructions. Note that DECforms automatically added a number
of statements to your IFDL file when you exited FDE. For example, the
Form Data section and the field descriptions in that file are a result
of the data fields that you created interactively with DECforms.
To edit the form IFDL source file, follow these steps:
- Use a text editor to open your IFDL source file named
EMPLOYEE_INFO_FORM.IFDL. When using the LSE editor, for example, enter
the following command:
$ LSEDIT EMPLOYEE_INFO_FORM.IFDL
|
- Enter a form record description in the IFDL source file following
the declaration of the form data items. Enter the following lines after
the line "End Data":
Form Record EMPLOYEE_INFO_RECORD
    Copy
        EMPLOYEE_INFO_RECORD From Dictionary
    End Copy
End Record
|
The fields in the form record description here must correspond to
the form data items defined above the description in the file. In this
tutorial, you create a one-to-one correspondence between the form data
items and the fields in EMPLOYEE_INFO_RECORD, which you previously
entered in CDD. The COPY...FROM DICTIONARY clause copies that record
from CDD.
This one-to-one correspondence of record fields and data items is
not a requirement, however. In more complex applications, the fields in
a form record description are usually a subset of the list of form data
items.
- Immediately following this definition, enter another form record
definition to correspond to a workspace definition that you enter later
in CDD (in Section 7.3.5):
Form Record CONTROL_WORKSPACE
    ERROR_STATUS_FIELD Character(4)
    MESSAGEPANEL Character(80)
End Record
|
In the data entry task, you need to inform users if they enter an
employee number that already exists. A COBOL procedure called from the
task checks for this error condition. If the error occurs, the
procedure moves the value DUPL into the field ERROR_STATUS_FIELD in the
record CONTROL_WORKSPACE.
In your task, you can test the field ERROR_STATUS_FIELD for the DUPL
value. If this value is in the field, you can place an error message in
the MESSAGEPANEL field of CONTROL_WORKSPACE. (The processing step in
the task definition discusses this error handling in more detail; see
Section 7.4.2.)
A MESSAGEPANEL is a special field in a form record. When you specify a
MESSAGEPANEL field in a form record, any data associated with this
field is automatically displayed in a message panel, which appears on
any panel you have created. If you do not create your own message panel
(this tutorial does not), DECforms uses the default message panel,
which is the last line (line 24) on a panel display.
- Enter the following lines after the line "Size 24 Lines by 80
Columns":
Function QUIT_KEY
    Is %PF4
End Function
|
This declares a function named QUIT_KEY and binds that name to
[PF4]. By declaring a function response for QUIT_KEY in the
next step, you allow the user to stop the task by pressing
[PF4].
- A function response describes the action you want to occur when a
user presses a function key. Enter the following lines after the line
"End Function".
(Note that there is a space before the F in FQUT.)
Function Response QUIT_KEY
    Remove All
    Return
        " FQUT"
End Response
|
If a user presses [PF4] while entering employee information
in the panel, the function response directs DECforms to remove all
viewports from the screen and return the value " FQUT" to ACMS. Within
ACMS, the task definition tests a control-key workspace and performs
some action based on receiving that value. The space and the F in "
FQUT" conform to a special DECforms format required to return a
receive-control text string. The QUT in this 5-character string are
arbitrary characters.
- To describe other actions that you want to occur at certain times
while the application is running, enter the following response lines in
the IFDL source file after the line "End Response" of the QUIT_KEY
function response:
Disable Response
    Request Exit Response
        Remove All
    End Response
End Response

Receive Response EMPLOYEE_INFO_RECORD
    Reset All
    Display EMPLOYEE_INFO_PANEL
    Activate Panel EMPLOYEE_INFO_PANEL
End Response

Transceive Response EMPLOYEE_INFO_RECORD EMPLOYEE_INFO_RECORD
    Display EMPLOYEE_INFO_PANEL
    Activate Panel EMPLOYEE_INFO_PANEL
    Deactivate Field EMPL_NUMBER on EMPLOYEE_INFO_PANEL
    Position to Field EMPL_NAME on EMPLOYEE_INFO_PANEL
End Response

Send Response CONTROL_WORKSPACE
    Activate Wait
    Signal
End Response
|
The Disable Response removes the current screen display by removing all
viewports when the form is disabled. This prevents old data from
appearing on the screen during transitions from one form to another.
The Receive Response prepares a DECforms panel for user input
whenever the data entry task definition ( Section 7.4) executes its
RECEIVE FORM RECORD EMPLOYEE_INFO_RECORD statement. The Receive
Response resets all data fields to spaces (clearing any old data). It
then displays the specified panel in its viewport and activates all the
data fields on that panel (allowing user input to every field on the
panel).
The Transceive Response prepares a DECforms panel for user
input whenever the Inquiry/Update Task definition ( Section 8.2)
executes its TRANSCEIVE FORM RECORD EMPLOYEE_INFO_RECORD statement. The
Transceive Response displays the specified panel and activates all the
data fields on that panel. Because the employee number is the record's
key field, it cannot be modified. The Deactivate statement prevents the
user from modifying the EMPL_NUMBER field when that record is
displayed. The Position statement places the cursor on the first field,
EMPL_NAME, that the user is allowed to modify.
The Send Response
causes DECforms to wait for the user to press a function key whenever
ACMS sends DECforms a message via the record CONTROL_WORKSPACE. For
example, ACMS sends DECforms an error message if the user tries to add
an employee number that already exists. DECforms displays the message,
activates a wait, and produces an audible signal. The user can then
press [PF4] to cancel the transaction, or
[Ctrl/Z] to begin again.
- Your EMPLOYEE_INFO_FORM.IFDL file is now complete. Save the edits
made in the IFDL file, and exit from the text editor.
7.3.4 Creating the Binary Form File
Whenever you edit your IFDL source file, you must translate that file
into an updated binary form file to reflect the edits made in the IFDL
file. DECforms stores a form internally in a binary form file (with
file type .FORM).
You also need to create an object module and a shareable image of the
form to use in your ACMS application.
To create a new binary form file, an object module, and a shareable
image of your form, follow these steps:
- Issue the following command to create a new binary form file:
$ FORMS TRANSLATE EMPLOYEE_INFO_FORM.IFDL
$
|
When you issue this command, DECforms uses the most recent version
of your IFDL file to create a new binary file.
- Issue the EXTRACT OBJECT command as the first step in creating a
shareable image of a form:
$ FORMS EXTRACT OBJECT EMPLOYEE_INFO_FORM.FORM
$
|
This command creates a form object module, or .OBJ file.
- Issue the LINK/SHARE command to link the form object module into a
shareable image:
$ LINK/SHARE EMPLOYEE_INFO_FORM.OBJ
$
|
The result of the LINK/SHARE command is an image (.EXE) of the file
that can be shared by multiple users.
7.3.5 Defining Additional CDD Records
You must now define the additional fields and records for a control
workspace and a quit workspace. The following steps explain how to
create the source files and how to enter these definitions in your CDD
dictionary.
- Using a text editor, create a source file called
EMPLOYEE_CONTROL_FIELDS.CDO and enter the following lines. Then exit
the file:
DEFINE FIELD ERROR_STATUS_FIELD
  DATATYPE TEXT SIZE 4
  INITIAL_VALUE IS "    ".

DEFINE FIELD MESSAGEPANEL
  DATATYPE TEXT SIZE 80.
|
- Create a source file called EMPLOYEE_CONTROL_WKSP.CDO, enter the
following lines, and exit the file:
DEFINE RECORD CONTROL_WORKSPACE.
  ERROR_STATUS_FIELD.
  MESSAGEPANEL.
END RECORD.
|
- Create a source file called EMPLOYEE_QUIT_FIELD.CDO, enter the
following lines, and exit the file:
DEFINE FIELD QUIT_KEY
  DATATYPE TEXT SIZE 5
  INITIAL_VALUE IS "     ".
|
- Create a source file called EMPLOYEE_QUIT_WKSP.CDO, enter the
following lines, and exit the file:
DEFINE RECORD QUIT_WORKSPACE.
  QUIT_KEY.
END RECORD.
|
- Execute these four source files by issuing the following commands
at the CDO> prompt:
$ CDO
CDO> @EMPLOYEE_CONTROL_FIELDS
CDO> @EMPLOYEE_CONTROL_WKSP
CDO> @EMPLOYEE_QUIT_FIELD
CDO> @EMPLOYEE_QUIT_WKSP
CDO>
|
- Exit from CDO.
7.4 Defining the Data Entry Task
The data entry task definition in this tutorial contains three kinds of
steps:
-
Exchange steps, during which information is exchanged between the
terminal user and the ACMS application.
-
A processing step that calls a COBOL procedure to handle the I/O
interactions between the application and the database (in this case, an
RMS master file). The procedures that you call from processing steps
are subroutines that you write and link together with a main program
module supplied by ACMS.
- A block step, which groups the exchange steps and processing steps
into a unit.
The first exchange step displays a form where the user enters new data.
The processing step adds a new record to the RMS file with the
information the user supplied in the first exchange step. The second
exchange step displays a message, if an error is encountered in the
processing step.
To define a task, you use commands and clauses of the ACMS Application
Definition Utility (ADU).
The easiest way to use ADU is to create a source file of ADU commands
with a text editor such as LSE. Then submit the file as a command file
to ADU, which compiles the task definition.
7.4.1 Defining the First Exchange Step
You begin an exchange step by identifying it with the ADU keyword
EXCHANGE. Following the keyword, you use a SEND, RECEIVE, or TRANSCEIVE
call to DECforms, identifying the direction of exchange:
- SEND
indicates that you want to send information from the ACMS application
to the form.
- RECEIVE
indicates that you want to receive information in the ACMS application
from the form.
- TRANSCEIVE
indicates that you want both to send information to the form
and receive information from the form, in that order.
To define the first exchange step in the data entry task definition,
follow these steps:
- Using an editor such as LSE, create a source file for your task
definition. Name the source file EMPLOYEE_INFO_ADD_TASK.TDF.
$ LSEDIT EMPLOYEE_INFO_ADD_TASK.TDF
|
- In this file, enter the following lines of this exchange step:
GET_EMPL_INFO:
  EXCHANGE
    RECEIVE FORM RECORD EMPLOYEE_INFO_RECORD
    RECEIVING EMPLOYEE_INFO_WKSP
    WITH RECEIVE CONTROL QUIT_WORKSPACE;
|
Use label names (such as GET_EMPL_INFO) to mark exchange and
processing steps in a task.
During debugging, you can then reference each step by its label name
rather than by line number.
The purpose of the first exchange step
in the data entry task is to obtain user input---users enter data in
response to prompts displayed on the terminal screen. In this case, the
ACMS application needs to receive information from the form.
A form
record name or form record list name must appear after a SEND, RECEIVE,
or TRANSCEIVE call to DECforms. That name must correspond to a form
record defined in the form source IFDL. This tutorial application, for
example, uses EMPLOYEE_INFO_RECORD here and in your form source file.
You must also include one or more workspace names after the keyword
RECEIVING. DECforms uses these workspaces to pass user-entered data to
ACMS.
The WITH RECEIVE CONTROL clause specifies the record containing the
name of the function key defined in the form source file. In this
tutorial, the function QUIT_KEY is a field in the record QUIT_WORKSPACE.
- Next, enter a CONTROL FIELD statement:
CONTROL FIELD IS QUIT_WORKSPACE.QUIT_KEY
  " FQUT" :  EXIT TASK;
END CONTROL FIELD;
|
The CONTROL FIELD clause tests the contents of a workspace field.
Here it tests the value of the QUIT_KEY field in the record
QUIT_WORKSPACE. The clause lists a value that this field can have:
FQUT. If the value is FQUT, the action taken is EXIT TASK, which is the
ADU clause that ends the current task.


