IDENTIFICATION DIVISION.
PROGRAM-ID.  ERASEIT.
DATA DIVISION.
WORKING-STORAGE SECTION.
01 ANY-CHAR             PIC X.
PROCEDURE DIVISION.
A00-BEGIN.
    DISPLAY "EMPLOYEE ACCESS SYSTEM" LINE 8 COLUMN 30.
    DISPLAY "Type any character to begin." LINE 20 COLUMN 10.
    ACCEPT ANY-CHAR.
A10-EN-SCREEN.
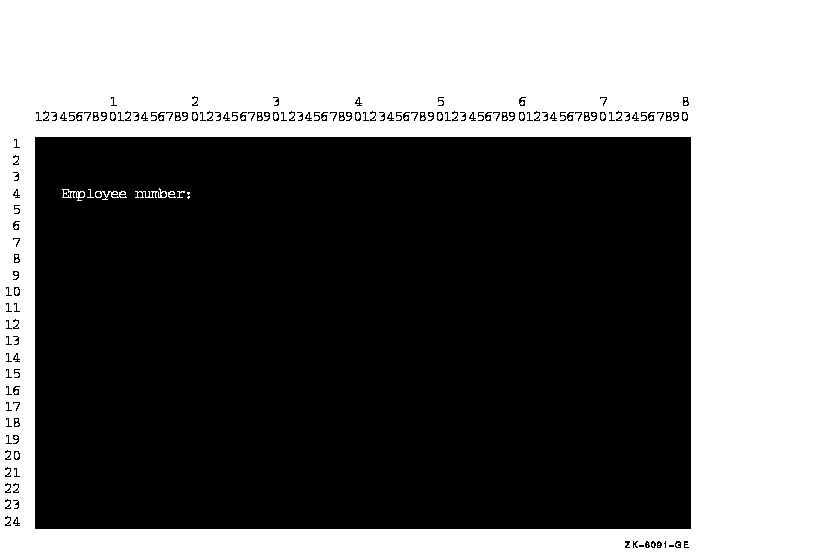
    DISPLAY "Employee number:" LINE 4 COLUMN 4 ERASE SCREEN.
    DISPLAY " " LINE 23 COLUMN 1.
    STOP RUN.
|
Figure 11-2 Screen After the ERASE Statement Executes
11.2.2 Horizontal and Vertical Positioning of the Cursor
To position data items at a specified line and column, use the LINE NUMBER and COLUMN NUMBER phrases. You can use these phrases with both the ACCEPT and DISPLAY statements. You can use literals or numeric data items to specify line and column numbers.
The default initial cursor position is in the upper left corner of the screen. Compaq COBOL moves the cursor to this initial position just prior to the execution of the first ACCEPT or DISPLAY statement. This is true regardless of the format of the statement, unless you specify the cursor position. |
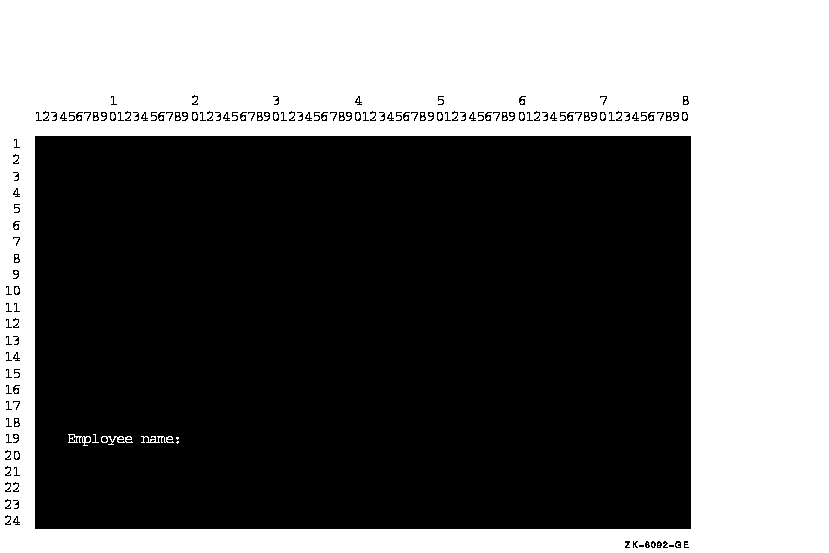
In Example 11_2 and in Figure 11_3, "Employee name:" is displayed on line 19 starting in column 4.
| Example 11-2 Cursor Positioning |
|---|
IDENTIFICATION DIVISION.
PROGRAM-ID.  LOCATE.
ENVIRONMENT DIVISION.
DATA DIVISION.
WORKING-STORAGE SECTION.
01 COL-NUM              PIC 99   VALUE 4.
PROCEDURE DIVISION.
A00-OUT-PARA.
    DISPLAY "Employee name:"     LINE 19
                                 COLUMN COL-NUM
                                 ERASE SCREEN.
    DISPLAY " " LINE 24
                COLUMN 1.
    STOP RUN.
|
Figure 11-3 Positioning the Data on Line 19, Column 5
If you use LINE, but not COLUMN, data is accepted or displayed at column 1 of the specified line position.
If you use COLUMN, but not LINE, data is accepted or displayed at the current line and specified column position.
If you do not use either phrase, data is accepted or displayed at the position specified by the rules for Format 1 ACCEPT and DISPLAY in the Compaq COBOL Reference Manual.
The presence of either or both the LINE and COLUMN phrases implies NO ADVANCING. |
You can use the PLUS option with the LINE or COLUMN phrases for relative cursor positioning. The PLUS option eliminates the need for counting lines or columns. Cursor positioning is relative to where the cursor is after the previous ACCEPT or DISPLAY. If you use the PLUS option without an integer, PLUS 1 is implied.
To get predictable results from your relative cursor positioning statements, do not:
- Cause a display line to wrap around to the next line.
- Accept data into unprotected fields.
- Go beyond the top or bottom of the screen.
- Mix displays of double-high characters and relative cursor positioning.
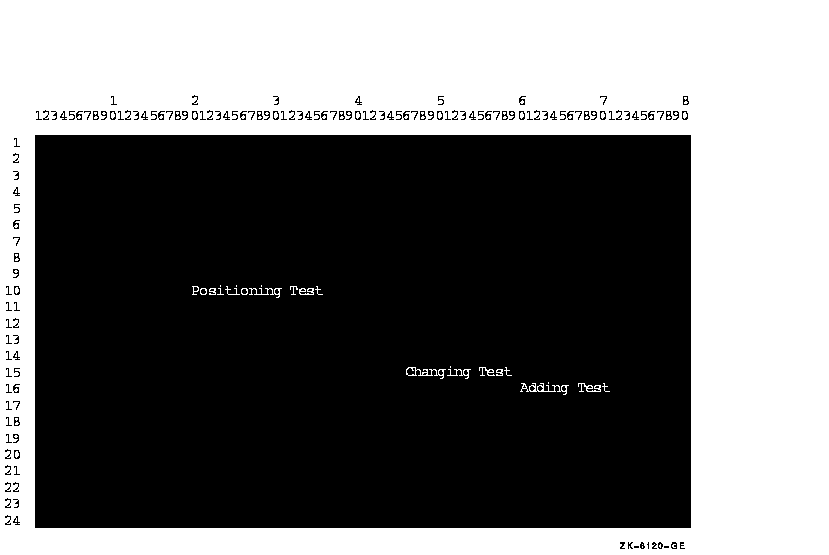
In Example 11-3, the PLUS phrase is used twice to show relative positioning, once with an integer, and once without. Figure 11-4 shows the results.
| Example 11-3 Using PLUS for Cursor Positioning |
|---|
IDENTIFICATION DIVISION.
PROGRAM-ID. LINEPLUS.
PROCEDURE DIVISION.
A00-BEGIN.
    DISPLAY "Positioning Test" LINE 10      COLUMN 20 ERASE SCREEN
            "Changing Test"    LINE PLUS 5  COLUMN PLUS 26
            "Adding Test"      LINE PLUS    COLUMN PLUS 14.
    DISPLAY " " LINE 23 COLUMN 1.
    STOP RUN.
|
If you use the LINE PLUS phrase so relative positioning goes beyond the bottom of the screen, your form scrolls with each such display. |
Figure 11-4 Cursor Positioning Using the PLUS Option
11.2.3 Assigning Character Attributes to Your Format Entries
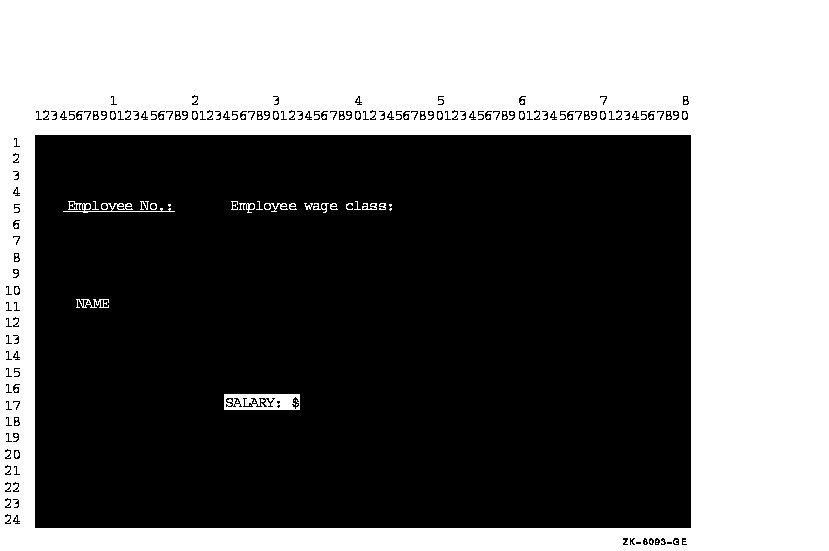
Depending on your terminal type, you can use one or more of the character attributes in Table 11-1 to highlight your screen data. Example 11-4 shows the use of these attributes in a program segment. Figure 11-5 shows the results of the program segment in Example 11-4.
| Character Attribute | VT500, VT400, VT300, VT200, and VT100 with Advanced Video Option | VT100 Without Advanced Video Option |
|---|---|---|
|
BELL
Sounds the terminal bell |
Available | Available |
|
UNDERLINED
Underlines the text |
Available | Not Available |
|
BOLD
Intensifies the text |
Available | Not Available |
|
BLINKING
Blinks the text |
Available | Not Available |
|
REVERSED
Changes the text's foreground & background colors |
Available | Not Available |
| Example 11-4 Using Character Attributes |
|---|
IDENTIFICATION DIVISION.
PROGRAM-ID. CHARATTR.
PROCEDURE DIVISION.
A00-BEGIN.
    DISPLAY "Employee No:" UNDERLINED LINE 5 COLUMN 5 ERASE SCREEN.
    DISPLAY "Employee wage class:" BOLD LINE 5 COLUMN 25.
    DISPLAY "NAME" BLINKING LINE PLUS 6  COLUMN 6.
    DISPLAY "SALARY: $" REVERSED LINE PLUS 6 COLUMN 24.
    DISPLAY " " LINE 23 COLUMN 1.
|
Figure 11-5 Screen Display with Character Attributes
11.2.4 Using the CONVERSION Phrase to Display Numeric Data
Use the CONVERSION phrase to convert the value of a numeric data item for display. It causes the value to appear on the screen as follows:
- In DISPLAY usage
- With a decimal point (if needed) or comma (if DECIMAL-POINT IS COMMA)
- Edited (if needed)
- With a sign (if needed)
Thus, the values of non-DISPLAY data items can be converted to a readable form. The size of the displayed field is determined by the PICTURE clause of the displayed item. Example 11_5 and Figure 11-6 show how to display different types of data with the CONVERSION phrase.
| Example 11-5 Using the CONVERSION Phrase |
|---|
IDENTIFICATION DIVISION.
PROGRAM-ID.  CONVERT.
ENVIRONMENT DIVISION.
DATA DIVISION.
WORKING-STORAGE SECTION.
01  DATA1A     PIC X(10).
01  DATA1B     PIC X(10) JUST.
01  DATA2      PIC +++++9999.99.
01  DATA3      PIC S9(2)V9(2) COMP.
01  DATA4      PIC S9(3)V9(3) COMP.
01  DATA5      PIC S9(6)V9(6) COMP.
01  DATA6      PIC S9(4)V9(4) COMP-3.
01  DATA7      PIC S9(1)V9(7) SIGN LEADING SEPARATE.
PROCEDURE DIVISION.
CONVERT-CHECK SECTION.
P1.
    DISPLAY "to begin... press your carriage Return key"
            LINE 1 COLUMN 1 ERASE SCREEN
            BELL UNDERLINED REVERSED.
    ACCEPT DATA1A.
    DISPLAY "X(10) Test" LINE 8 ERASE LINE.
    ACCEPT DATA1A WITH CONVERSION PROTECTED REVERSED
           LINE 8 COLUMN 50.
    DISPLAY DATA1A REVERSED WITH CONVERSION
            LINE 8 COLUMN 65.
    DISPLAY "X(10) JUSTIFIED Test" LINE 10 ERASE LINE.
    ACCEPT DATA1B WITH CONVERSION PROTECTED REVERSED
           LINE 10 COLUMN 50.
    DISPLAY DATA1B REVERSED WITH CONVERSION
            LINE 10 COLUMN 65.
P2.
    DISPLAY "Num edited Test (+++++9999.99):" LINE 12 ERASE LINE.
    ACCEPT DATA2 PROTECTED REVERSED WITH CONVERSION
           LINE 12 COLUMN 50.
    DISPLAY DATA2 REVERSED WITH CONVERSION
            LINE 12 COLUMN 65.
P3.
    DISPLAY "Num COMP Test S9(2)V9(2):" LINE 14 ERASE LINE.
    ACCEPT DATA3 PROTECTED REVERSED WITH CONVERSION
           LINE 14 COLUMN 50.
    DISPLAY DATA3 REVERSED WITH CONVERSION LINE 14 COLUMN 65.
P4.
    DISPLAY "Num COMP Test S9(3)V9(3):" LINE 16 ERASE LINE.
    ACCEPT DATA4 PROTECTED REVERSED WITH CONVERSION
           LINE 16 COLUMN 50.
    DISPLAY DATA4 REVERSED WITH CONVERSION
            LINE 16 COLUMN 65.
P5.
    DISPLAY "Num COMP Test S9(6)V9(6):" LINE 18 ERASE LINE.
    ACCEPT DATA5 PROTECTED REVERSED WITH CONVERSION
           LINE 18 COLUMN 50.
    DISPLAY DATA5 REVERSED WITH CONVERSION
            LINE 18  COLUMN 65.
P6.
    DISPLAY "Num COMP-3 Test S9(4)V9(4):" LINE 20 ERASE LINE.
    ACCEPT DATA6 PROTECTED REVERSED WITH CONVERSION
           LINE 20 COLUMN 50.
    DISPLAY DATA6 REVERSED WITH CONVERSION
            LINE 20 COLUMN 65.
P7.
    DISPLAY "Num DISPLAY Test S9(1)V9(7)Sign Lead Sep:"
           LINE 22 ERASE LINE.
    ACCEPT DATA7 PROTECTED REVERSED WITH CONVERSION
           LINE 22 COLUMN 50.
    DISPLAY DATA7 REVERSED WITH CONVERSION
            LINE 22 COLUMN 65.
P8.
    DISPLAY "To end...type END"
            LINE PLUS COLUMN 1 ERASE LINE
            BELL UNDERLINED REVERSED.
    ACCEPT DATA1A.
    IF DATA1A = "END" STOP RUN.
    GO TO P1.
|
Figure 11-6 Sample Run of Program CONVERT
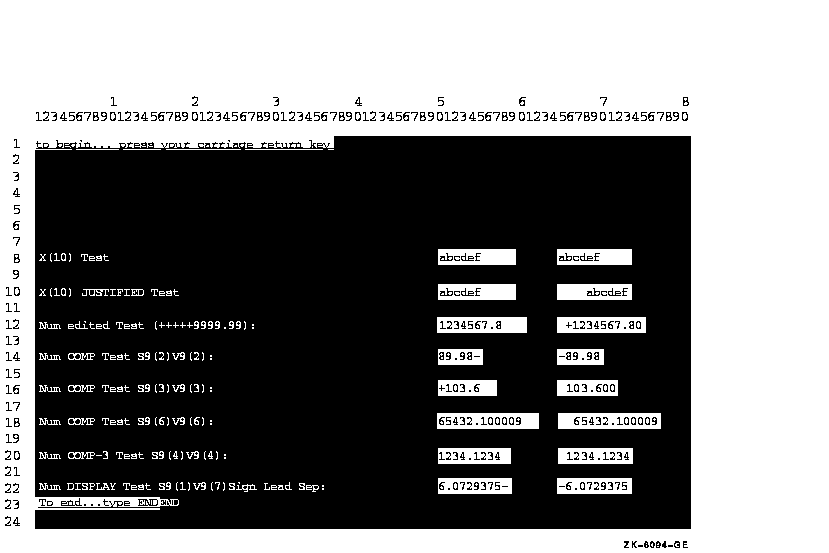
Note that, in addition to the items illustrated in Figure 11-6, you can also display the following:
- COMP-1 and COMP-2 data items
- On OpenVMS, RMS registers (RMS-STS, RMS-STV, RMS-FILENAME, RMS-CURRENT-STS, RMS-CURRENT-STV, RMS-CURRENT-FILENAME) <>
- LINAGE-COUNTER register
- RETURN-CODE special register
- RWCS registers (PAGE-COUNTER, LINE-COUNTER)
- VALUE EXTERNAL data items
- POINTER VALUE REFERENCE data items
The /DISPLAY_FORMATTED command-line qualifier is an alternative way to
display numeric data without specifying the CONVERSION phrase. It
accomplishes the same result, converting any nonprinting values for
display. (The default is /NODISPLAY_FORMATTED.)
11.2.5 Handling Data with ACCEPT Options
The ACCEPT options CONVERSION, ON EXCEPTION, PROTECTED, SIZE, NO ECHO,
and DEFAULT are described in the following sections.
11.2.5.1 Using CONVERSION with ACCEPT Data
When you use the CONVERSION phrase with an ACCEPT numeric operand (other than floating point), Compaq COBOL converts the data entered on the form to a trailing-signed decimal field. Editing is performed when specified by destination. The data is then moved from the screen to your program using standard MOVE statement rules.
When you use the CONVERSION phrase with an ACCEPT numeric floating-point operand, Compaq COBOL converts input data to floating-point (COMP-1 or COMP-2 as appropriate). The converted result is then moved to the destination as if moving a numeric literal equivalent to the input data with the MOVE statement.
When an ACCEPT operand is not numeric, the CONVERSION phrase moves the input characters as an alphanumeric string, using standard MOVE statement rules. This lets you accept data into an alphanumeric-edited or JUSTIFIED field.
If you use the CONVERSION phrase while accepting numeric data, you can also use the ON EXCEPTION phrase to control data entry errors.
If you do not use the CONVERSION phrase, data is transferred to the
destination item according to Format 1 ACCEPT statement rules.
11.2.5.2 Using ON EXCEPTION When Accepting Data with CONVERSION
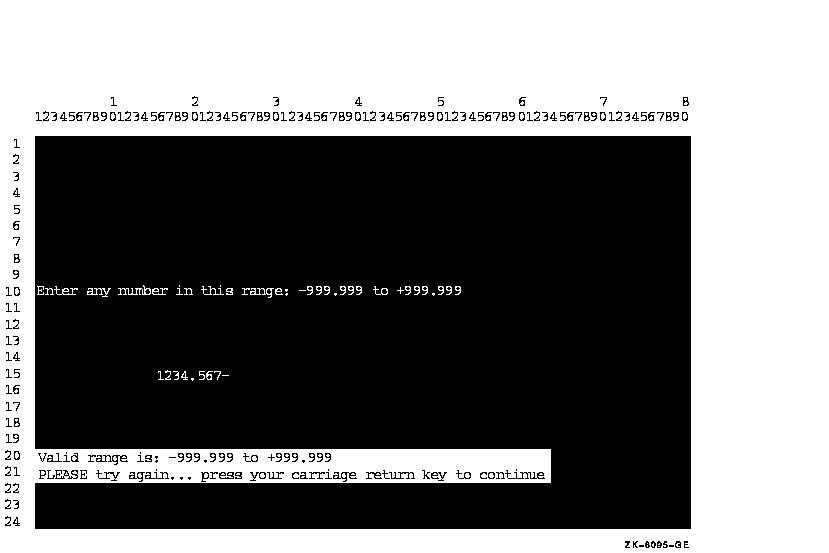
If you enter illegal numeric data or exceed the PICTURE description (if not protected) of the ACCEPT data (with an overflow to either the left or right of the decimal point), the imperative statement associated with ON EXCEPTION executes, and the destination field does not change.
Example 11_6 (and Figure 11-7) show how the ON EXCEPTION phrase executes if you enter an alphanumeric or a numeric item out of the valid range. The statements following ON EXCEPTION prompt you to try again.
If you do not use ON EXCEPTION and a conversion error occurs:
- The field on the screen is filled with spaces.
- The terminal bell rings and the terminal automatically reprompts you for the data results.
| Example 11-6 Using the ON EXCEPTION Phrase |
|---|
IDENTIFICATION DIVISION.
PROGRAM-ID. ONEXC.
ENVIRONMENT DIVISION.
DATA DIVISION.
WORKING-STORAGE SECTION.
01  NUM-DATA   PIC S9(3)V9(3) COMP-3.
PROCEDURE DIVISION.
A00-BEGIN.
    DISPLAY "Enter any number in this range: -999.999 to +999.999"
            LINE 10 COLUMN 1
            ERASE SCREEN.
    ACCEPT NUM-DATA WITH CONVERSION LINE 15 COLUMN 16
        ON EXCEPTION
           DISPLAY "Valid range is: -999.999 to +999.999"
              LINE 20 REVERSED WITH BELL ERASE TO END OF SCREEN
           DISPLAY
              "PLEASE try again... press your carriage return key to continue"
              LINE PLUS REVERSED
           ACCEPT NUM-DATA
           GO TO A00-BEGIN.
    STOP RUN.
|
Figure 11-7 Accepting Data with the ON EXCEPTION Option
A DISPLAY statement within an ACCEPT [NOT] ON EXCEPTION statement must
be terminated, with, for example, END-DISPLAY.
11.2.5.3 Protecting the Screen
You can use the PROTECTED phrase in an ACCEPT statement to limit the number of characters that can be entered. This phrase prevents overwriting or deleting parts of the screen. For more information about using the PROTECTED phrase, refer to the ACCEPT statement in the Compaq COBOL Reference Manual.
If you use this phrase, and you try to type past the rightmost position of the input field or delete past the left edge of the input field, the terminal bell sounds and the screen cursor does not move. You can accept the data on the screen by pressing a legal terminator key, or you can delete the data by pressing the DELETE key. If you specify PROTECTED WITH AUTOTERMINATE, the ACCEPT operation terminates when the maximum number of characters has been entered unless a terminator has been entered prior to this point. For more information on legal terminator keys, refer to the CONTROL KEY phrase of the ACCEPT statement in the Compaq COBOL Reference Manual.
You can also use the REVERSED, BOLD, BLINKING, or UNDERLINED attributes with the PROTECTED phrase. Using these attributes lets you see the size of the input field on the screen before you enter data. The characters you enter also echo the specified attribute.
You can specify the NO BLANK and FILLER phrases with the PROTECTED phrase. The NO BLANK phrase specifies that the protected input field is not to be filled with spaces until after the first character is entered. The FILLER phrase initializes each character position of the input field with the filler character specified.
When you use the FILLER phrase with the NO BLANK phrase, the input field is filled with the filler character only after you have entered the first character.
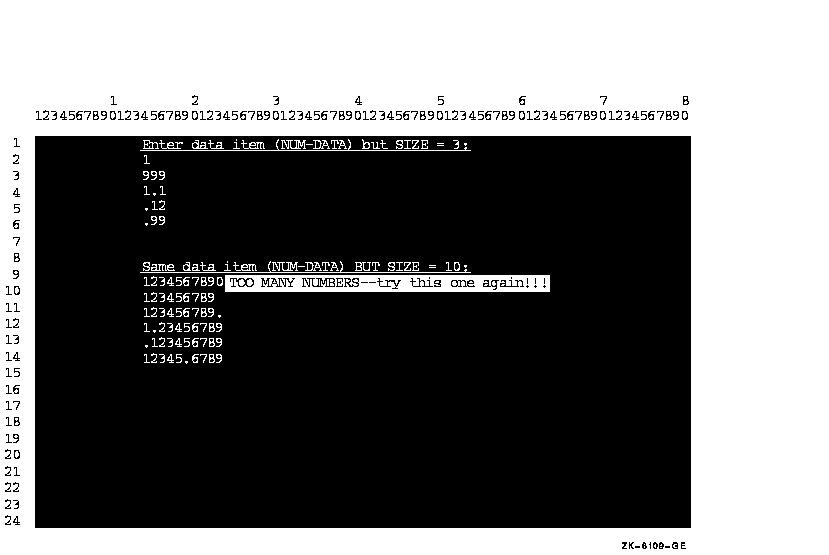
The PROTECTED SIZE phrase sets the size of the input field on the screen and allows you to change the size of the input field from the size indicated by the PICTURE phrase of the destination item. Example 11_7 and Figure 11-8 show how to use the SIZE phrase with the PROTECTED phrase. When the example specifies SIZE 3, any attempt to enter more than three characters makes the terminal bell ring. When the example specifies SIZE 10, the ACCEPT statement includes the ON EXCEPTION phrase to warn you whenever you enter a number that will result in truncation at either end of the assumed decimal point. Figure 11-8 shows such an example in which the operator entered a 10-digit number, exceeding the storage capacity of the data item NUM-DATA on the left side of the assumed decimal point.
| Example 11-7 Using the SIZE and PROTECTED Phrases |
|---|
IDENTIFICATION DIVISION.
PROGRAM-ID.  PROTECT.
ENVIRONMENT DIVISION.
DATA DIVISION.
WORKING-STORAGE SECTION.
01  NUM-DATA  PIC S9(9)V9(9) COMP-3.
PROCEDURE DIVISION.
A00-BEGIN.
    DISPLAY "Enter data item (NUM-DATA) but SIZE = 3:"
             LINE 1 COLUMN 14
             UNDERLINED
             ERASE SCREEN.
    PERFORM ACCEPT-THREE 5 TIMES.
    DISPLAY "Same data item (NUM-DATA) BUT SIZE = 10:" LINE PLUS 3
             COLUMN 14
             UNDERLINED.
    PERFORM ACCEPT-TEN 5 TIMES.
    STOP RUN.

ACCEPT-THREE.
    ACCEPT NUM-DATA WITH CONVERSION PROTECTED SIZE 3
           LINE PLUS COLUMN 14.
ACCEPT-TEN.
    ACCEPT NUM-DATA WITH CONVERSION PROTECTED SIZE 10
           LINE PLUS COLUMN 14
           ON EXCEPTION
               DISPLAY "TOO MANY NUMBERS--try this one again!!!"
                        COLUMN PLUS
                        REVERSED
                        GO TO ACCEPT-TEN.
|
Figure 11-8 Screen Display of NUM-DATA Using the PROTECTED Option
When you do not use the PROTECTED phrase, the amount of data
transferred is determined according to the ACCEPT statement rules.
(Refer to the Compaq COBOL Reference Manual.)
11.2.5.4 Using NO ECHO with ACCEPT Data
By default, the characters you type at the terminal are displayed on the screen. Example 11-8 shows how you can use the NO ECHO phrase to prevent the input field from being displayed; thus, the NO ECHO phrase allows you to keep passwords and other information confidential.
| Example 11-8 Using the NO ECHO Phrase |
|---|
IDENTIFICATION DIVISION.
PROGRAM-ID.  NOSHOW.
ENVIRONMENT DIVISION.
DATA DIVISION.
WORKING-STORAGE SECTION.
01  PASSWORD PIC X(25).
PROCEDURE DIVISION.
A00-BEGIN.
    DISPLAY "ENTER YOUR PASSWORD: " LINE 5 COLUMN 10
            ERASE SCREEN.
    ACCEPT PASSWORD WITH NO ECHO.
    STOP RUN.
|
11.2.5.5 Assigning Default Values to Data Fields
Use the DEFAULT phrase to assign a value to an ACCEPT data item whenever:
- The program requires a value, and the operator does not have a value for the data item.
- There is a high probability that the default value is identical in most of the records, as where a constant (such as a state's abbreviation) is used in a mailing list.
When you use the DEFAULT phrase, the program executes as if the default value had been typed in when you press Return. However, the value is not automatically displayed on the screen.
You can also use the CURRENT VALUE phrase with the DEFAULT phrase to specify that the default input value is the initial value of the ACCEPT destination item.
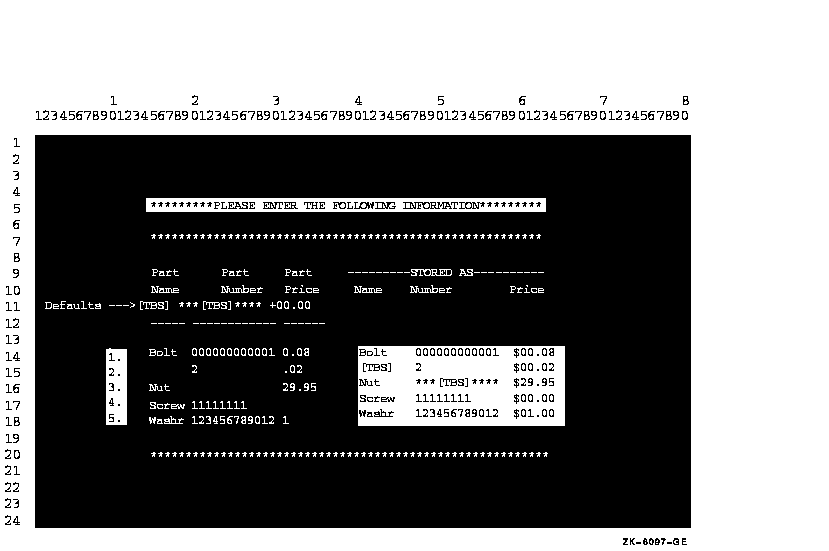
Example 11_9 and Figure 11-9 show how to use the DEFAULT phrase to specify default input values. (The value must be an alphanumeric data name, a nonnumeric literal, or figurative constant.) The example uses the "TO-BE-SUPPLIED" abbreviations "[TBS]" and " ***[TBS]****" and +00.00 as the default values for three data items in the program.
| Example 11-9 Using the DEFAULT Phrase |
|---|
IDENTIFICATION DIVISION.
PROGRAM-ID. TRYDEF.
ENVIRONMENT DIVISION.
DATA DIVISION.
WORKING-STORAGE SECTION.
01  DATA1A       PIC 9(12).
01  NAME1A       PIC XXXXX.
01  PRICEA       PIC S99V99.
01  DATA123.
    02  NAME1B   PIC XXXXX.
    02           PIC XX VALUE SPACES.
    02  DATA1B   PIC XXXXXXXXXXXX.
    02           PIC XXX VALUE SPACES.
    02  PRICEB   PIC $99.99-.
01  NAME-DEFAULT PIC XXXXX VALUE "[TBS]".
01  COL-NUM      PIC 99    VALUE 10.
PROCEDURE DIVISION.
A00-DEFAULT-TEST.
    DISPLAY "*********PLEASE ENTER THE FOLLOWING INFORMATION*********"
             LINE 5 COLUMN 15
             REVERSED BLINKING
             ERASE SCREEN.
    DISPLAY "********************************************************"
             LINE 7 COLUMN 15.
    DISPLAY " Part     Part     Part    ---------STORED AS-----------"
             LINE 9 COLUMN 15.
    DISPLAY " Name    Number    Price    Name    Number         Price"
             LINE 10 COLUMN 15.
    DISPLAY "Defaults --->[TBS] ***[TBS]**** +00.00"
             LINE 11 COLUMN 2.
    DISPLAY "----- ------------ ------"
             LINE 12 COLUMN 15.
    DISPLAY "********************************************************"
             LINE 20 COLUMN 15.
    DISPLAY "5. " REVERSED BLINKING LINE 18 COLUMN COL-NUM.
    DISPLAY "4. " REVERSED BLINKING LINE 17 COLUMN COL-NUM.
    DISPLAY "3. " REVERSED BLINKING LINE 16 COLUMN COL-NUM.
    DISPLAY "2. " REVERSED BLINKING LINE 15 COLUMN COL-NUM.
    DISPLAY "1. " REVERSED BLINKING LINE 14 COLUMN COL-NUM.
    DISPLAY " " LINE 13 COLUMN 15.
    PERFORM A05-GET-DATA 5 TIMES.
    DISPLAY " " LINE 22 COLUMN 1.
    STOP RUN.

A05-GET-DATA.
    ACCEPT NAME1A
           PROTECTED
           DEFAULT NAME-DEFAULT
           LINE PLUS COLUMN 15 ERASE TO END OF LINE.
    ACCEPT DATA1A
           PROTECTED
           DEFAULT "***[TBS]****"
           COLUMN 21.
    ACCEPT PRICEA
           PROTECTED
           WITH CONVERSION
           DEFAULT ZERO
           COLUMN 34.
    MOVE NAME1A TO NAME1B.
    MOVE DATA1A TO DATA1B.
    MOVE PRICEA TO PRICEB.
    DISPLAY DATA123 REVERSED COLUMN 44.
|
Figure 11-9 Accepting Data with the DEFAULT Phrase
| Previous | Next | Contents | Index |