


Common Desktop Environment: Advanced User's and System Administrator's Guide
9 Creating Actions and Data Types
Using Create Action
Contents of Chapter:
- What Create Action Does
-
- Limitations of Create Action
-
- Action Limitations
-
- Data Type Limitations
-
- Creating an Action and Data Type for an Application with Create Action
-
 To Create an Action for an Application
-
 To Create One or More Data Types for an Application
-
- Using the Find Set Dialog Box To Specify an Icon
-
 To Specify a Set of Icons Located on the Icon Search Path
-
 To Specify an Icon in a Registration Package
-
Create Action is a tool for creating:
- An action to start an application
- One or more data types for an application's data files
- Actions for opening and printing the application's data files
Create Action is also useful for creating simple actions for running operating system commands and shell scripts.
For reference information, see the dtcreate(1X) man page.
Create Action includes a main window and a set of dialog boxes for creating an action and its associated data types.
Create Action does the following:
- Creates an action definition that runs a command.
-
Creates a file
HomeDirectory
/.dt/types/
action_name
.dt.
This file stores the action and data type definitions created for the application.
- Creates an action file in the user's home directory. The action file is an executable file with the same name as the action.
The action file's representation in File Manager is called an application icon because double-clicking it starts the application.
Optionally, you can make the action icon a drop zone by specifying dropable data types when you create the action.
- Creates one or more data types for the application's data files (optional).
- Creates an Open action for each data type.
- Creates a Print action for each data type (optional).
- Reloads the database of actions and data types. This makes the actions and data types take effect immediately.
Create Action is designed to create actions and data types for running applications. However, actions and data types are very flexible, and include additional functionality that can only be accessed if you create the definitions manually.
For more information, see:
Action Limitations
You cannot use Create Action to create the action for an application if any of the following conditions are true:
- The command line requires a non-file argument (parameter).
For example, you cannot use Create Action to write an action for the command:
lp -ddevice filename
where the user has to supply device each time the command is executed.
- The application icon must have a different label than the action name.
For example, you cannot use Create Action to provide a local-language version of an existing action.
- The action requires any of the advanced features of the action database.
Examples of these advanced features are actions that:
- Launch commands on systems remote from the action definition
- Invoke other actions
- Must be run as a different user (for example, as superuser)
- Make extensive use of the ``map'' feature
- Have very different behaviors, depending on the number of file arguments supplied to the action
You cannot use Create Action to create the data type for an application if any of the following conditions are true:
There are some things you'll need to know about the application before you run Create Action.
- The command line for starting the application.
You'll need to know whether the command line includes a required file argument, an optional file argument, or no file argument.
If the application requires a non-file argument, you cannot use Create Action to create the action.
- The types of data files an application can accept.
Some applications can accept only one type of data. Others (for example, an ASCII editor or graphics editor) can accept multiple data types.
- The way the application identifies its data files.
This may be a naming convention (for example, file names ending with.doc
), and/or may depend on the content of the file. If the application does not use a file-name convention, you can still set one up for the action icon.
- Optional: The command line to print the files
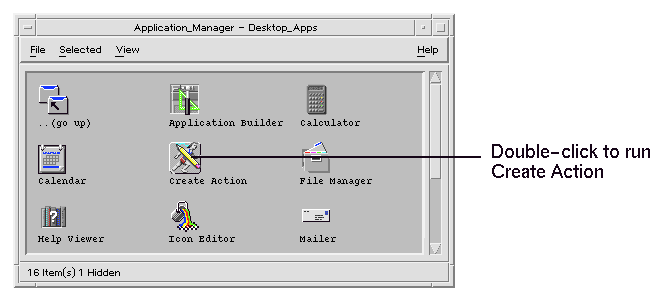
- Double-click Create Action in the Desktop_Apps application group.
Figure 9-1 Create Action icon in Application Manager
This displays the main Create Action window.
Figure 9-2 Create Action main window
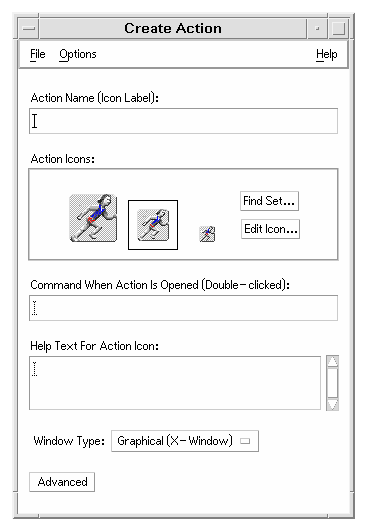
- Type the name that will label the action icon into the Action Name text field.
- Use the Action Icons controls to specify the icon for the application. Initially, the default icon is shown.
- In the Command When Action Icon Is Opened text field, type the command to start the application.
Use the syntax $n for a file argument; for example:
emacs
bitmap $1
diff $1 $2
lp -oraw $1
If the command line includes a file argument ($n), then the action icon will be a drop zone for files.
The command lines are not passed to a shell unless you explicitly specify the use of a shell. For example, these lines use shell processing:
/bin/sh -c 'ps | lp'
/bin/sh -c 'spell $1 | more'
- Type the On Item help text for the action icon into the Help Text For Action Icon text field.
The text will automatically wrap in the text field. However, these line breaks are not preserved online. If you want to specify a hard line break, use \n.
- Choose the windowing support required by the action from the Window Type option menu.
- Graphical (X-Window)
- The application creates its own window
- Terminal (Auto-Close)
- The application will run in a terminal emulator window that closes automatically when the user exits the application
- Terminal (Manual Close)
- The application will run in a terminal emulator window that remains open until the user explicitly closes it
- No Output
- The application does not produce output to the display
- Proceed as follows:
- If your application has data files, and you want to create one or more data types for them, see the next section, "To Create One or More Data Types for an Application".
- If you do not need to create a data type, save the action by choosing Save from the File menu. Then, test the new action by double-clicking its icon in your home directory.
- Define the action for the application using the procedure in the previous section, "To Create an Action for an Application".
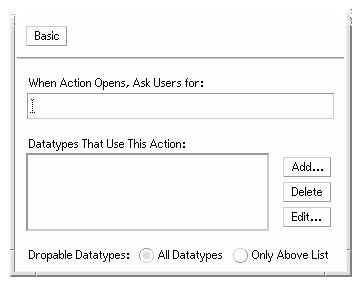
- Click the Advanced button in the Create Action window to expand the window.
Figure 9-3 Advanced features in the main Create Action window
-
If you want the application icon to prompt for a file argument when the icon is double-clicked, type the text of the prompt into the ``When Action Opens, Ask Users for'' text field.
Use these guidelines for this text field:
- You must use this field if the application's command line has a required file argument.
- You must leave this field blank if the command line does not include a file argument.
- If the file argument in the application's command line is optional, you have a choice. If you supply the prompt text, the action icon will prompt for the file when double-clicked. If you do not supply the prompt text, the action will be executed with a null string as the file argument.
- Specify the types of files that the action will accept as arguments:
- If the action can accept any data type, select All Data Types.
- If the action can accept only the data type(s) you create for the application, select Only Above List.
Initially, the Datatypes That Use This Action list is empty. As you create data types for the application, they are added to the list.
- Click Add beside the Datatypes That Use This Action list box to display the Add Data Type dialog box.
Figure 9-4 Create Action's Add Datatype dialog box
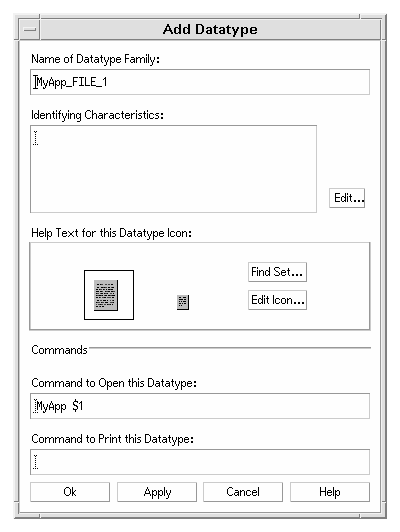
- Optional: If you don't want to use the default data type name, type a new name for the data type into the Name of Datatype Family text field.
The name cannot include spaces. The data type name is not visible to application users; it is used in the actions/data types database to identify the data type definition.
- Click the Edit button beside the Identifying Characteristics box to display the Identifying Characteristics dialog box.
Figure 9-5 Create Action's Identifying Characteristics dialog box
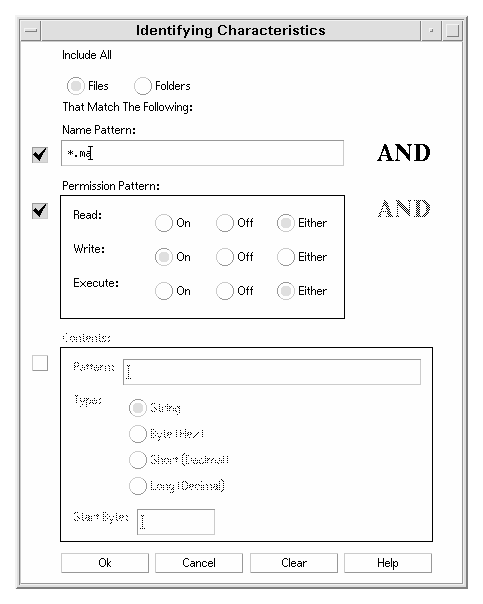
Characteristics of a data type are the criteria used to differentiate the data type from others. You can choose one or more of the following criteria:
- Files or Folder
- The data type applies only to files or only to folders
- Name Pattern
- Data typing based on the file name
- Permission Pattern
- Read, write, execute permissions
- Contents
- Contents of a specified portion of the file
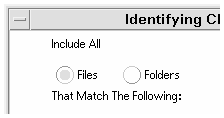
- Select whether the data type represents a file or folder.
Figure 9-6 Specifying a file or directory characteristic for a data type.
- If the data typing depends on the name, select the Name Pattern check box and fill in the text field.
Figure 9-7 Specifying the file name characteristic for a data type

You can use * and ? as wildcards:
- *
- Matches any sequence of characters
- ?
- Matches any single character
- If the data typing depends on the permissions, select the Permission Pattern check box and select the permissions for the data type.
Figure 9-8 Specifying the permission characteristics for a data type
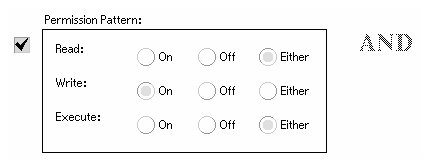
- On
- The file must have the specified permission
- Off
- The file must lack the specified permission
- Either
- The specified permission does not matter
- If the data typing depends on the contents, select the Contents check box and supply the requested information--Pattern to search for and Type of contents. Optionally, you can supply the byte location where the search should start.
Figure 9-9 Specifying the contents characteristics for a data type
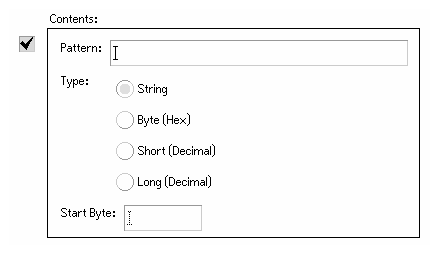
Note: Use of content-based data typing may affect the performance of the system.
- Click OK to close the Identifying Characteristics dialog box.
The characteristics will be displayed in the Identifying Characteristics field using this coding:
- d
- A directory
- r
- The file has read permission
- w
- The file has write permission
- x
- The file has execute permission
- !
- Logical operator NOT
- &
- Logical operator AND
- Type the help text for the data files into the Help Text text field.
- Use the Datatype Icons controls to specify the icon for the application. Initially, the default icon is shown.
- Verify the command in the Command to Open this Datatype text field. This is the command that will be executed when the user double-clicks a data file.
- Optional: If the application supplies a print command for printing data files from the command line, type the command into the Command to Print this Datatype text field, using the syntax $
n
for a file argument.
- Do one of the following to save the data type definition:
- Click OK to save the data type and close the Add Datatype dialog box.
- Click Apply to save the data type without closing the Add Datatype dialog box. This let you immediately proceed to define another data type for the action.
The Find Set dialog box is displayed when you click Find Set in the Create Action main window or in the Add Datatype window. Use the dialog box to specify the icon that will be used for the action or data type.
Figure 9-10 Find Set dialog box
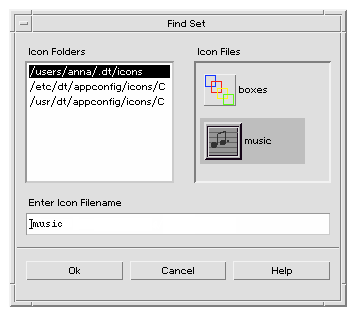
The Find Set dialog box lets you specify a set of icon image files located:
- In a directory on the icon search path. The Icon Folders list includes all the directories on the icon search path.
- In a registration package that will be integrated with the desktop using dtappintegrate
. These icons are not yet located in a directory on the icon search path, but will be placed there by dtappintegrate
.
Note:
The action and data type definitions created using Create Action write out the base name for the icon files (the file name minus the file-name suffixes for size and type). Icons for actions and data types created with Create Action must eventually be placed in directories on the icon search path.
 To Specify a Set of Icons Located on the Icon Search Path
- In the Find Set dialog box's Icon Folders list, double-click the folder path containing the icon.
The Icon Files list will show all the icon files in that folder.
- In the Icon Files list, click the icon you want to use.
This places the base name of the icon file in the Enter Icon File name text field.
- Click OK.
 To Specify an Icon in a Registration Package
If you are a system administrator or programmer creating a registration package, the icon image files are initially located in a directory in the registration package:
app_root/dt/appconfig/icons/language
After registration with dtappintegrate, the icon files will be copied to /etc/dt/appconfig/icons/language, which is on the icon search path.
Use this procedure to specify icons that are part of a registration package:
- In the Find Set dialog box's Enter Icon Filename text field, type the base name of the icon file.
- Click OK.
Create Action displays a dialog box to inform you that the icons were not found in directories on the icon search path.
- In the information dialog box that appears, choose No Change.


Generated with CERN WebMaker
To Create an Action for an Application
To Create One or More Data Types for an Application
To Specify a Set of Icons Located on the Icon Search Path
To Specify an Icon in a Registration Package


