 |
DECwindows Motif for OpenVMS Applications Guide
Exiting CDA Viewer
To exit CDA Viewer, choose Quit from the File menu.
Chapter 6
Using Clock
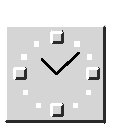
Clock displays the time (in both analog and digital format) and the
date. You can change the Clock display to suit your needs. You can also
set Clock's alarm to remind you of appointments.
This chapter describes how to
- Start Clock
- Customize the Clock display
- Set the alarm
- Exit Clock
Starting Clock
To start Clock, choose Clock from Session Manager's Applications menu.
The Clock display appears on your screen. You can move and change the
size of the display.
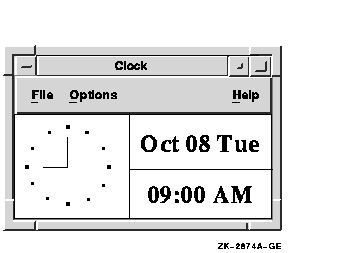
Customizing the Clock Display
You can customize the Clock display to include any combination of the
date and time regions.
To change the Clock display, choose Display... from the Options menu.
Clock displays the Display Options dialog box.
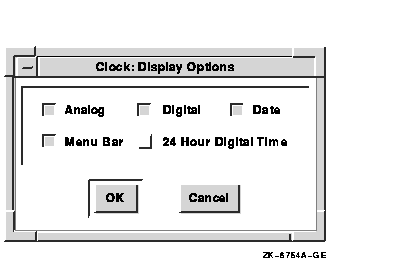
Shaded (enabled) check buttons indicate the current settings. To change
the setting, click MB1 on a check button or its label. For example, if
you want only the analog clock displayed and the Analog, Digital, and
Date check buttons are shaded, click on the Digital and Date check
buttons to disable those settings.
To use the current settings, click on OK. To return to the date and
time display without changing any settings, click on Cancel.
If you disable the menu bar, you can use a pop-up menu to customize the
Clock display:
- Place the pointer anywhere in the Clock display.
- Press and hold MB3. A pop-up menu appears.
- Drag to the Display... menu item.
- Release MB3. The Display Options dialog box appears.
To save the new settings and the size and placement of the Clock
display on the screen:
- Make any desired changes to the size, position, and settings of the
Clock display.
- Choose Save Settings from the Options menu or the pop-up menu.
To restore the system defaults, choose Restore System Settings from the
Options menu or the pop-up menu.
Setting the Alarm
You can set the alarm to remind you of an appointment.
To set the alarm
- Choose Alarm... from the Options menu.
The Alarm Options dialog
box appears.

- In the entry box for the hour of the day, type the hour you want
the alarm to sound.
You can use a 12-hour clock, in which case you
need to specify AM or PM, or you can use a 24-hour clock (military
time).
To erase a number that you previously entered or to correct
typing mistakes, use the Delete key (<X|).
- In the entry box for the minutes of the hour, finish entering the
time you want the alarm to sound.
- If you are using a 12-hour clock or if the time you specify is
earlier than 13:00, click on either the AM or PM radio button.
- To display a message on your screen when the alarm sounds, type
your message in the Alarm Message entry box. Alarm messages can contain
up to 200 characters.
- To use the current settings, click on OK. To return to the date and
time display without changing the previous settings, click on Cancel.
When the alarm sounds, click on OK in the dialog box to clear the alarm
message from your screen.
Exiting Clock
To exit Clock, choose Exit from the File menu or the pop-up menu.
Chapter 7
Using DECsound
DECsound is a software application that you can use to play and record
audio messages, which you can mail to other users or include in
documents.
This chapter describes how to
- Start DECsound
- Use the DECsound control panel
- Make an audio recording
- Play an audio recording
- Edit an audio recording
- Use LiveLink connections
- Mail audio recordings
- Exit DECsound
Starting DECsound
You can start a DECsound session in any of the following ways:
- Using Session Manager or FileView
To start DECsound from
Session Manager or FileView, choose DECsound from the Applications
menu. If the Applications menu does not contain a DECsound menu item,
contact your system manager.
- Using LiveLink connections
You can make LiveLink connections
from DECwrite (see Using LiveLink Connections).
- Using the command line
To start DECsound from the operating system command line on an
OpenVMS system, enter one of the following commands:
$ RUN SYS$SYSTEM:DECSOUND
|
You can also define a symbol on the command line or in your
LOGIN.COM file, as follows:
If you define a symbol, you can specify the qualifiers that control
how the DECsound session executes (see Table 7-1).
Table 7-1 Starting DECsound Sessions from the Command Line Using Qualifiers
| Qualifier |
Description |
|
-file
file-spec
|
Starts a DECsound session. If the file exists, the DECsound window
displays the recording. If the file does not exist, DECsound creates a
new recording. If you do not specify a file type, DECsound adds the
default .AUD file type.
|
|
-headphone
|
Plays the DECsound recording to the headphone jack on your workstation.
DECsound ignores the -headphone qualifier if you do not also specify
the -play qualifier.
|
|
-icon
|
Creates a DECsound file that includes an icon. This qualifier is useful
when you make recordings that you want to include in DECwrite
documents, because the resulting data block in the document displays an
icon that indicates the presence of a DECsound recording. This option
is available for DECwrite Version 2.1 only.
If you do not insert the icon, the DECsound data block can be
difficult to locate in a document. However, if you do insert the icon,
the icon is also displayed when you print the document.
|
|
-play
file-spec
|
Plays the specified file without displaying the DECsound window.
|
|
-speaker
|
Plays the DECsound recording on your workstation's built-in speaker.
DECsound ignores the -speaker qualifier if you do not also specify the
-play qualifier.
|
|
-volume
n
|
Specifies the playback volume, where
n is an integer between 0 and 100. DECsound ignores the
-volume qualifier if you do not also specify the -play qualifier.
|
Note
You can specify either the -speaker qualifier or the -headphone
qualifier, but you must not specify both. If you specify both of these
qualifiers, DECsound uses the one that is last in the command line.
|
The following example shows how to invoke DECsound to play the
BIRDS.AUD file at a playback volume of 50 without displaying the
DECsound window:
$ DECSOUND -play BIRDS.AUD -volume 50
|
DECsound Files
DECsound files have a file type of .AUD by default. When you specify a
file name for a DECsound file, you do not need to enter the default
.AUD file type. DECsound adds the default file type automatically.
DECsound can also read audio files created on Suntm
workstations. These files have a file type of .AU, so when you open
these files, you must specify the .AU file type.
DECsound creates files in the DDIF format. DDIF (Digital Document
Interchange Format) is the standard document format used by CDA, a
component of Digital's NAS architecture that defines standards for
compound documents and enables file interchange among all compliant
applications.
DECsound is supplied with a number of sample files of file types .AUD
and .AU. These files are located in the DECW$EXAMPLES directory.
Clipboard
Like many other windows-based applications, DECsound includes a
clipboard, which is a temporary (invisible) storage area. When you cut
or copy part of a DECsound recording, DECsound stores the selected part
of the recording in the clipboard. When you use the Paste menu item,
DECsound pastes the contents of the clipboard into the recording.
The clipboard stores only the most recently cut or copied part of a
recording. When you cut or copy part of a recording to the clipboard,
the recording overwrites the current contents of the clipboard.
Each DECsound session uses a separate clipboard; you cannot use the
Edit menu to cut and paste between two DECsound sessions. If you need
to cut and paste between two DECsound sessions, you can do so using the
mouse, as follows:
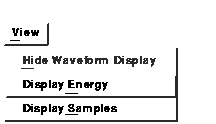
- Choose Display Energy or Display Samples from the View menu in both
DECsound sessions to display the waveforms.
- Drag MB1 across the waveform to select the part of the recording
you want to cut from the first DECsound session.
- Position the pointer at the spot in the second waveform where you
want to insert the part of the recording.
- Click MB2 to paste this recording to the second DECsound session.
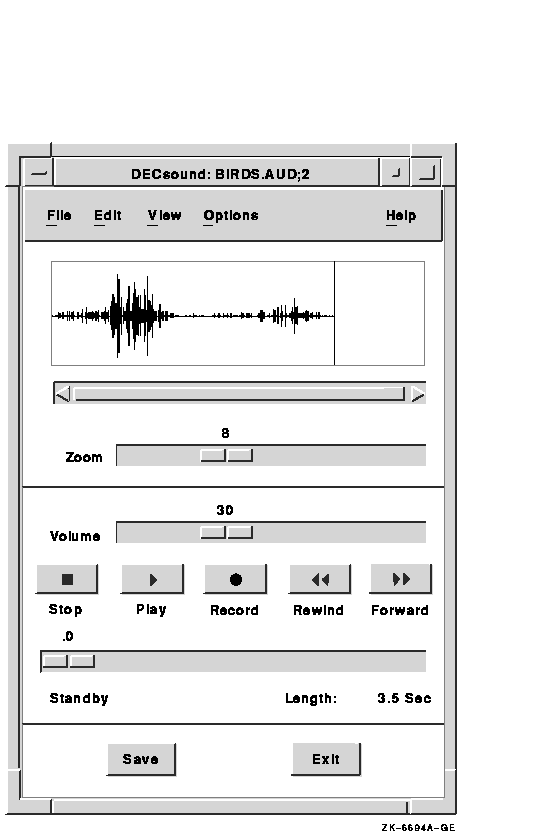
Using the DECsound Control Panel
When you start a DECsound session, DECsound displays a control panel,
as follows:
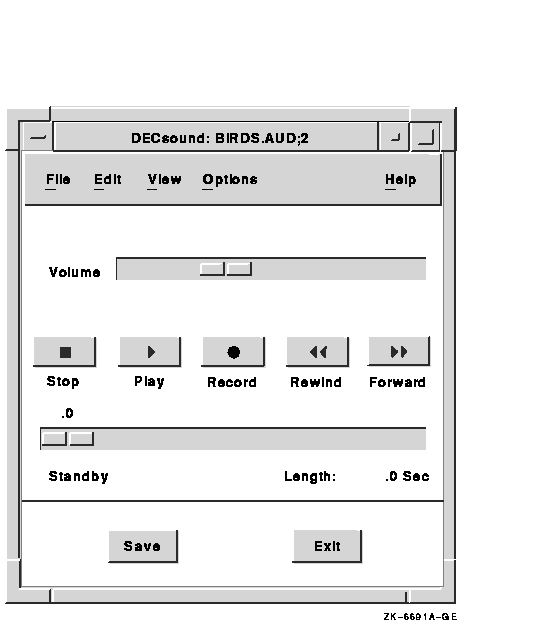
The main functions of the control panel are similar to those of a tape
recorder.

- Stop
Click on the Stop button to stop a play or record
operation.
- Play

Click on the Play button to play a recording. While playing the
recording, DECsound displays Playing... in the bottom left corner of
the DECsound window.
- Record

To start recording, click on the Record button and speak into the
microphone. While recording is in progress, DECsound displays
Recording... in the bottom left corner of the DECsound window.
- Rewind

To rewind a recording, click on the Rewind button. Each time you
click on the Rewind button, DECsound rewinds the recording by 1 second.
To rewind continuously, press and hold MB1. DECsound displays the
length of the recording, in seconds, in the bottom right corner of the
DECsound window.
- Forward

To advance through a recording, click on the Forward button. Each
time you click on the Forward button, DECsound advances the recording
by 1 second. To advance continuously, press and hold MB1. DECsound
displays the length of the recording, in seconds, in the bottom right
corner of the DECsound window.
The control panel also contains a Save button, an Exit button, and
sliders for the following:
- Volume control
The Volume slider allows you to control the volume when you play
DECsound recordings.

Move the slider to the right to increase the volume. Move it to the
left to decrease the volume. The Volume slider also indicates the
volume level as a percentage of the full volume.
- Current position in a recording
The Position slider indicates the current position in the
recording. In the following figure, the current position is the start
of the recording.
Making an Audio Recording
This section describes how to make an audio recording in DECsound.
To make a DECsound recording, follow these steps:
- Choose New from the File menu to start a new recording.
- Click on the Record button and speak into the microphone or headset.
- Click on the Stop button to stop recording.
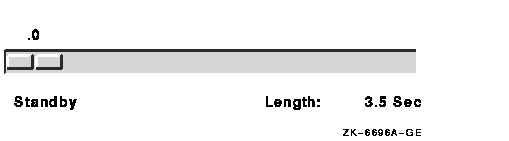
The Position slider
shows the length of the recording.
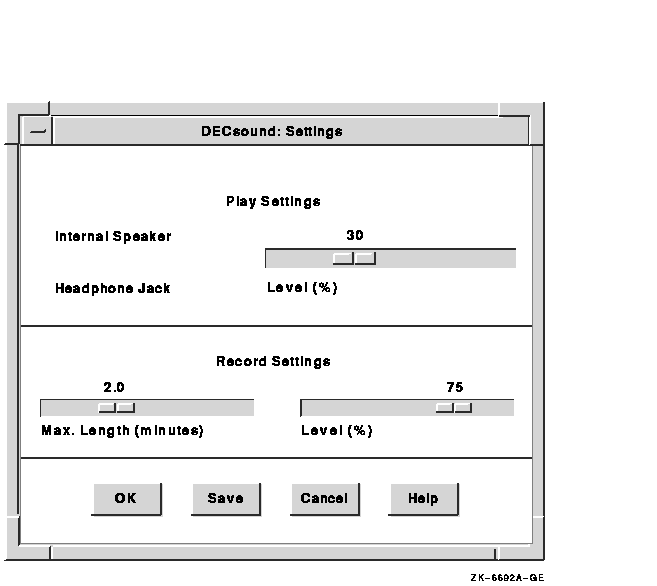
Making Long Recordings
DECsound allows you to specify the maximum length of a recording using
the Max. Length slider in the Settings dialog box, as shown in the
following figure:
The size of a recording is limited by the amount of free memory
available on the system. In some cases, while you are making a long
recording, DECsound displays a message informing you that there is
insufficient memory before your recording reaches the maximum recording
length. If this happens, take one of the following actions:
- Save the recording and restart DECsound in one of the following
ways:
- Click on the Save button.
- Choose Save or Save As... from the DECsound File menu.
- Decrease the maximum recording length.
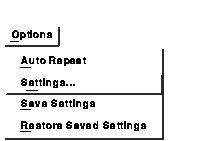
Choose Settings... from the Options menu to display the Settings
dialog box. In the dialog box, use the Max. Length slider to decrease
the maximum recording length.
- Ask your system manager to increase the memory quotas for your
account.
When you open a DECsound recording that is longer than the maximum
recording length, you cannot record new material onto the end of that
recording. However, you can bypass this problem by following these
steps:
- Choose Display Energy or Display Samples from the View menu.
DECsound displays the waveform for the recording.
- Choose Select All and then Cut from the DECsound Edit menu to
transfer the record clipboard.
- Click on the Record button to record the message that you want to
add to the existing recording.
- Click on the Stop button when you finish recording.
- Position the pointer at the start of the recording, and choose
Paste from the Edit menu to insert the original recording.
Inserting New Material in a Recording
If the DECsound window already contains a recording when you click on
the Record button, DECsound adds the new recording to the end of the
current recording. To insert new material in a recording, follow these
steps:
- Position the pointer where you want to insert the new material and
click MB1.
- Drag MB1 to the end of the recording, and choose Cut from the Edit
menu to remove the selected part of the recording.
- Click on the Record button and record the new material.
- Position the pointer at the end of the recording, and choose Paste
from the Edit menu to complete the new recording.
Playing an Audio Recording
DECsound allows you to play all or part of a recording. To play all of
a recording, click on the Play button.
The Position slider adjusts to indicate the current position in the
recording.
Play part of a recording as follows:
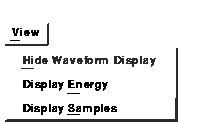
- Choose Display Energy or Display Samples from the View menu.
DECsound displays the waveform for the recording. The following
figure shows the Display Samples waveform, which displays the amplitude
of the audio waveform:
Note that the Zoom slider is also displayed. The Zoom slider allows
you to view the DECsound waveform in greater or lesser detail. Move the
slider to the left to view the waveform in greater detail. Move the
slider to the right to view the waveform in lesser detail.
- Select part of the recording by dragging MB1 across the waveform.
DECsound highlights the selected part of the recording.
- Click on the Play button.
DECsound plays only the part of the
recording that you have selected.
Editing an Audio Recording
DECsound allows you to perform editing operations on your recordings.
This section describes how to
- Select a recording
- Cut a recording
- Copy a recording
- Delete a recording
Selecting a Recording
DECsound allows you to select all or part of a recording for editing,
as follows:
- Selecting an entire recording
To select an entire recording, choose Select All from the Edit
menu.
When you choose an edit operation after selecting the entire
recording, the edit operation applies to the entire recording.
- Selecting part of a recording
Before you can edit a recording,
you must select the part of the recording that you want to modify.
Select part of a recording, as follows:
- Choose Display Energy or Display Samples from the View menu.
DECsound displays the waveform for the recording. The following
figure shows the Display Energy waveform, which displays the variations
in audio energy levels in the waveform:

- Drag MB1 across the waveform.
DECsound highlights the selected
part of the recording.
When you select part of a recording, you can
extend the selection by pressing the Shift key while dragging MB1.
When you choose an edit operation after selecting part of a
recording, the edit operation applies to only that part of the
recording.
Cutting a Recording
DECsound allows you to cut all or part of a recording, as follows:
- Cutting an entire recording
Choose Cut from the Edit menu to
transfer the entire recording to the clipboard. DECsound deletes the
recording from the display area.
- Cutting part of a recording
Choose Cut from the Edit menu to transfer the selected part of a
recording to the clipboard. DECsound deletes the selected part of the
recording from the display area.
Copying a Recording
DECsound allows you to copy all or part of a recording, as follows:
- Copying an entire recording
Choose Copy from the Edit menu to
copy the entire recording to the clipboard. The original waveform is
still visible in the display area.
- Copying part of a recording
Choose Copy from the Edit menu to
copy the selected part of a recording to the clipboard. The original
waveform is still visible in the display area.
- Using the QuickCopy function
DECsound provides a QuickCopy function, which copies the selected part
of a recording to the current position in the waveform. To use the
QuickCopy function, follow these steps:
- In the current waveform, position the pointer where you want the
recording to be copied to by pointing and clicking MB1.
- In the other waveform, point to the part of the waveform you want
to copy.
- Press and hold MB2.
- Drag across the part of the waveform you want to copy.
The
waveform is highlighted as you drag across it.
- Release MB2.
The waveform is copied to the new location in the
current waveform.
Note
When you use the QuickCopy function, DECsound does not copy the
selected part of the recording to the clipboard.
|
Deleting a Recording
DECsound allows you to delete all or part of a recording as follows:
- Deleting an entire recording
To delete an entire recording,
choose Clear from the Edit menu without selecting part of the recording.
- Deleting part of a recording
To delete part of a recording,
choose Clear from the Edit menu to delete the selected part of the
recording. DECsound deletes the selected part of the recording from the
display area, but the Clear operation does not affect the contents of
the clipboard.
Using LiveLink Connections
You can include DECsound recordings in DECwrite documents using
LiveLink connections. A LiveLink connection puts a DECsound recording
into a document. The following are examples of when you might find this
feature to be useful:
- Your document includes a complex graphic showing a machine part or
a circuit diagram.
Rather than type the description, you can create
a LiveLink connection to a DECsound recording.
- You want to comment on a draft document prepared by a colleague.
Rather than insert handwritten comments in the document, you can
use DECsound to insert your comments at appropriate places in the
document.
When you create a LiveLink connection to a DECsound recording, the
recording is maintained in a DECsound file. If you update the
recording, the document is updated automatically to include the new
recording.
When you insert a LiveLink connection into a DECsound file in a
DECwrite Version 2.1 document, you can insert an icon that indicates
the presence of a DECsound recording in the document.
If you do not insert the icon, the DECsound data block may be difficult
to find in a document. However, if you do insert the icon, the icon is
also displayed when you print the document.
Making LiveLink Connections from DECwrite
To create a LiveLink connection between a DECwrite document and a
DECsound recording, follow these steps:
- Choose Links from the File menu.
Note
You must have the Full Menus option turned on to display the Links
menu. To turn on this option, choose Full Menus from the DECwrite
Options menu.
|
DECwrite displays the Links submenu, as follows:
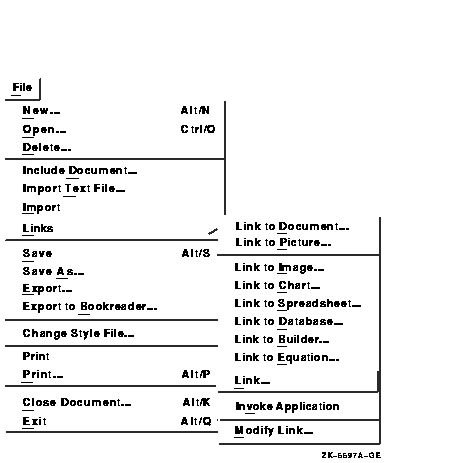
- Choose Link... from the Links submenu.
DECwrite displays the
Link dialog box. For information about the Link dialog box, click on
the Help button in the dialog box.
- Click on a file name in the list box. If you want to create a new
DECsound recording, enter the name of the file in the Selection entry
box.
- Click on the Options... button in the dialog box.
DECwrite
displays the Link Options subdialog box. For information about the Link
Options subdialog box, click on the Help button in the subdialog box.
In the Link Options subdialog box, enter the LiveLink connection
information, as follows:
- Specify the file location type for the file that contains the
recording to which you want to link.
The location also affects the
way that the audio file is treated if you mail the DECwrite document.
- Specify DECsound in the Application Name entry box, as follows:
- If you want the DECwrite document to display an icon to indicate
the presence of the DECsound recording in the document, specify the
-icon qualifier in the Parameters entry box, as follows:
Note
This option is available for DECwrite Version 2.1 only.
|
- Click on OK to dismiss the Link Options subdialog box.
- Set the Invoke Application toggle button to the On state if you
want to invoke DECsound.
- Set the Keep Natural Size toggle button to the Off state if you
want to specify the size of the DECsound icon that is displayed in the
DECwrite document.
- Click on OK in the Link dialog box.
- Position the pointer at the spot in the document window where you
want the DECsound data block to be displayed, drag MB1 to size the data
block, then release MB1.
|