HP OpenVMS Systems Documentation |
OpenVMS System Manager's Manual
Figure 14-11 shows job flag and burst pages. Figure 14-12 shows file flag and burst pages. Figure 14-13 shows file trailer and job trailer pages. Figure 14-11 Job Flag and Burst Pages 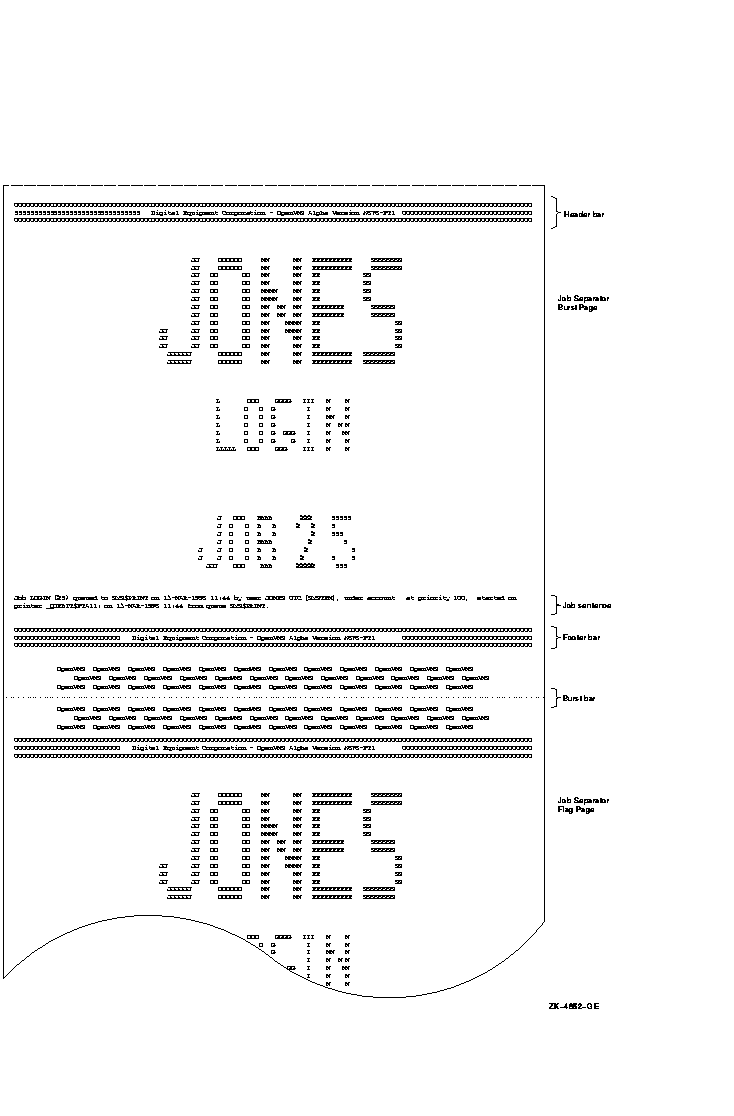
Figure 14-12 File Flag and Burst Pages 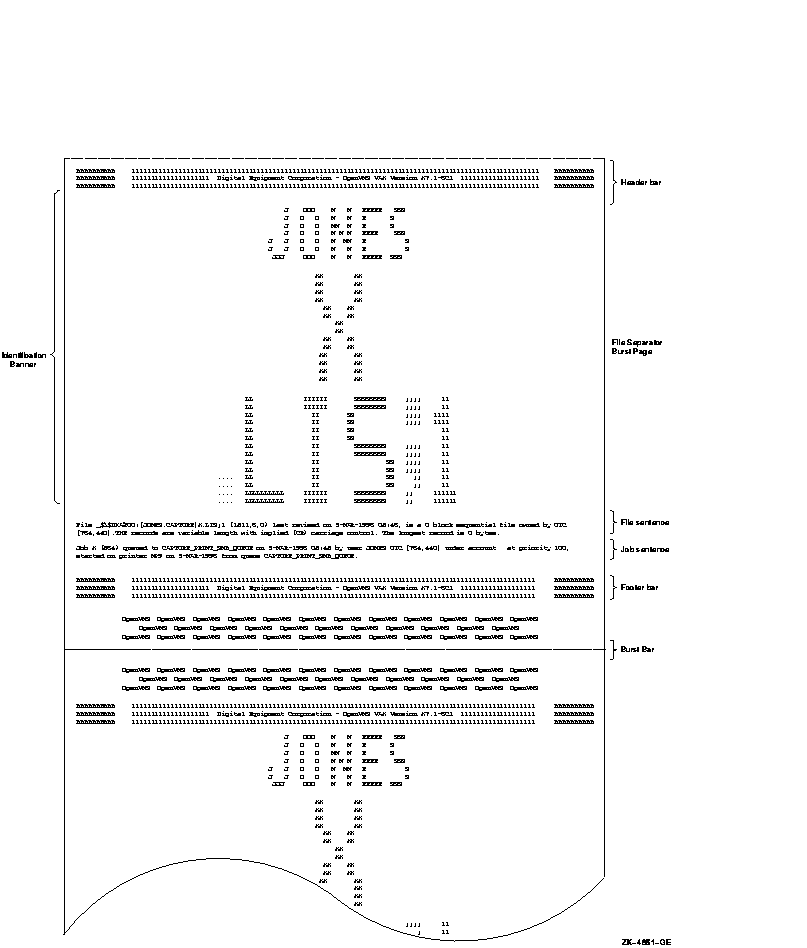
Figure 14-13 File and Job Trailer Pages 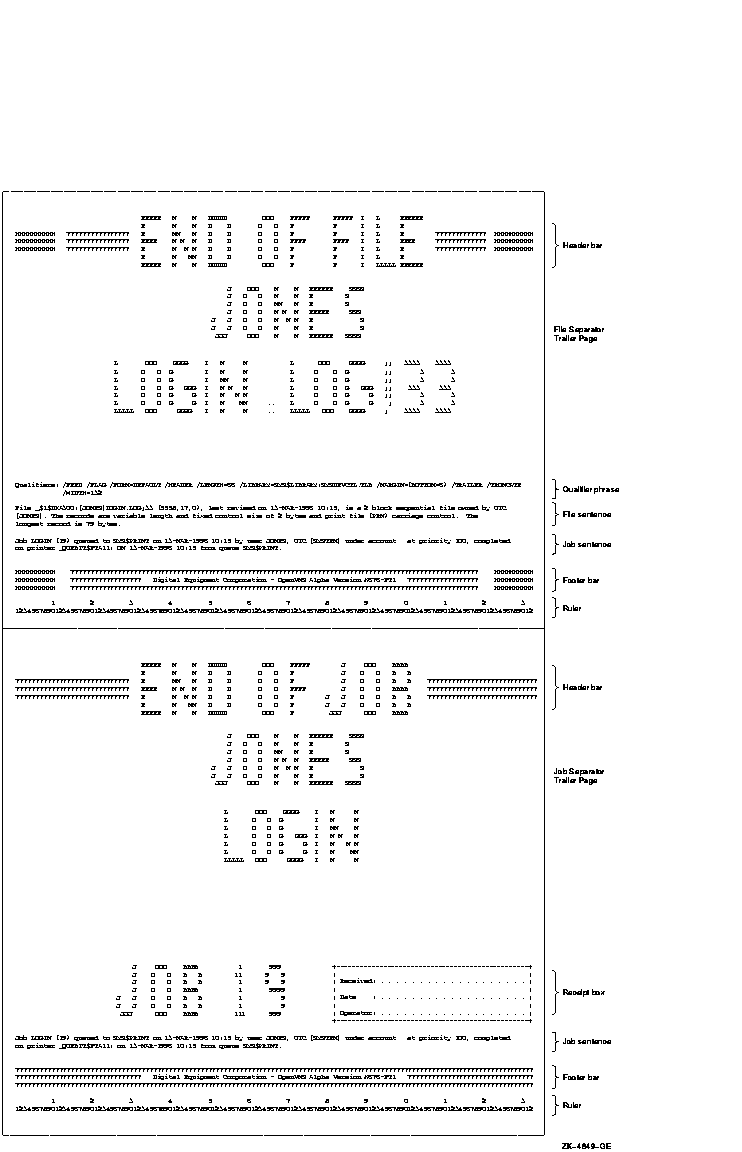
Widths greater than 40 characters and less than 200 characters and lengths of any size greater than 40 characters are supported for file and job banner pages. Pages requested for widths greater than 200 characters are formatted and printed at 200-character widths. Lengths less than 40 characters are extended by that form length until the 40-character threshold is exceeded. Margins are not taken into account when formatting banner pages.
Commands for Specifying Banner Pages
Use the following commands when working with banner pages: 14.6.7 Using and Creating FormsPrint forms determine certain page formatting attributes (such as margins, page length, and wrapping lines). Also, the paper stock specified in the form definition is used in determining whether a job is eligible to print. In OpenVMS, you have the option of using either of the following forms:
The stock of a form affects whether a job is eligible to print. The stock must match the queue's mounted form. The mounted form is the form of the current job or, if no job is processing, the form of the last job printed in a queue. If the stock of a job's form matches the stock of the queue's mounted form, the job is processed using the options in the job's form. The mounted form changes automatically to the form of the job being processed in the queue. If the stock does not match the stock of the mounted form, the job remains pending until you perform special steps. (See Section 14.6.7.6.) Use the following commands when working with forms:
Systemwide Default or Customized Forms
To use the systemwide default form with no changes, do nothing. The system will automatically use the systemwide default form, DEFAULT, for all queues. If you want to change the default form, however, do so before creating any queues that reference the form. For more information about how to make changes, see Section 14.6.7.3. To create customized forms, perform the steps explained in Section 14.6.7.4. The following sections provide guidelines for performing these tasks with all forms, systemwide default forms, or customized forms:
14.6.7.1 Displaying Forms Defined on a SystemTo display forms defined on a system, enter SHOW QUEUE/FORM/FULL. If you know the name of the form, you can specify the form name as a parameter.
14.6.7.2 Displaying the Form Assigned to a QueueTo display the default form for a queue, enter SHOW QUEUE/FULL. In the following example, the default form is REPORT and its stock is 8_5x11. All jobs processed on this queue that are not associated with an explicit form definition in the PRINT command have the default form REPORT. As long as the stock of the mounted form matches the stock of the default form, all jobs submitted to this queue without an explicit form definition will be scheduled to print.
14.6.7.3 Changing the Systemwide Default FormA queue initialized without the /DEFAULT=FORM qualifier uses the systemwide default form to process print jobs not explicitly associated with a form definition. The systemwide default form corresponds to the form number 0 and uses the following options: /MARGIN=(BOTTOM=6) Table 14-3 explains these options in detail. To change the systemwide default form, enter the DEFINE/FORM command in the following format:
To change the default bottom margin from 6 to 4, and the page length from 66 to 55, enter this command:
14.6.7.4 Creating a Customized FormTo create a customized form, follow these steps:
When you create a form, you can specify any of the qualifiers shown in Table 14-3.
If you create forms only to provide different formatting options (and not to specify paper stock), specify the same stock type for each form. That way, jobs requesting any of these forms will print on the same queue without requiring you to enter any additional commands to modify the queue. Unless you specify the /STOCK qualifier, the form's stock name is the same as the name of the form.
The command in the following example defines the form MEMO as the number 3 and defines formatting options for the form:
14.6.7.5 Assigning a Default Form for a QueueIf a user does not specify the /FORM qualifier when submitting a job with the PRINT command, the job uses the default form for the execution queue on which the job is printed. To assign a default form for an output execution queue, use the /DEFAULT qualifier with INITIALIZE/QUEUE, START/QUEUE, or SET QUEUE.
If you do not establish a default form for a queue, the queue uses the systemwide default form, DEFAULT. In the following example, the SET QUEUE command changes the default form to LN03_PORTRAIT for the LN03_PRINT queue.
14.6.7.6 Mounting a Form on a QueueTo mount a form on a queue, use the /FORM_MOUNTED qualifier with INITIALIZE/QUEUE, START/QUEUE, or SET QUEUE in the following format:
where type is the form name or number defined by the DEFINE/FORM command.
If you see a print job pending because of a stock mismatch, change the
stock of the printer to the requested stock and mount the form
associated with the requested stock on the queue, or perform one of the
other steps explained in Section 14.8.2.1.
To delete a customized form, enter the DELETE/FORM command. For example:
You must specify the form name with DELETE/FORM (not the form number). If you know the number assigned to the form but do not know the name, enter SHOW QUEUE/FORM to display the names and numbers assigned to forms on the system. If the system displays the following messages, a queue or job exists with a reference to the form:
You must remove all references to the form before you can delete the
form. For information about removing references to a form, see
Section 14.8.5.
Under certain conditions, lines and pages formatted by the print symbiont might exceed the length of lines and pages for a printer. You can use queue options to control line and page overflow. Compaq recommends that you control line overflow by using form definitions. To do this, you must set terminals and printers to avoid wrapping or truncating the print line before the physical limit of the device's width.
Different forms can have different right, left, top, and bottom margin settings. By using forms to control page and line overflow, users can switch from one form to another without requiring operators to stop the queue, alter the device setup, and restart the queue. The queue manager automatically mounts any forms with the same stock as the currently mounted form. Operator assistance is needed only to mount a form that has a stock that differs from the stock of the currently mounted form. For more information, see Section 14.8.2.1. To control line overflow, create forms using DEFINE/FORM with the /[NO]TRUNCATE and /[NO]WRAP qualifiers described in Table 14-3. To control page overflow errors, use the /DEFAULT=[NO]FEED qualifier with INITIALIZE/QUEUE, START/QUEUE, or SET QUEUE. This qualifier controls whether a form-feed character is automatically inserted when the symbiont detects overflow into the bottom margin area. Users can use the PRINT/[NO]FEED command to override the default feed option specified for a queue.
Users can specify the /PASSALL qualifier with the PRINT command to
bypass all formatting, including carriage control, that the print
symbiont performs. The default is /NOPASSALL. Use this qualifier when
the print symbiont formatting might interfere with the desired
formatting of the file. The /PASSALL qualifier causes the print
symbiont to send I/O to the device driver with all formatting
suppressed.
When you start a print queue, a form feed is sent to the output device to ensure that the paper is at the top of the page before printing begins. The initial form feed causes a blank form to be printed when a queue starts. To suppress the initial form feed, use the /NO_INITIAL_FF qualifier with INITIALIZE/QUEUE, SET QUEUE, or START/QUEUE.
|