HP OpenVMS Systems Documentation |
OpenVMS Guide to System Security
11.8 Using the System Management UtilityThe System Management utility (SYSMAN) is a facility supporting the cluster work of the security administrator. Through its centralized management of nodes and clusters, SYSMAN lets you perform system management tasks from your local node that the utility executes on all nodes in the target environment. To use SYSMAN requires OPER privilege on the local node and authorization for the OPER privilege on any remote node. The utility does not require a password when you are operating within a cluster in your own account. The operating system audits any logical link connections or any operation in which the utility requires a password.
System managers using SYSMAN should be careful that logical names are
set to the same name on each node.
Clustered systems use a group number and a cluster password to both allow multiple independent clustered systems to coexist on the same extended local area network (LAN) and to prevent accidental access to a cluster by unauthorized computers. The group number uniquely identifies each cluster system on a LAN. The cluster password serves as an additional check to ensure the integrity of individual clusters on the same LAN that accidentally use identical group numbers. The password also prevents an intruder who discovers the group number from joining the cluster. The cluster group number and password (in encrypted form) are maintained in the cluster authorization file, SYS$COMMON:[SYSEXE]CLUSTER_AUTHORIZE.DAT. This file is created during installation of the operating system if you indicate that you want to set up a local area or mixed interconnect cluster. The installation procedure then prompts you for the cluster group number and password. Under normal conditions, you need not alter records in the CLUSTER_AUTHORIZE.DAT file interactively. However, if you suspect a security breach, you may want to change the cluster password. In that case, you use SYSMAN to make the change. The file is accessible only to users with the SYSPRV privilege. Note that if you change either the group number or the password, you must reboot the entire cluster. If your configuration has multiple system disks, each disk must have a copy of CLUSTER_AUTHORIZE.DAT. You must run SYSMAN to update all copies. The following command sequence illustrates the use of SYSMAN to change the cluster password:
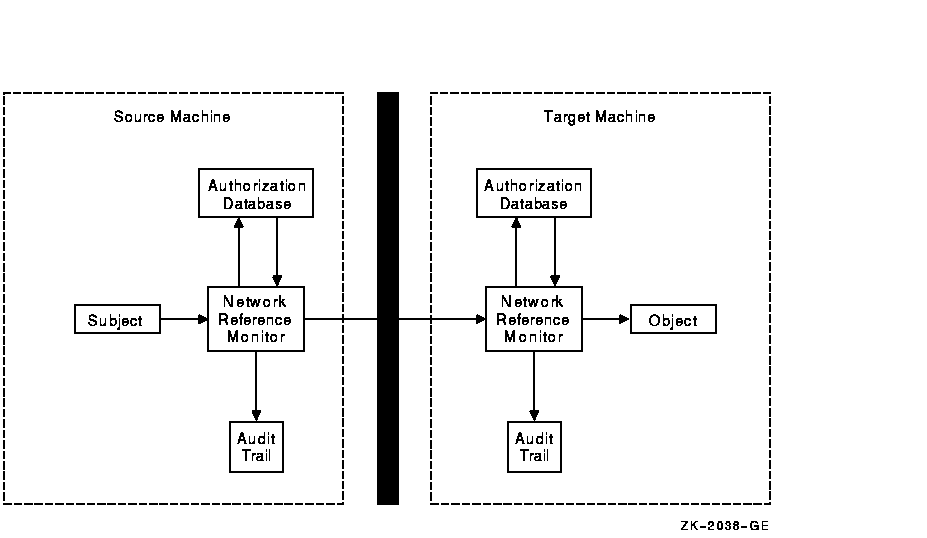
11.10 Using DECnet Between Cluster NodesThe cluster environment provides such a rich resource-sharing model (which includes files and volumes, disk and tape devices, and batch and print queues) that it is usually unnecessary to directly access another cluster node through DECnet software. Nonetheless, there are situations where resources may not be uniformly shared across the cluster. This is particularly true in mixed interconnect or local area cluster configurations, where you may choose to limit cluster access to a satellite's disk or tape volumes. In such cases, users need to use the DCL command SET HOST or some form of network access to access a satellite's resources from other cluster members. See Section 12.3 for more information on network access through proxy logins.
Chapter 12
|
|
NODE"username password"::disk:[directory]file.typ |
In the following, user Puterman uses an access control string to copy the file BIONEWS.MEM:
$ COPY WALNUT"PUTERMAN A25D3255"::BIONEWS.MEM BIONEWS.MEM |
NCP> TELL TORONTO USER A_JOHNSTON PASSWORD XZZOQ87 SHOW OBJECT- _NCP> MAIL CHARACTERISTICS |
A proxy login enables a user logged in at a remote node to be logged in automatically to a specific account at the local node, without having to supply any access control information. Note that a proxy login is not the same as an interactive login. A proxy login means that specific network access operations can be executed, such as a copy operation. By contrast, an interactive login requires a user to supply a user name and password before the user can perform any interactive operations.
To establish a proxy login on the local node, the remote user must have a default proxy account on the local node that maps to a local user name. The remote user assumes the same file access, rights, and privileges as the local user name. You can use the proxy login capability to increase security because it minimizes the need to specify explicit access control information in node specifications passed over the network or stored in command procedures.
Note that network applications can also be assigned proxy login access.
The use of access control strings is not permitted in an evaluated
configuration. Proxy login accounts should be used in the evaluated
configuration.
12.2.3 Using Default Application Accounts
Another form of access control specific to network applications is default account information used by inbound connects from remote nodes that send no access control information. Because the remote node supplies no access control information, the local node uses the default information you specify for the application to make the connection.
You can use the following command to store default access control information about the application in the network configuration database:
NCP> SET OBJECT FAL USER JILL |
Section 12.2.2 defines the concept of proxy logins. You can authorize proxy access when you encounter situations where users either on different nodes or in different groups want to share files on your system and you are reluctant to give out passwords or to set the directory and file protection to W:RWE. With proxy logins, there is no need to embed passwords in commands to copy a file across the network. There is also no need to allow world read access to a file for file transfers. The user enters the following form of the DCL command COPY to a default proxy account:
|
COPY remotenode::file-spec file-spec |
To copy a file over the network using proxy access from an account other than the default, the user includes the name of the proxy account in the access control string of the DCL command, as follows:
|
COPY remotenode"proxyacct"::file-spec file-spec |
12.3.1 Special Security Measures with Proxy Access
Proxy access is a selective merging of the authorization databases of the affected systems. Therefore, the security is only as good as the security of the least secure node.
Although proxy access eliminates passwords going over the network, it is possible for a personal computer to bypass the proxy login mechanism by impersonating one of the authorized nodes. For this reason, implement the following procedures:
If a remote user's connection request does not contain access control information, the following conditions must be met for proxy access to be approved:
You can control the use of proxy logins at the local node. Use AUTHORIZE to create and modify the permanent proxy database.
The default network proxy authorization file is NET$PROXY.DAT. However, AUTHORIZE maintains the file NETPROXY.DAT for compatibility, for support of many layered products, and for translation of DECnet for OpenVMS (Phase IV) node names.
Each network proxy entry can map a single remote user to multiple proxy user names on the local node (one default proxy user name and up to fifteen additional proxy user names). If you are going to have access to more than one proxy account from the same node and login name, indicate which proxy account should be the default. The proxy database entry identifies the user in the form of nodename::username or nodename::[group,member].
For example, to create a proxy file at a local node and add a default proxy entry mapping user Martin on remote node Boston to user Allen at the local node, enter the following commands:
$ SET DEFAULT SYS$SYSTEM $ RUN AUTHORIZE UAF> CREATE/PROXY UAF> ADD/PROXY BOSTON::MARTIN ALLEN/DEFAULT UAF> EXIT |
Similarly, the system manager at a remote node can create and maintain a proxy database of network users having proxy access to specific accounts on that node. Table 12-1 summarizes AUTHORIZE commands used to manage the proxy database.
| Command | Argument | Description |
|---|---|---|
| ADD/PROXY |
node::remoteuser
localuser[,...] |
Adds proxy access for the specified user. |
| CREATE/PROXY | Creates a network proxy authorization file. | |
| LIST/PROXY | Creates a listing file of all proxy accounts and all remote users with proxy access to the accounts. | |
| MODIFY/PROXY | node::remoteuser | Modifies proxy access for the specified user. |
| REMOVE/PROXY | Deletes proxy access for the specified user. | |
| SHOW/PROXY |
*
node::remoteuser |
Displays proxy access allowed for the specified user. |
You can control proxy access to your node and to particular applications.
Controlling Proxy Access to a Node
To accept proxy connections to your node, set the incoming proxy attribute in the executor database in the following way:
NCP> SET EXECUTOR INCOMING PROXY ENABLE |
To deny proxy connections to your node, set the outgoing proxy attribute in the following way:
NCP> SET EXECUTOR INCOMING PROXY DISABLE |
If proxy access to the node is disabled, the system ignores any proxy connection request.
A comparable set of steps is necessary on the originating node so that proxy data is transmitted in the connect request message. Set proxy attributes for both the node and for all applications that expect to use proxy, for example:
NCP> SET EXECUTOR OUTGOING PROXY ENABLE NCP> SET OBJECT MAIL PROXY BOTH NCP> SET OBJECT MAIL PROXY INCOMING NCP> SET OBJECT MAIL PROXY OUTGOING |
In general, enabling outgoing proxy is a good idea, even if the target node does not enable proxy for the object, because enabling outgoing proxy puts the originating user name in the connect message. Thus the user name is available for accounting and audit logs on the target node. Be aware that a small number of DECnet applications depend on the nonproxy form of the connect message (for example, some use the connect message space for application information rather than user names) and do not function if outgoing proxy is enabled.
Controlling Proxy Access to an Application
To allow proxy access to a particular application, you must enable the proxy access for both the node and the application. In addition, specify the name of the application in the SET OBJECT command. For example, the following enables proxy access to the application NML:
NCP> SET EXECUTOR INCOMING PROXY ENABLE NCP> SET OBJECT NML INCOMING PROXY ENABLE |
To disable proxy access to an application, identify the application in the SET OBJECT command, and set the incoming proxy attribute to disable. For example, the following disables proxy access to the application FAL:
NCP> SET OBJECT FAL INCOMING PROXY DISABLE |
If incoming proxy is enabled for the application but the proxy access for the node is disabled, the system in effect ignores any proxy access request to the application.
| Previous | Next | Contents | Index |