OpenVMS VAX Version 7.2
Compaq Computer Corporation
Houston, Texas
January 1999
Compaq Computer Corporation makes no representations
that the use of its products in the manner described in this publication
will not infringe on existing or future patent rights, nor do
the descriptions contained in this publication imply the granting
of licenses to make, use, or sell equipment or software in accordance
with the description.
Possession, use, or copying of the software described
in this publication is authorized only pursuant to a valid written
license from Compaq or an authorized sublicensor.
Compaq conducts its business in a manner that conserves the
environment and protects the safety and health of its employees, customers, and
the community.
© Compaq Computer Corporation 1999. All rights
reserved.
The following are trademarks of Compaq Computer Corporation:
Alpha, Bookreader, DECnet, DIGITAL, OpenVMS, POLYCENTER, VAX,
VAXcluster, VMS, VMScluster, and the Compaq logo.
The
following are third-party trademarks:
Intel is a
registered trademark of Intel Corporation.
Microsoft, Windows, and Windows
NT are registered trademarks of Microsoft Corporation.
All other trademarks and registered trademarks are the property of their
respective holders.
ZK6403
Contents
What's New?
Overview
How to Get
Started
Release Notes
Preface
Intended Audience
This document is intended for system managers, operators,
and others who want to use OpenVMS Management Station to manage
user accounts, printers, and storage.
Document Structure
This document is divided into the following chapters:
Chapter 1 provides information about new features.
Chapter 2 provides an overview of OpenVMS Management
Station.
Chapter 3 describes how to get started using the
OpenVMS Management Station software.
Chapter 4 describes pertinent release notes that
you should read before you start to use OpenVMS Management Station.
Reader's Comments
Compaq Computer Corporation welcomes your comments on this manual. Print
or edit the online form SYS$HELP:OPENVMSDOC_COMMENTS.TXT and send
us your comments by:
Internet openvmsdoc@zko.mts.dec.com
Fax:
603 884-0120, Attention: OSSG Documentation,
ZKO3-4/U08
Mail:
Compaq Computer Corporation
OSSG Documentation Group, ZKO3-4/U08
110 Spit Brook Rd.
Nashua, NH 03062-2698
How To Order Additional Documentation
Use the following World Wide Web address to order
additional documentation:
http://www.openvms.digital.com:81/
If you need help deciding which documentation best
meets your needs, call (800-282-6672).
1
This chapter provides new information about OpenVMS
Management Station.

This release of OpenVMS Management Station adds storage
management support. OpenVMS Management Station now makes it easy
for you to manage your disk storage devices across multiple OpenVMS
Cluster systems.
With Version 3.0 of OpenVMS Management Station, you
no longer need to maintain complicated command files to control
your storage environment. You can create, delete, and manage
storage from an easy-to-use Windows interface. OpenVMS Management
Station makes it easy for you to manage a wide range of storage
devices across multiple OpenVMS Cluster systems. It provides
a persistent database that can automatically determine and configure
your system's storage configuration at system startup.
OpenVMS Management Station is now based on the Microsoft®
Management Console (MMC). The Microsoft Management Console provides
a common management framework for various administration programs.
OpenVMS Management Station is implemented as an MMC snap-in and
includes all of the MMC components you need.
Features include:
- Storage configuration management
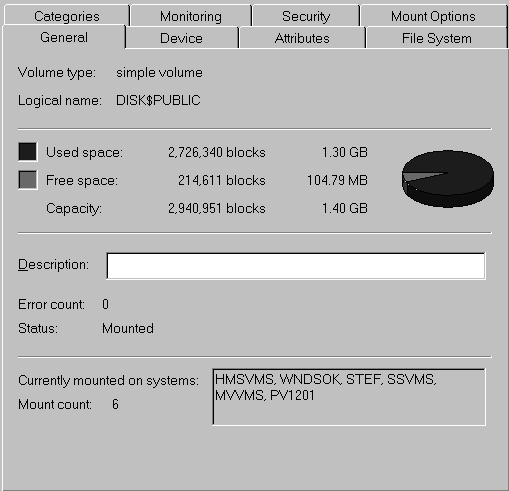
You can create, delete, and manage a disk volume
under one interface. Wizards make it easy to create a volume.
- Configuration control over reboots
If you allow it to, OpenVMS Management Station preserves
the disk configuration across reboots. OpenVMS Management Station
can mount and maintain your storage configuration without intervention.
And, OpenVMS Management Station mounts volumes much
faster than is possible with DCL or command procedures, so performance
is enhanced.
- Coexistence with established environment
You do not have to change your existing DCL command
procedures if you don't want to. You can use the display capabilities
of OpenVMS Management Station without having to use the automated
mount feature. In this way, you can give OpenVMS Management Station
as little or as much control as you are comfortable with.
In addition, the OpenVMS Management Station server periodically
generates a DCL command procedure that includes the commands to
mount all of the volumes managed by OpenVMS Management Station.
If you are familiar with DCL, you can look at this command procedure
to see what actions OpenVMS Management Station performs for you.
And, in the event of an unforeseen system problem or a corrupt
server database (SYS$SYSTEM:TNT$ACS.DAT), you could use this command
procedure to mount the volumes.
The name of the generated file is SYS$SYSTEM:TNT$EMERGENCY_MOUNT.COM.
The OpenVMS Management Station server limits this file to seven
versions.
- Remote management support
You can use OpenVMS Management Station to remotely
manage your OpenVMS systems. Once you establish a TCP/IP dialup
connection, you can then use OpenVMS Management Station to manage
your OpenVMS systems from home, while traveling, and so forth.
MMC allows you to insert World Wide Web URLs directly
into the viewer and access them using Microsoft Internet Explorer.
You can use this feature to add web links of your own. For example,
you might add a link to an internal help desk troubleshooting
page or to a system management procedures page.
- You can create multiple management windows.
Multiple windows enable you to view and switch to multiple parts
of the console interface at once. This means that each window
can have a different view of the current OpenVMS Management Domain.
For example, you could view printers in one window and storage
in another.
- Once you have created an OpenVMS Management Domain
you are satisfied with, you can save it to a "console file"
(with the default extension of .MSC). Loading the file later
recreates all the saved management domain settings.
| OpenVMS Server Software |
OpenVMS VAX
Version 6.2 or higher
OpenVMS Alpha
Version 6.2 or higher
|
AND | DIGITAL TCP/IP Services for OpenVMS, Version 3.2 or higher and, optionally, DECnet for OpenVMS
|
| PC Client Software |
Microsoft Windows NTTM
V4.0 (Service Pack 3 or higher) or Windows 95 or higher
Microsoft Internet Explorer
V3.02 or higher
|
AND | Compliant TCP/IP Stack, such as the native Windows stack
|
| Important Notes |
- The version of MMC included in this version requires files provided by
Microsoft Internet Explorer. Version 3.02 or higher of Internet Explorer
must be present on the system.
- The OpenVMS Management Station client supports only TCP/IP connections for primary servers, so at least one OpenVMS system must be running TCP/IP.
- If you are running Version 6.2 of OpenVMS and plan to manage shadow volumes, you will need remedial kits. See the installation guide for details.
- Additional TCP/IP stacks for OpenVMS have not been tested. However, TCP/IP stacks that are 100% compliant with the QIO interface for DIGITAL TCP/IP Services for OpenVMS should also work. Contact your TCP/IP vendor for additional information and support issues.
|
2
OpenVMS Management Station is a powerful Microsoft
Windows and Windows NT
based management tool for system managers and others who perform
management tasks on OpenVMS systems. OpenVMS Management Station
provides a comprehensive user interface to OpenVMS account, printer,
and storage management.
OpenVMS Management Station allows you to organize
the systems you need to manage in ways that are meaningful to
you and your environment, and allows you to manage user accounts,
printers, and storage on those systems.
Plus, you can easily manage user accounts,
printers, and storage across multiple OpenVMS systems. For
example, assume that you have an account on three different OpenVMS
Cluster systems. With OpenVMS Management Station, you can easily
update a process quota, add a privilege, grant a rights identifier,
and so forth, for each instance of the account.
OpenVMS Management Station consists of two components.
You install the client software on a PC to perform all management
operations. You install the server component on all of the OpenVMS
systems you want to manage. You do not interact directly with
the server component.
With Version 3.0 of OpenVMS Management Station, you
no longer need to maintain complicated command files to control
your storage environment. You can create, delete, and manage
storage from an easy-to-use Windows interface.
OpenVMS Management Station makes it easy for you
to manage a wide range of storage devices across multiple OpenVMS
Cluster systems. It provides a persistent database that can automatically
determine and configure your system's storage configuration at
system startup.
Some of the tasks you can perform include:
- Monitor your storage configuration
- Examine and modify storage attributes
- Create volumes
- Preserve the storage configuration across reboots
OpenVMS Management Station makes it easy for you
to manage a wide range of printers and print queues across multiple
OpenVMS Cluster systems and OpenVMS nodes. In addition, the printer
monitoring feature allows you to quickly detect and correct printer
problems.
You no longer need to maintain complicated command
files to control your printer environment. You can create, delete,
and manage a printer and its related queues, as well as perform
print job management for those printers, from an easy-to-use Windows
interface.
Some of the tasks you can perform include:
- Monitor one or more printers
- Examine and modify printer attributes
- Delete printers and their associated queues
- Create printers and their associated queues
- Examine and modify queue attributes
- Examine and modify job attributes, requeue jobs,
delete jobs
You can use OpenVMS Management Station to manage
OpenVMS user accounts in a convenient, easy manner. For example,
when creating an account, OpenVMS Management Station can add a
user authorization file (UAF) entry, grant rights identifiers,
create an OpenVMS directory, set a disk quota, set up OpenVMS
Mail characteristics, and so forth.
Plus, you can easily manage user accounts across multiple OpenVMS
systems. For example, assume that you have an account on
three different OpenVMS Cluster systems. OpenVMS Management Station
makes it easy to update a process quota, add a privilege, grant
a rights identifier, and so forth, for each instance of your account.
OpenVMS Management Station can manage the following
OpenVMS resources:
- SYSUAF.DAT user authorization file
- TNT$UADB.DAT file
- RIGHTSLIST.DAT user rights file
- Network proxy database
- Account login directory trees
- User account disk quotas
- OpenVMS Mail VMSMAIL_PROFILE.DATA file
OpenVMS Management Station supports the following
storage management operations:
| For this task |
Choose |
Create a volume
| New Volume from the Action menu or right click options
|
| Monitor storage | Monitor from the Action menu or right click options
|
| Modify volume and device attributes | Properties from the Action menu or right click options
|
| Delete a volume and move its devices to the "unassigned" list
| Delete from the Action menu or right click options
|
| Mount/dismount a volume | Mount and Dismount from the Action menu or right click options
|
Add/remove a volume set
member | Add and Remove Member from the Action menu or right click options, plus drag and drop for shadow set members
|
OpenVMS Management Station supports the following
printer management operations:
| For this task |
Choose |
| Create a printer and its queues | Create from the Action menu or right-click options
|
| Monitor printers | Monitor from the Action menu or right-click options
|
| Modify printer, queue, and job attributes |
Properties from the Action menu or right-click options
|
| Delete a printer and its queues | Delete from the Action menu or right-click options
|
| Rename a printer | Rename from the Action menu or right-click options
|
| Stop, start, or restart a printer or queue |
Stop, Start, or Restart from the Action menu or right-click options
|
OpenVMS Management Station supports the following
account management operations:
| For this task |
Choose |
| Create user accounts | Create from the Action menu or right-click options
|
Modify user accounts
(any aspect) |
Properties from the Action menu or right-click options
|
| Delete user accounts | Delete from the Action menu or right-click options
|
| Rename user accounts | Rename from the Action menu or right-click options
|
Display user account
attributes | Properties from the Action menu or right-click options
|
The systems in the OpenVMS Management Domain depend
on your needs. They might be some of the clusters in a network,
all of the systems on a given floor of a building, a mix of clusters
and nonclustered nodes, and so forth. You create the OpenVMS
Management Domain based on how you want to manage the systems
under your control.
OpenVMS Management Domains can include the following:
 OpenVMS Cluster systems
and OpenVMS Nodes
 Other OpenVMS Management
Domains
You use OpenVMS Management Domains to group
OpenVMS systems.
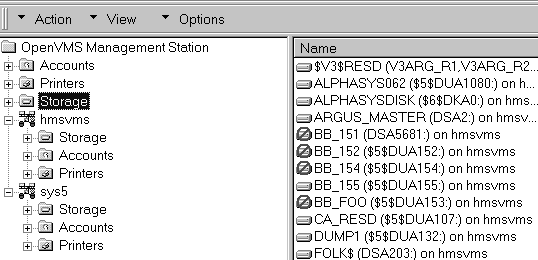
You can think of an OpenVMS Management Domain as
a "manageable unit"; that is, the system or collection
of systems that you want to manage is one unit. OpenVMS Management
Domains are the principal building blocks in the management hierarchy.
When you design your hierarchy, you determine what
you want your manageable units to be. The systems in the OpenVMS
Management Domain depend on your needs. They might be some of
the clusters in a network, all of the systems on a given floor
of a building, a mix of clusters and nonclustered nodes, and so
forth. You create the OpenVMS Management Domain based on how
you want to manage the systems under your control.
Once you have created your management domain, you
can manage the user accounts on the systems in the domain.
The scope of an operation is the set of OpenVMS
systems on which that operation takes place. When you perform
a management operation such as creating a user account, you need
to be able to specify where you want the account to be created.
For example, you might want to create the account on every OpenVMS
system in your operation or on only one or two specific OpenVMS
systems. OpenVMS Management Station gives you complete control
of an operation's scope.
The scope is determined by the object you select
in the hierarchy. Think of the objects in the hierarchy as parents
and children. Parents contain other objects. Children
are contained within parents and "inherit" the effects
of operations that are performed on their parents.
If you perform an operation on an object in the hierarchy,
that operation is also performed on all of that object's children.
If the child object has children of its own, the operation is
performed on those children as well.
If you perform a management operation without thinking
about its scope, you might be surprised by the results. For example,
there might be a huge difference between creating a printer on
one system and creating the printer on every system in your building.
To avoid surprises, carefully consider scope when
you create your management hierarchy. Think about the logical
relationships between systems and how to arrange those systems.
You should also consider what you want the scope
of a management operation to be before you perform the operation.
Think about the systems on which you want the operation to take
place. Pay particular attention to the item you select in the
hierarchy.
When you create an OpenVMS Cluster object or OpenVMS
Node object in an OpenVMS Management Domain, you choose whether
to use DECnet or TCP/IP for all communications with this
system.
If you choose DECnet, other OpenVMS systems will
use the DECnet transport when communicating with this system.
If you choose TCP/IP, that transport is used instead.
This release of the OpenVMS Management Station client
supports only TCP/IP connections for primary servers. That
is, the OpenVMS Management Station client will use only TCP/IP
to communicate with any primary server; at least one OpenVMS system
must be running TCP/IP. However, this does not prevent the
OpenVMS systems from communicating with each other using DECnet.
For TCP/IP connections, OpenVMS Management Station
then uses the existing Windows Sockets Dynamic Link Library (WINSOCK.DLL)
and TCP/IP stack on your PC to establish connections to your OpenVMS
systems.
On the OpenVMS system, the OpenVMS Management Station
server automatically detects both the DECnet and TCP/IP protocols.
You do not have to take any specific action to tell the server
which protocol to use.
Version 3.0 of OpenVMS Management Station is a 32-bit
application and is not compatible with the management domains
created with any prior version of OpenVMS Management Station.
You must re-create existing OpenVMS Management Domains for use
with Version 3.0. (The new wizards make this process easy!)
If you install Version 3.0 of the client software
on your PC, install Version 3.0 of the server on all of the OpenVMS
systems that you want to manage. When it first starts up, the
OpenVMS Management Station server will update an existing Version
2.1 database and journal to Version 3.0 status. This update
cannot be reversed and will render the files unusable with Version
2.1.
You might never need the Version 2.1 files again,
but as a safeguard the installation backs up the following files
for you:
- TNT$UADB.DAT
- TNT$ACS.DAT
- TNT$JOURNAL.TNT$TRANSACTION_JOURNAL
You can manage any number of OpenVMS Cluster or node
objects, with the following conditions:
- Managing cluster members as individual nodes
is not supported. OpenVMS Cluster systems are treated as indivisible
entities; you can't perform an operation on individual cluster
members.
- Creating nodes in a cluster or deleting them
from a cluster is not supported.
- Clusters with multiple user authorization files
(UAFs) are not supported.
3
The OpenVMS Management Station help file contains
a complete example of how to get started with OpenVMS Management
Station.
This chapter describes how to create a simple OpenVMS
Management Domain consisting of one OpenVMS Node. The chapter
also provides an example of how to manage user accounts on that
system.
Depending on the systems you need to manage, your
own OpenVMS Management Domain might include many OpenVMS Cluster
systems, OpenVMS nodes, or other OpenVMS Management Domains.
1. Select OpenVMS Management Station from the Start
menu. The main viewer dialog box is displayed.

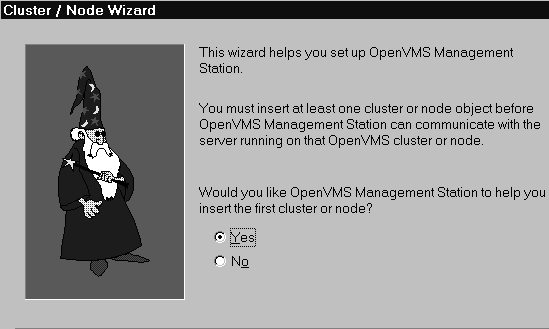
2. The Cluster/Node Wizard recognizes that you do
not have an existing OpenVMS Management Domain and asks whether
you want to add an OpenVMS Cluster system or OpenVMS node to the
domain. Follow the wizard to create this first entry.
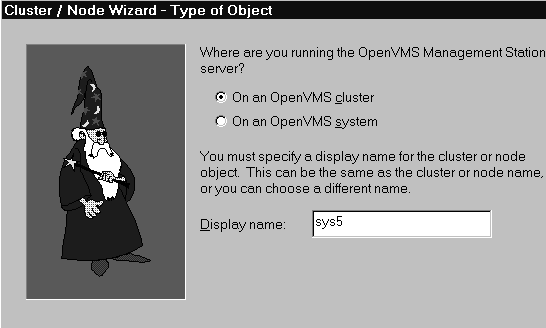
3. Select OpenVMS Cluster or OpenVMS system. If
you have both OpenVMS Cluster systems and nonclustered nodes in
your environment, you can choose either one. To get started,
you might find it convenient to make the display name the cluster
or node name.
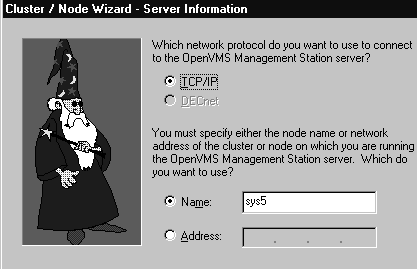
4. Fill in the name or IP address of an OpenVMS Cluster
system or OpenVMS node on which you want to try OpenVMS Management
Station operations. (The OpenVMS Management Station server must
be running on this system.) If you do not specify the IP domain,
the default IP domain is assumed.
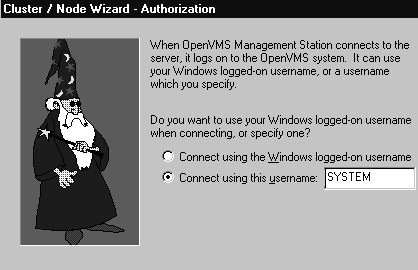
5. Specify a user name for the OpenVMS System.
Although you are using a PC to manage your OpenVMS accounts, you
still must have sufficient authorized privileges on the
OpenVMS system to perform a given operation. The user name and
password must pass the same security checks as they would if you
were directly logging in to the OpenVMS system.
If your Windows NT user name is also your OpenVMS user name, you
might find the option to use this username convenient.
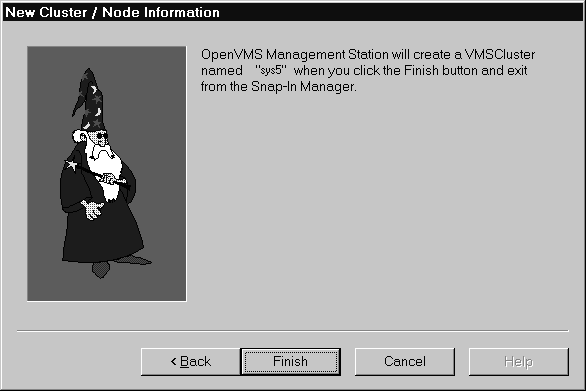
6. Click Finish.
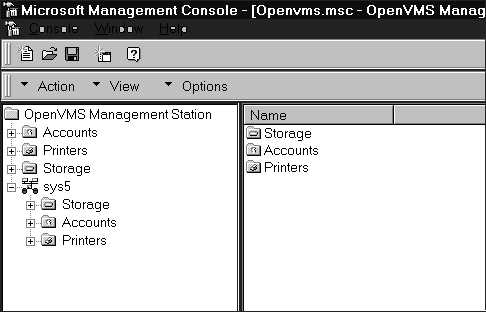
7. Select (single click on) the OpenVMS Accounts
object to display a list of user accounts.
(At this point you can also expand the OpenVMS Printers object
to view printers, queues, and jobs, and the OpenVMS Storage object
to view disk volumes.)
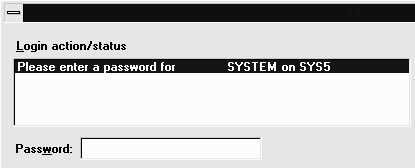
8. Enter your password for the OpenVMS system and
click OK. (You need to enter your password when you first establish
a connection.)
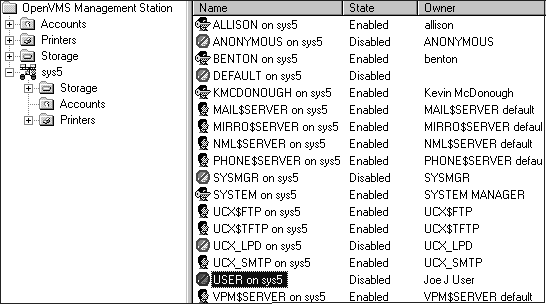
9. Select an OpenVMS User Accounts object in the
right-hand pane.
10. Right click and choose Properties to display
the account attributes for that user account.
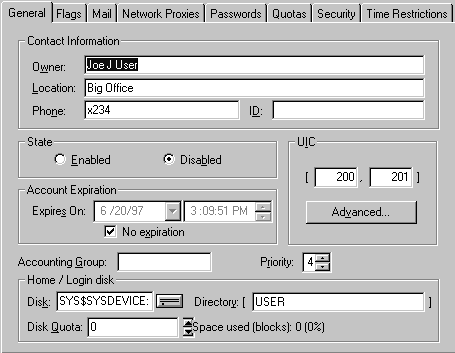
11. Take some time to see how the account attributes
are presented. When you are done, click Cancel to return to the
viewer.
12. Expand the OpenVMS Printers object to view printers,
queues, and jobs, and the OpenVMS Storage object to view disk
volumes.

13. Optionally, you can create multiple management
windows, where each window has a different view of the current
OpenVMS Management Domain. You can select the object you want
to be the "root" object in that view. To do this:
- Select the object at which you want to start
the new window.
- Select New window from here from the right-click
options.
For example, you could create a window that displays
only the printer components for a given OpenVMS system:
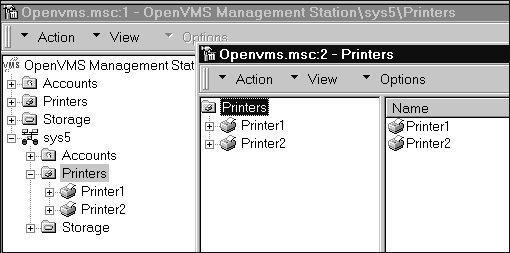
Examine how the account, printer, and storage attributes
are presented in OpenVMS Management Station. This is a good time
to become familiar with the layout of the dialog boxes and attributes.
Click the tabs at the top of the dialog box to examine other attributes.
You can switch between attribute groups and make changes anywhere.
You can click OK to make changes and return to the viewer, Apply
Now to make changes without returning to the viewer, or Cancel
to return to the viewer without making any changes.
4
This chapter contains important information regarding
the OpenVMS Management Station software that is not described
in the installation guide or in online help. Read this chapter
before you begin using OpenVMS Management Station.
Version 3.0 of OpenVMS Management Station is a 32-bit
application and is not compatible with the management domains
created with any prior version of OpenVMS Management Station.
You must recreate your OpenVMS Management Domain for use with
Version 3.0.
OpenVMS Version 7.1 allows users to log in using
an account and password maintained by an external authentication
agent such as a Primary Domain Controller in a LANman domain.
To use this functionality, you need to use the AUTHORIZE
qualifier /FLAGS=EXTAUTH with the ADD, COPY, MODIFY and RENAME
commands. If this flag is set but a matching account does not
exist in the external authenticator, the user cannot log in, even
if there is a matching account in the OpenVMS UAF file.
OpenVMS Management Station does not yet display or
control this flag. However, it does propagate the flag when creating,
modifying, or renaming accounts. For example, when you create
an account, the flag is set however it is set in the reference
account.
When you create or rename an account and the EXTAUTH
flag is set, the following warning is issued:
TNT-W-EXTAUTH, Newly created or
renamed account is externally authenticated.
Make sure a corresponding account exists in the external domain.
This is a reminder that an account that matches the
new OpenVMS account name must exist in the external authenticator's
security domain in order for the login to succeed.
External authentication can be disabled by the AUTHORIZE
command MODIFY account /FLAGS=NOEXTAUTH.
If you have the StorageWorks Command Console software
installed on your PC, you can launch it from OpenVMS Management
Station by right-clicking on a disk device and selecting the Launch
SWCC menu entry.
The time needed to filter users by their rights identifiers
is directly proportional to the number of users and rights identifiers
on the system.
This section details known problems and restrictions
in the OpenVMS Management Station software.
Although you are using a PC to manage your OpenVMS system, the
account name you use to connect to the OpenVMS system must have all privileges
(set as default privileges).
This release of OpenVMS Management Station manages
and displays only disks that are visible to all nodes in a cluster.
This means that you will not be able to display or manage public
volumes mounted on "unmanaged" devices, such as an infoserver
device.
It also means that OpenVMS Management Station does not manage
SCSI disks connected to VAX systems.
OpenVMS Management Station can manage bound volumes
with these restrictions:
- If every member volume is a shadow unit with
one member, the maximum number of member volumes is 28.
- If every member volume is a non-shadowed disk,
the maximum number of member volumes is 42.
OpenVMS Management Station handles privately mounted
and foreign volumes as special cases and does not display or manage
them.
When the OpenVMS Management Station server is first
installed on a system, the TNT$SERVER_ERROR.LOG error log contains
errors that indicate that the TNT$ACS.DAT and journal files could
not be found. These files are, in fact, created immediately after
the errors are logged. You can ignore the errors.
This version of OpenVMS Management Station does not
support write-locked shadow sets.
Expanding an OpenVMS Storage object  occasionally results in a "Retrieving information from the
server..." message window being displayed. If you click
the Stop button while this message is displayed, the following
error might be reported:
TNT-F-Writelock Locked against
write access.
SYSTEM-W-NOT QUEUED, Request
not queued
To work around this problem, select that same OpenVMS
Storage Object  and refresh the display
by either using the F5 key or by choosing Refresh from the Action
menu.
If the OpenVMS Management Station server returns
a "busy, try again later" message, it usually means
that multiple clients are using the server at the same time.
Retry the operation.
If you set the direct memory access (DMA) attribute
for a terminal device (TT or LAT) that does not support DMA, the
device ignores the DMA setting. However, OpenVMS Management Station
considers the DMA control to be set.
If DMA support is later added for the device, you
must clear the DMA attribute and then reset it in order to enable
DMA support on the physical device. You cannot just set DMA again
because the OpenVMS Management Station believes it is already
set and will not set it again until it is first cleared.
OpenVMS Management Station does not update the DECnet
Phase IV NETPROXY.DAT file. If you add a proxy using OpenVMS
Management Station, applications such as DFS (prior to Version
2.0) and DECnet Phase IV (components such as file access listener
(FAL)) that read the Phase IV database do not see the proxy.
Use AUTHORIZE to add a proxy if you require access
by DFS (prior to Version 2.0) and DECnet Phase IV components such
as FAL.
If you rename a user account that has unread new
mail messages, the new mail count for the renamed account is set
to zero. However, the user can use the READ/NEW command to read
the new mail messages.
If you manually edit the UIC Group control on the
Advanced UIC dialog box, the Next Available Member and Next Highest
Member controls are not updated. If you select an existing group
from the list, the Next Available Member and Next Highest Member
controls are properly updated. Please see the online help for
more information.
Queues that are based upon TCPware's print symbiont
TCPWARE_TSSYM cannot be made autostartable. As such, this type
of queue cannot be used as the reference printer during a Create
Printer operation.
If you rename a printer at the OpenVMS Management
Domain level, and the printer you select is a reconciled printer
with two or more DQS queues from the same node, the rename operation
fails to rename all reconciled printers.
When creating a printer at the OpenVMS Management
Domain level based on a reference printer accessed using DQS,
the queue naming algorithm sometimes generates duplicate queue
names. To work around this problem, check the queue names and
use the Rename control to correct any duplicates.
When viewing the devices for a printer made up of
DQS and unknown (other) devices, the Destination Node field is
not shown for the DQS device.