 |
DECnet-Plus for OpenVMS
Applications Installation and Advanced Configuration
ncl> create modem connect line dynamic_asynch -
_ncl> communications port async
|
If you now display information about the port, you will see that
the line has a new communications port name of
async-n. For example:
ncl> show modem connect line dynamic_asynch communications port
|
async-dev-c-u --- Specifying
async-dev-c-u allows you to set up a dynamic protocol
tower on an explicit line.
For a dynamic line or circuit, the
communications port has one of two formats:
- devcu as in txa0:
- dev-c-u as in tx-0-0
where dev-c-u is defined as follows:
|
dev
|
The first two letters of the asynchronous device name (possible values
are
tt and
tx).
|
|
c
|
A decimal number (0 or a positive integer) designating a device's
hardware controller. If the third letter of the device name is A,
c equals 0. If the third letter of the device name is B,
c equals 1, and so on.
|
|
u
|
The unit number of the device name;
u is always equal to 0 or a positive integer.
|
ncl> create modem connect line dynamic_asynch -
_ncl> communications port async-tx-0-3
|
If you request a specific device, txa3 (with the set
terminal command; see Section A.1.2.2, step 13), for a dynamic
asynchronous connection, the asydriver first searches for an
available modem connect line with a communications
port attribute of async-tx-0-3. If this search fails, the
asydriver then searches for a "floating" modem connect
line with a communications port attribute of
async-n. If asydriver finds a "floating"
line, it uses it. For the duration of this connection, the
communications port attribute is modified to async-tx-0-3 so
you can tell which terminal devices are actively running dynamic
asynchronous connections.
If asydriver does not find a
"floating" line, the dynamic switch fails. Either you have set up the
protocol stack incorrectly, or else all modem connect lines
are in use.
Next, configure your data link and routing circuit. For information
about configuring your data link and routing circuit, see the chapters
on managing network security and network management tasks in the
DECnet-Plus for OpenVMS Network Management guide.
For security over a dialup connection, run NCL and establish
optional routing initialization passwords. For more information about
using verifiers, refer to the DECnet-Plus for OpenVMS Network Management guide.
A.1.2.2 Switching on Dynamic Asynchronous Connections
This section explains how to dynamically switch your line for
communication.
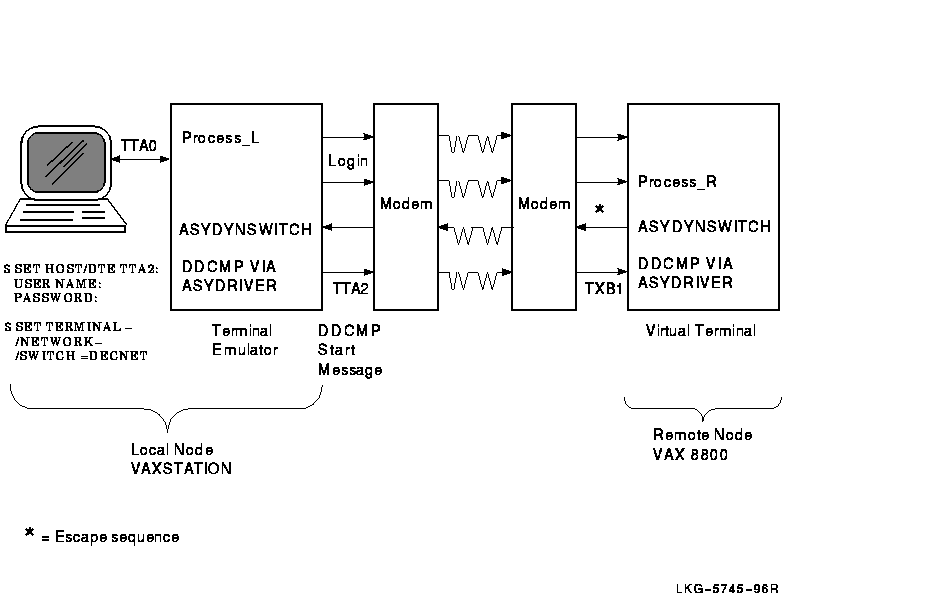
Figure A-1 shows a typical configuration in which dynamic
asynchronous switching occurs over a dialup line. The local node in
Figure A-1 is a standalone VAXstation 3100 system; the remote node
is a VAX 8800. After the user at the local node dials in to the remote
node, he or she can switch the lines connected to terminal ports
tta2 and txb1 to dynamic asynchronous DDCMP.
Figure A-1 Dynamic Switching of Asynchronous DDCMP
Lines
- The following steps can be performed by any OpenVMS user.
- Log in to your local OpenVMS system. This login creates a process
(identified by Process_L in Figure A-1).
- Enter the following DCL command:
$ set host/dte terminal-port-name:
|
terminal-port-name is the name of your local
terminal port that is connected to the modem. If both systems use modems
with autodial capabilities (for example, DF03, DF112, or DF224 modems),
you can optionally include the /dial qualifier on the set
host/dte command
to cause automatic dialing of the modem on the remote node, as follows:
$ set host/dte/dial=number:number terminal-port-name:
|
- If you do not specify the /dial qualifier in the previous
step, dial the remote system manually. After the dialup connection is
made and you receive the remote system welcome message, log in to your
account on the remote node. In this case, you supply your user name and
password to the remote OpenVMS operating system.
- If you are not using automatic dialing, dial in to the remote node
manually.
- Once the dialup connection is made and you receive the remote
OpenVMS system welcome message, log in to your account on the remote
node. This process is identified by Process_R in Figure A-1.
- You can initiate the dynamic switch by specifying the following
DCL command on the remote node:
$ set terminal/network/switch=decnet
|
The set terminal command is an OpenVMS DCL command. If you
are on a node other than an OpenVMS node, specify the equivalent
function for your system.
- When the SET image on the remote system recognizes the
/NETWORK and /switch=decnet qualifiers, it calls the
shareable image asydynswitch (see
Figure A-1). The asydynswitch image verifies the link and
sends an escape sequence to the terminal emulator on the local system.
The escape sequence notifies the local terminal emulator that the line
connected to the remote system is becoming a dynamic asynchronous line.
- When the terminal emulator at the local system receives the escape
sequence, it calls the asydynswitch image (see Figure A-1)
on the local system. The asydynswitch image verifies the line
on the local system and switches it to an asynchronous DECnet line.
- When the switch occurs on the local system, asydriver
first searches for an explicitly named dynamic asynchronous line. For
example, if the switch is on device tta1:, it searches for a
line with a communications port attribute of
async-tt-0-1. If asydriver cannot find that line, it
searches for a "floating" line (created with a communications
port attribute of async). Because a protocol stack
previously had been preconfigured over this line, the data link
protocol now attempts to start the link.
- The local system then sends a ddcmp start message (see
Figure A-1) to the remote system that initiated the dynamic switch.
When asydynswitch on the remote system detects the
start message, it activates the preconfigured local protocol
stack. (For information about the protocol stack, see Section A.1.2.1,
steps 5--7.)
The remote system first searches for an explicitly
named dynamic asynchronous line. When it searches for an explicitly
named dynamic line, it searches for one that refers to the physical
terminal over which the original switch was made. In Figure A-1, the
remote system searches for a line associated with port txb1.
Therefore, it looks for a line with a communications port
attribute of async-tx-1-1. If it does not find one, it uses a
"floating" async-n line. If this fails, the dynamic
switch fails.
- Since both ends of the link have a preconfigured protocol stack,
the DECnet link comes up over both circuits. Any preconfigured security
checks also occur at this time.
The following message indicates
that the terminal emulator on the local system has exited and that the
DECnet link is being established:
%REM-S-END - control returned to local-nodename::
$
|
To check whether the communications link has come up, specify the
following command on the local system:
$ run sys$system:ncl

ncl> show routing circuit dynamic_asynch adjacency adjacent-node all
ncl> exit
|
If there is an adjacency, you can start to communicate with the
remote system over the asynchronous DECnet connection.
- As an alternative to switching the terminal line to a DECnet line
automatically, you can switch the line manually. If you originate a
dynamic connection to an OpenVMS node from a system other than OpenVMS,
manual switching is required; from an OpenVMS system, it is optional.
If you are originating the connection from a node other than OpenVMS,
follow system-specific procedures to log in to the remote OpenVMS node
by means of terminal emulation.
Once you are logged in to the
remote node, two steps are required for manual switching:
- Using your account on the remote OpenVMS node, specify the set
terminal command described in Step 7, but add the /manual
qualifier. For more information see Section A.1.2.1, Step 5.
$ set terminal/network/switch=decnet/manual
|
You will receive the following message from the remote node
indicating the remote system is switching its line to DECnet use:
%SET-I-SWINPRG The line you are currently logged over is becoming
               a DECnet line
|
- You should exit from the terminal emulator and switch your line
manually to a DECnet line. The procedure depends on the specific
operating system on which you are logged in.
The following example
shows how an OpenVMS user originating a dynamic connection exits from
the terminal emulator and turns on the DECnet line.
- Exit from the terminal emulator: Press and hold down the Control
key while you press the \ (backslash) key on your OpenVMS
system.
- Enter the following command to switch your terminal line to a
DECnet line manually:
$ set terminal/network tta0:
|
tta0 is the name of the terminal port on the local node.
- Next, you must manually turn on the lines, data links, and routing
circuits connected to your terminal port. See Steps 5 through 7 in
Section A.1.1 for information about setting up your static asynchronous
link.
Asynchronous DECnet is then started on the local OpenVMS node.
A.1.2.3 Managing Dynamic Asynchronous Resources
You can define the following system logical names in
sys$manager:net$logicals.com to manage the resources used by a
dynamic asynchronous connection:
- asy$dynamic_maxlines
Specifies the maximum number of dynamic asynchronous modem
connect lines
that can be active on a system at any one time. You can specify values
in the range of 0--65534 lines. The default is 16 lines. For example:
$ define/system asy$dynamic_maxlines 16
|
- asy$dynamic_line_timeout
Specifies the amount of time in seconds that a dynamic asynchronous
line waits before deciding that a dynamic connection has broken. When
the dynamic asynchronous line decides that a link is broken, the line
is automatically switched back to a terminal line. You can specify
values in the range of 10--65535 seconds. The default is 300 seconds.
For example:
$ define/system asy$dynamic_line_timeout 300
|
A.1.2.4 Terminating a Dynamic Asynchronous Connection
Take the following steps to terminate a dynamic asynchronous connection:
- Disable the modem connect line and then re-enable it. For
example:
$ run sys$system:ncl

ncl> disable modem connect line dynamic_asynch

ncl> enable modem connect line terminal_line
ncl> exit
|
- Switch your asynchronous line back to a terminal line.
$ set terminal/permanent/nonetwork/typeahead terminal_port_name
|
The dynamic asynchronous connection can also terminate, if the time
specified by the logical name asy$dynamic_line_timeout
expires. The link is considered idle if it has no input or output for
the timeout interval. When this occurs, the link is broken and the line
automatically switches from a DECnet line back to a terminal line. For
more information about asy$dynamic_line_timeout, see
Section A.1.2.3.
A.1.2.5 Reasons for Failure of Dynamic Asynchronous Connections
If you are using dynamic switching and the asynchronous DECnet
connection is not made, check that:
- DECnet-Plus has been started.
- WANDD has been started.
- The asydriver has been loaded (the asy0 device is
present).
- The asyswitch has been installed.
- The asydynswitch has been installed.
- The modem connect lines have been configured correctly.
- Virtual terminals must be enabled both on the remote node and, in
particular, for the terminal at which you are logged in. The terminal
line at the remote node must have the attribute disconnect set.
- After you enter a set terminal command with the
/manual qualifier, you must specify NCL commands to turn on
the DECnet line within approximately 2 minutes or the line returns to
terminal mode.
If the logical station is in the on-starting state,
check that:
- The routing circuits have been configured correctly.
- The routing initialization passwords on each node must be set
correctly. (Refer to the DECnet-Plus for OpenVMS Network Management guide.)
- The parity is correct. Asynchronous DECnet requires the parity on
the asynchronous line to be set to none and the terminal line
to be set up to use 8-bit characters. If you are using a non OpenVMS
system, you must check that the terminal line is set to the correct
parity.
For more information about solving problems in your DECnet-Plus
network, refer to the DECnet-Plus Problem Solving guide.
Appendix B
Configuring Transports
B.1 Overview
To configure NSP Transport, OSI Transport, DECnet over TCP/IP, or OSI
over TCP/IP on your system, invoke the
sys$manager:net$configure using the ADVANCED option, and
select Option 4 ("Configure Transports"). Section 1.4 and
Section 1.5 in this manual describe in detail the questions
net$configure asks in order to configure the transports.
DIGITAL recommends that you do not modify the NSP and OSI startup
scripts that net$configure creates. (These scripts in
SYS$MANAGER are named NET$NSP_TRANSPORT_STARTUP.NCL and
NET$OSI_TRANSPORT_STARTUP.NCL.) DIGITAL also recommends that you accept
the default settings for the various attributes.
This appendix describes the NCL commands that you can use to manually
create and modify these transports if necessary. Refer to DECnet-Plus Network Control Language Reference
for more information about transport attributes.
B.2 Manually Configuring NSP
This section describes how to configure the Network Services Protocol
(NSP). The following example shows the commands to create the
nsp entity on your system. DIGITAL recommends that you accept
the default settings (used in the example) for the various attributes
and change these only if you need to. Refer to the DECnet-Plus Network Control Language Reference for
more information about these attributes.
ncl> create nsp

ncl> set nsp delay factor 2, delay weight 3, - (1)
_ncl> maximum remote nsaps 200, maximum transport connections 200, - (2)
_ncl> maximum window 20, nsap selector 32, -
_ncl> retransmit threshold 5
ncl> enable nsp
|
- The effect of delay factor is to
increase the retransmission time by increasing the average round-trip
delay time, thus allowing for additional network delay.
The value of the weighting factor is given by the delay weight
characteristic. Basically, delay weight determines how quickly
the retransmission timer responds to variations in actual round-trip
delay times. A low value of delay weight means that the
retransmission timer responds quickly to each sample of round-trip
delay time; a delay weight of 0 means that an
estimate is nearly the same as the last actual sample of round-trip
delay. A high value for delay weight reduces the impact of
recent variations in network delay; the higher the value, the closer
each estimate of round-trip delay is to the average of all estimates.
The default values of delay factor and delay
weight should be suitable for most networks. However, consider
increasing these values if there are wide variations in round-trip
delay times on your network.
-
You can save memory resources by reducing the value of maximum
remote nsaps. However, you do not have access to the information
provided by this entity's counters and status attributes (except
through information in event logs). The maximum NSAPs must be greater
than the maximum transport connection.
For some NSP characteristics, such as maximum remote nsaps, or
maximum transport connections, you can raise values at any
time, but you cannot lower the value without first disabling NSP.
The following is an example of how to set up NSP:
ncl> create nsp
ncl> set nsp maximum window 8
ncl> set nsp maximum transport connections 200
ncl> set nsp maximum receive buffers 2000
ncl> enable nsp
ncl> create session control transport service nsp protocol %x04
|
B.2.1 Transmit and Receive Window
NSP receiver's window is controlled by a combination of Maximum
Transport Connections, Maximum Receive Buffers, and Maximum Window.
The receiver initial quota is determined by dividing Maximum Receive
Buffers by Maximum Transport Connections. During the life of the
connection, the receiver quota fluctuates, using the value of Maximum
Receive Buffers divided by Currently Active Connections. The credit
window sent to the remote transmitter may or may not be this quota
value, depending on the value of Maximum Window. If Maximum Window is
set to less than the determined receiver quota, this value is used
instead for the credit granted to the remote transmitter.
The transmitter on an NSP connection uses the credit sent by the remote
receiver as its transmit window, unless Maximum Window is a lower
value. In that case, Maximum Window is used for the transmitter window.
By controlling the transmitter's and receiver's window as above a
dynamic balance of system resource consumption and network performance
may be achieved and maintained.
B.3 Manually Configuring the OSI Transport Service
This section describes how to configure the OSI transport service. The
following example shows the commands to create the osi
transport entity on your system. DIGITAL recommends that you
accept the default settings (used in the example) for the various
attributes and change these only if you need to. Refer to the
DECnet-Plus Network Control Language Reference for more information about these attributes.
The characteristics specified in the following command example are
those that apply to all types of network service. For details of
osi transport entity characteristics that are specific to
Connection-Oriented Network Service (CONS) or Connectionless-Mode
Network Service (CLNS), see Section B.3.2 or Section B.3.3.
ncl> create osi transport

ncl> set osi transport delay factor 4, delay weight 5,- (1)
_ncl> maximum receive buffers 96, maximum remote nsaps 64, - (2)
_ncl> maximum transport connections 33, maximum window 20

ncl> enable osi transport
|
-
The effect of delay factor is to increase the retransmission
time by increasing the average round-trip delay time, thus allowing for
additional network delay.
The value of the weighting factor is given by the delay weight
characteristic. Basically, delay weight determines how quickly
the retransmission timer responds to variations in actual round-trip
delay times. A low value of delay weight means that the
retransmission timer responds very quickly to each sample of round-trip
delay time; a delay weight of 0 means that an
estimate is nearly the same as the last actual sample of round-trip
delay. A high value for delay weight reduces the impact of
recent variations in network delay; the higher the value, the closer
each estimate of round-trip delay is to the average of all estimates.
The default values of delay factor and delay
weight should be suitable for most networks. However, consider
increasing its value if there are wide variations in round-trip delay
times on your network.
For a complete discussion of delay
factor and delay weight and how to calculate round-trip
delay, refer to DECnet-Plus for OpenVMS Network Management.
-
You can save memory resources by reducing the value of maximum
remote nsaps. However, you will not have access to the information
provided by this entity's counters and status attributes (except
through information in event logs). The maximum remote NSAPs cannot be
lower than the maximum transport connections.
You must disable the osi transport entity before you can
modify any of its characteristics.
|