 |
    
Common Desktop Environment: User's Guide
9 Printing
Contents of Chapter:
- Your Default Printer
-
 To Determine the Default Printer To Determine the Default Printer-
 To Change the Default Printer To Change the Default Printer-
- Printing Files
-
- Submitting a File to a Printer
-
 To Print Using the Front Panel To Print Using the Front Panel-
 To Print Using File Manager To Print Using File Manager-
 To Print Using Print Manager To Print Using Print Manager-
- Setting Print Options Using the Print Dialog Box
-
- Printer Applications
-
- Print Manager
-
 To Start Print Manager To Start Print Manager-
- Printer Jobs Application
-
 To Start the Printer Jobs Application To Start the Printer Jobs Application-
- Displaying Print Job Information
-
 To Open a Printer Icon To Open a Printer Icon-
 To Close a Printer Icon To Close a Printer Icon-
 To Find a Print Job To Find a Print Job-
 To Cancel a Print Job To Cancel a Print Job-
- Print Job Properties
-
 To Display Print Job Properties To Display Print Job Properties-
- Printers and the Front Panel
-
 To Change the Front Panel Printer To Change the Front Panel Printer-
 To Add a Printer to the Personal Printers Subpanel To Add a Printer to the Personal Printers Subpanel-
- Changing the Print Manager Display
-
 To Change How Printers and Print Jobs Are Displayed To Change How Printers and Print Jobs Are Displayed-
 To Change the Update Frequency To Change the Update Frequency-
 To Determine Which Jobs Are Displayed To Determine Which Jobs Are Displayed-
 To Display the Print Manager Message Line To Display the Print Manager Message Line-
 To Display the Print Manager Problem Flag To Display the Print Manager Problem Flag-
 To Determine Which Printers Are Shown To Determine Which Printers Are Shown-
- Printer Properties
-
 To Show a Printer's Properties To Show a Printer's Properties-
 To Change a Printer's Icon To Change a Printer's Icon-
 To Change a Printer's Icon Label To Change a Printer's Icon Label-
You can easily print files, find or cancel print jobs, and get information about printers and print jobs through the desktop.
Your system may have more than one printer that you can use for printing. One of the printers will be designated as the default printer. The default printer is the printer that your desktop automatically uses if you submit a document for printing and you don't specify a printer name. When you first open your desktop, the default printer is shown in the Front Panel.
To find out how to display a printer other than your default printer in the Front Panel, see "To Change the Front Panel Printer".
 To Determine the Default Printer To Determine the Default Printer
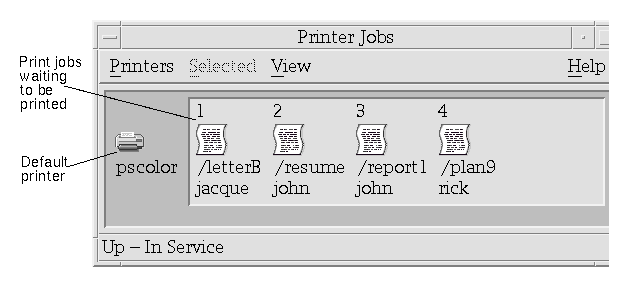
 To find out the name of your default printer, double-click the Default printer control in the Personal Printers subpanel in the Front Panel. To find out the name of your default printer, double-click the Default printer control in the Personal Printers subpanel in the Front Panel.
- This starts the Printer Jobs application. The name under the printer icon is the name of your default printer.
To designate a different printer as the default printer:
- Go to your home folder and open the file .dtprofile.
- Add or edit a line that sets a value for the LPDEST environment variable:
LPDEST=printer_device; export LPDEST
If you are using csh the syntax is:
setenv LPDEST printer_device
Note: This change will take effect the next time you log out and back in again.
For example, the following line would change the default printer to the printer whose device name is laser3d.
LPDEST=laser3d; export LPDEST
If you are using csh the syntax is:
setenv LPDEST laser3d
The desktop can print different types of files, as listed in Table 9-1.
Table 9-1 Types of Data That Can Be Printed (Initial Configuration)
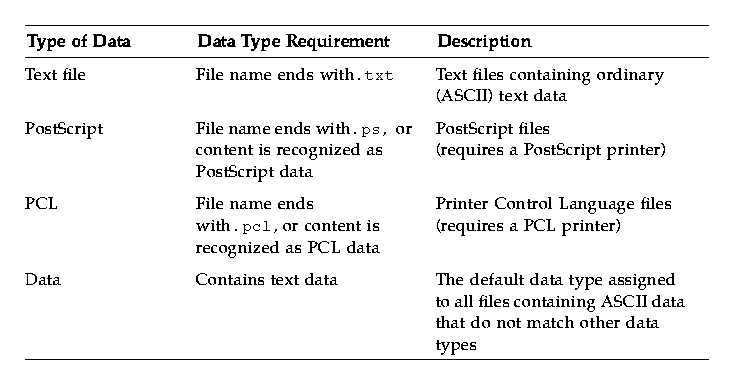
If applications are installed on your system that create other types of files, your system administrator can add printing capabilities for them.
Note: Ensure that your destination printer is capable of printing PostScript or PCL files before you try to print them. or PCL files before you try to print them.
Submitting a File to a Printer
There are many ways to submit a file to a printer:
- Using the Front Panel
- Using File Manager
- Using Print Manager
- Using applications
 To Print Using the Front Panel To Print Using the Front Panel
- Drag a single file or multiple files from File Manager to the Printer control in the Front Panel or to a Printer icon in the Personal Printers subpanel.
The system then displays a Print dialog box for specifying print options. A Print dialog box appears for each file you drag to the Printer control.

Note: pscolor will not show on your system. It is only included as an example of a printer that has been added to a system.
- Optional. Use the text fields in the Print dialog box to set additional print options. (See "Setting Print Options Using the Print Dialog Box".)
- Click OK in the Print dialog box to send the job to the printer.
 To Print Using File Manager To Print Using File Manager
- Select the file in File Manager.
- Choose Print from the Selected menu or the file's pop-up menu.
The system displays a Print dialog box for specifying various print options.
- Optional. Use the text fields in the Print dialog box to set additional print options. (See "Setting Print Options Using the Print Dialog Box".)
- Click OK in the Print dialog box to send the job to the printer.
 To Print Using Print Manager To Print Using Print Manager
- Start Print Manager from the Personal Printers subpanel.
- Drag a file from File Manager to a printer icon in Print Manager.
In Print Manager, you can submit a document by dropping it on a printer icon or into the jobs list area to the right of a printer.
Note: If you submit a job to a printer that is down (flag is showing), it may never be printed even though it appears in the jobs list.
The system displays a Print dialog box for specifying various print options.
- Optional. Use the text fields in the Print dialog box to set additional print options. (See "Setting Print Options Using the Print Dialog Box".)
- Click OK in the Print dialog box to send the job to the printer.
The desktop displays the Print dialog box when you print text, PCL, PostScript, and data files (see Table 9-1).
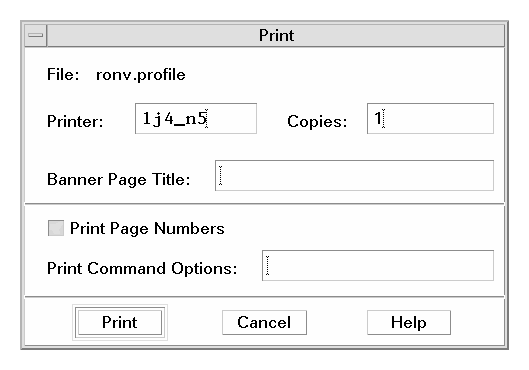
When application data files, such as word processor documents, are submitted for printing, they may display their own unique Print dialog boxes.
Use the Print dialog box to set these print options:
- Printer
- The destination for the print job. The text field initially displays the printer on which you dropped the data file. In this example, the document was dropped on a printer named lj4_n5.
- Copies
- The number of copies to print. The default is 1.
- Banner Page Title
- A title to appear on the banner page. The banner page is a sheet of paper that the printer prints before it prints the first page of your document.
- Print Page Numbers
- Prints page numbers on each page. If page numbering is selected, Print Manager will not display the true name of your document. Instead, the name in the jobs list will be STDIN:XXXXX, where XXXXX is a five-digit number.
- Print Command Options
- Other options that change the way printing is done. See the next section for more details on using this field.
Print Command Options
You can use the Print Command Options text field in the Print dialog box to set other print options. Type the proper lp command flag in the text field for the print option you want to use. To see a list of the lp command flags, type
man lp in a Terminal window.
For example, one of the lp flags is -m. This flag tells the print server to send you a mail message that tells you when it is done printing your document. To use this flag you would type -m in the Print Command Options field of the Print dialog box. Then when your document is done printing, you will see a message appear in your mailbox from the printer.
After you submit a document (print job) for printing, you can use the Print Manager or Printer Jobs applications to find out about the progress of the printing. Printer Jobs gives you information about jobs on a single printer. Print Manager shows all the printers that are on your system.
Print Manager
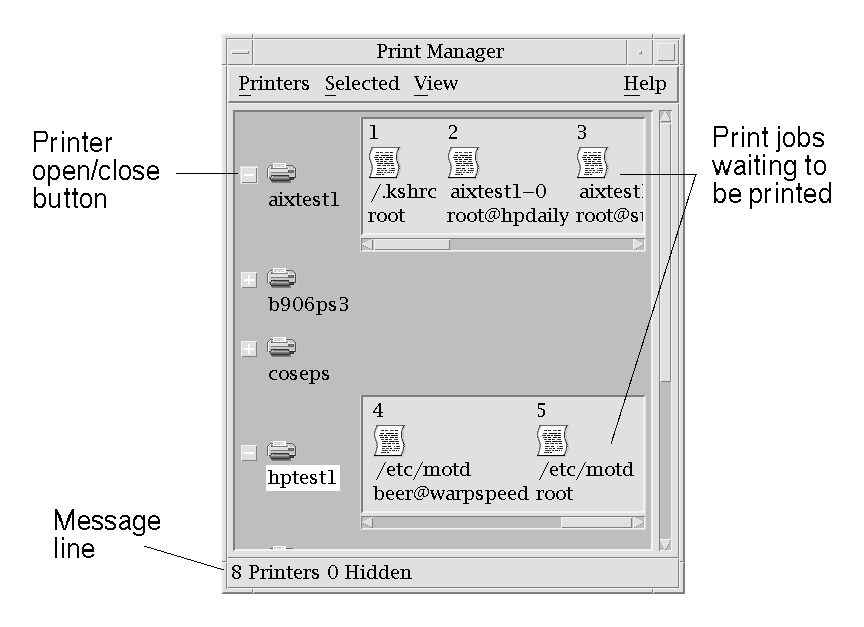
The Print Manager window is shown below. To find out how to modify it, see "Changing the Print Manager Display".
 To Start Print Manager To Start Print Manager
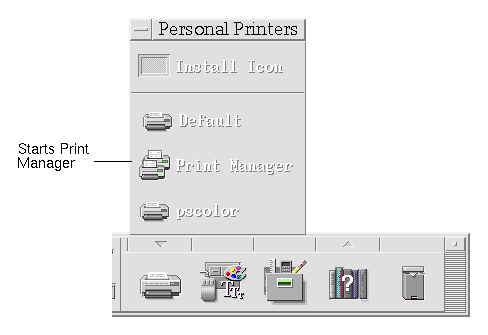
- Click the Print Manager control in the Personal Printers subpanel in the Front Panel.
- Or, double-click the Print Manager icon in the Desktop_Apps group in Application Manager.
Printer Jobs Application
The Printer Jobs application is the application you see when you open a single printer from the Front Panel. The Printer Jobs application is a simplified version of Print Manager that only shows a single printer instead of all the printers on your system. The functions that are available inside Printer Jobs work the same way as they do in Print Manager.
 To Start the Printer Jobs Application To Start the Printer Jobs Application
 Click the Printer control in the Front Panel. Click the Printer control in the Front Panel.
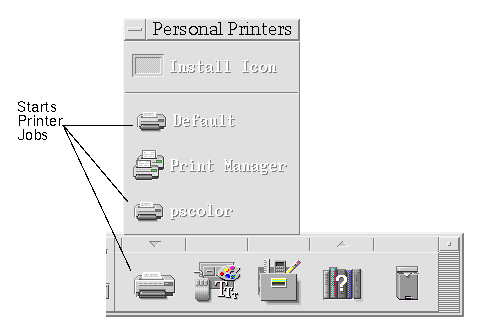
The pscolor printer is only shown in the figure as an example of a printer that has been added to a system. It will not be on your subpanel.
Displaying Print Job Information
Information about the jobs waiting to be printed on a printer is displayed when you open a printer icon. A display area to the right of the printer icon displays an icon for each of the jobs waiting to be printed on it, and each job's position in line, job name, and owner.
 To Open a Printer Icon To Open a Printer Icon
There are three ways to open a printer:
- Click the Open [+] button to the left of the printer icon.
- Select a printer, then choose Open from the Selected menu or from the printer's pop-up menu (displayed by pressing Shift+F10 or mouse button 3).
- Double-click the printer icon.
Note: Your job will not appear in the Print Manager or Printer Jobs window if there are no jobs waiting to be printed when you send your job to the printer.
 To Close a Printer Icon To Close a Printer Icon
Close a printer if you don't want to see the jobs waiting to be printed on it.
- Click the Close [-] button to the left of the printer icon.
- Select a printer, then choose Close from the Selected menu or from the printer's pop-up menu (displayed by pressing Shift+F10 or mouse button 3).
 To Find a Print Job To Find a Print Job
- Choose Find from the Printers menu.
Find is available in Print Manager but not in the Printer Jobs application.
- Type the name of the print job you want to find in the Job Name field.
For example, typing cat will find all jobs that include the fragment "cat" in their name, such as "Catchall" and "catalog," regardless of case.
To find jobs with the name "cat" only, you would select Exact match.
To find only jobs that match your capitalization, deselect Ignore case.
Note: Find only finds print jobs that list you as the owner and it searches all printers, even those that are not currently displayed.
- Click Start Find.
- Once you have found a job, you can go directly to it in Print Manager or cancel it. To go to a found job, select the job and click Goto. To cancel a found job, select it and click Cancel Print Jobs.
 To Cancel a Print Job To Cancel a Print Job
- Select a print job in the Print Manager or Printer Jobs window.
- Choose Cancel from the Selected menu or from the print job's pop-up menu (displayed by pressing Shift+F10 or mouse button 3).
- Click Yes in the confirmation dialog box.
Print Job Properties
The following properties can be displayed for print jobs:
- Job name
- Job owner
- Job number
- Job size
- Time job submitted
- Date job submitted
Note: The term "not available" may appear in some fields to indicate that the print system is not supplying that information.

 To Display Print Job Properties To Display Print Job Properties
- Select a print job.
- Choose Properties from the Selected menu or the print job's pop-up menu (displayed by pressing Shift+F10 or mouse button 3).
The properties are displayed.
Printers and the Front Panel
The printer shown in the Front Panel is usually your default printer. You can change it to another printer, or add a printer to the Personal Printers subpanel.
Note: This does not change your default printer assignment. To find out how to change the default printer, see "To Change the Default Printer".
- Open the Personal Printers subpanel (by clicking the arrow above the Printer control in the Front Panel) and verify that the icon for the printer you want to move to the Front Panel appears.
If the printer is not in the Personal Printers subpanel, add it by following the steps in "To Add a Printer to the Personal Printers Subpanel."
- In the subpanel, point to the printer icon you want to add to the Front Panel and select Put In Main Panel from the icon's pop-up menu (displayed by pressing Shift+F10 or mouse button 3).
To verify that the printer has been changed, double-click the Printer control in the Front Panel and check the name of the icon in the Printer Jobs window that appears.
- Open the Personal Printers subpanel (by clicking the arrow above the Printer control in the Front Panel).
- Start Print Manager.
- Drag a printer icon from the Print Manager window to the Install Icon control in the open subpanel.
This section describes how to change display parameters in Print Manager.
 To Change How Printers and Print Jobs Are Displayed To Change How Printers and Print Jobs Are Displayed
- Choose Set Options from the View menu.
- Select how you want the print jobs represented:
- Large Icon - Displays printers and print jobs as large icons
- Small Icon - Displays printers and print jobs as small icons
- Name Only - Displays printer and print jobs as only text
- Details - Displays job owner, size, job number, and the date and time each job was submitted
- Show Labels - Displays a description of each details row to the left of the job list area
Note: The term "not available" may appear in some fields to indicate that the print server is not supplying that information
- Click OK.
 To Change the Update Frequency To Change the Update Frequency
- Choose Set Options from the View menu.
- Adjust the interval gauge to specify how frequently printers are queried for information about their print jobs. The default is every 30 seconds.
- Click OK.
 To Determine Which Jobs Are Displayed To Determine Which Jobs Are Displayed
- Choose Set Options from the View menu.
- Select which jobs you want shown:
- Only Mine - Displays just your print jobs
- Everyone's - Displays all print jobs
- Click OK.
 To Display the Print Manager Message Line To Display the Print Manager Message Line
- Choose Set Options from the View menu.
- Select Message Line to display a message line at the bottom of the Print Manager window.
The message line shows the number of printers on your system and the number that are currently hidden. It also presents messages telling you when printer updates are being done.
- Click OK.
 To Display the Print Manager Problem Flag To Display the Print Manager Problem Flag
- Choose Set Options from the View menu.
- Select Problem Flag to have a flag icon displayed next to printers when a problem is found with one of them.
For more information on the problem, you can double-click the Flag icon.
- Click OK.
 To Determine Which Printers Are Shown To Determine Which Printers Are Shown
- Choose Modify the Show List from the View menu.
Printers that are visible in the Print Manager window have highlighted names.
- Click a non-highlighted printer to make it visible in the Print Manager window.
Click a highlighted printer to remove it from the main window. You can also use Select All to show all the printers or Deselect All to hide all the printers.
- Click OK.
Printer Properties
The following properties can be displayed:
- Icon label
- Icons
- Description
- Printer queue
- Printer queue status
- Device name
- Device status
 To Show a Printer's Properties To Show a Printer's Properties
- Select a printer in the Print Manager window or the printer in the Printer Jobs window.
- Choose Properties from the Selected menu or from the printer's pop-up menu (displayed by pressing Shift+F10 or mouse button 3).
 To Change a Printer's Icon To Change a Printer's Icon
- Select a printer.
- Choose Properties from the Selected menu or from the printer's pop-up menu (displayed by pressing Shift+F10 or mouse button 3).
- Click Find Set.
- Select the new icon you wish to use.
If the icon you want is not visible, choose another folder from the Icon Folders menu. This dialog box will only display icons that have a complete set of all three sizes.
- After you have selected an icon, click OK.
- Click OK in the Properties dialog box.
 To Change a Printer's Icon Label To Change a Printer's Icon Label
- Select a printer.
- Choose Properties from the Selected menu or from the printer's pop-up menu (displayed by pressing Shift+F10 or mouse button 3).
- Type the new icon label in the Icon Label field.
- Click OK.
    
|


