 |
HP OpenVMS Debugger Manual
10.3.1 Determining Where Execution Is Currently Paused
To determine where execution is currently paused within your program:
- If the current-location pointer is not visible in the main window,
click on the Call Stack menu of that window to display the pointer (see
Figure 10-1).
- Look at the current-location pointer:
- If the pointer is filled in, it marks the source line whose code
will execute next (see Section 10.1). The Call Stack menu always shows
the routine at scope level 0 (where execution is paused) when the
pointer is filled in.
- If the pointer is cleared, the source code displayed is that of a
calling routine, and the pointer marks the source line to which
execution returns in that routine:
- If the Call Stack menu shows level 0, source code is not available
for display for the routine in which execution is paused (see
Section 10.1.3).
- If the Call Stack menu shows a level other than 0, you are
displaying the source code for a calling routine (see Section 10.6.2).
To list the sequence of routine calls that are currently active on the
call stack, click on the Call Stack menu. Level 0 denotes the routine
in which execution is paused, level 1 denotes the calling routine, and
so on.
10.3.2 Starting or Resuming Program Execution
To start program execution or resume execution from the current
location, click on the Go button in the push button view (see
Figure 8-3).
Letting your program run freely without debugger intervention is useful
in situations such as the following:
- To test for an infinite loop. In this case, you start execution;
then, if your program does not terminate and you suspect that it is
looping, click on the Stop button. The main window will show where you
interrupted program execution, and the Call Stack menu will identify
the sequence of routine calls at that point (see Section 10.3.1).
- To execute your program directly to a particular location. In this
case, you first set a breakpoint at the location (see Section 10.4)
and then start execution.
Once started, program execution continues until one of the following
events occurs:
- The program completes execution.
- A breakpoint is reached (including a conditional breakpoint whose
condition is true).
- A watchpoint is triggered.
- An exception is signaled.
- You click on the Stop button on the push button view.
Whenever the debugger suspends execution of the program, the main
window display is updated and the current-location pointer marks which
line of code will execute next.
10.3.3 Executing Your Program One Source Line at a Time
To execute one source line of your program, click on the
STEP button in the push button view or enter the STEP command in the
command view. This debugging technique (called
stepping) is one of the most commonly used.
After the line executes, the source view is updated and the
current-location pointer marks which line of code will execute next.
Note the following points about source lines and the stepping behavior:
- A source line can consist of one or more programming language
elements depending on the language and coding style used.
- When you click on the STEP button, the debugger executes one
executable line and suspends execution at the start of the next
executable line, skipping over any intervening nonexecutable lines.
- Executable lines are those for which instructions were generated
by the compiler (for example, lines with routine call or assignment
statements). Executable lines have a button to their left in the main
window.
- Examples of nonexecutable lines are comment lines or lines with
variable declarations without value assignments. Nonexecutable lines do
not have a button to their left in the main window.
Keep in mind that if you optimized your code at compilation time, the
source code displayed might not reflect the code that is actually
executing (see Section 1.2).
10.3.4 Stepping into a Called Routine
When program execution is paused at a routine call statement, clicking
on the STEP button typically executes the called routine in one step
(depending on the coding style used), and the debugger suspends
execution at the next source line in the calling routine (assuming no
breakpoint was set within the called routine). This enables you to step
through the code quickly without having to trace execution through any
called routines (some of which might be system or library routines).
This is called stepping over called routines.
To step into a called routine so that you can execute it one line at a
time:
- Suspend execution at the routine call statement, for example, by
setting a breakpoint (see Section 10.4) and then clicking on the Go
button in the push button view.
- When execution is paused at the call statement, click on the
S/in button in the push button view, or enter the STEP/INTO command at
the DBG> prompt. This moves execution just past the start of the
called routine.
Once execution is within the called routine, click on the STEP button
to execute the routine line by line.
Clicking on the S/in button when execution is not paused at a routine
call statement is the same as clicking on the STEP button.
10.3.5 Returning from a Called Routine
When execution is suspended within a called routine, you can execute
your program directly to the end of that routine by clicking on the
S/ret button in the push button view, or enter the STEP/RETURN command
at the DBG> prompt.
The debugger suspends execution just before the routine's return
instruction executes. At that point, the routine's call frame has not
been deleted from the call stack, so you can still get the values of
variables local to that routine, and so on.
You can also use the S/call button in the push button view (or enter
the STEP/CALL command at the DBG> prompt) to execute the program
directly to the next Return or Call instruction.
The S/ret button is particularly useful if you have inadvertently
stepped into a system or library routine (see Section 10.1.3).
10.4 Suspending Execution by Setting Breakpoints
A breakpoint is a location in your program at which you want execution
to stop so that you can check the current value of a variable, step
into a routine, and so on.
When using the debugger's HP DECwindows Motif for OpenVMS user interface, you can set
breakpoints on:
- Specific source lines
- Specific routines (functions, subprograms, and so on)
- Exceptions signaled during the execution of your program
Note
If you are stopped at a breakpoint in a routine that has control of the
mouse pointer by a PointerGrab or a KeyboardGrab, your workstation will
hang.
To work around this problem, debug your program using two workstations.
For more information, see Section 9.8.3.1.
|
The debugger provides two ways to qualify breakpoints:
- You can set a conditional breakpoint. The
debugger suspends execution at a conditional breakpoint only when a
specified relational expression is evaluated as true.
- You can set an action breakpoint. The debugger
executes one or more specified system-specific commands when it reaches
the breakpoint.
You can set a breakpoint that is both a conditional and action
breakpoint.
The following sections explain these breakpoint options.
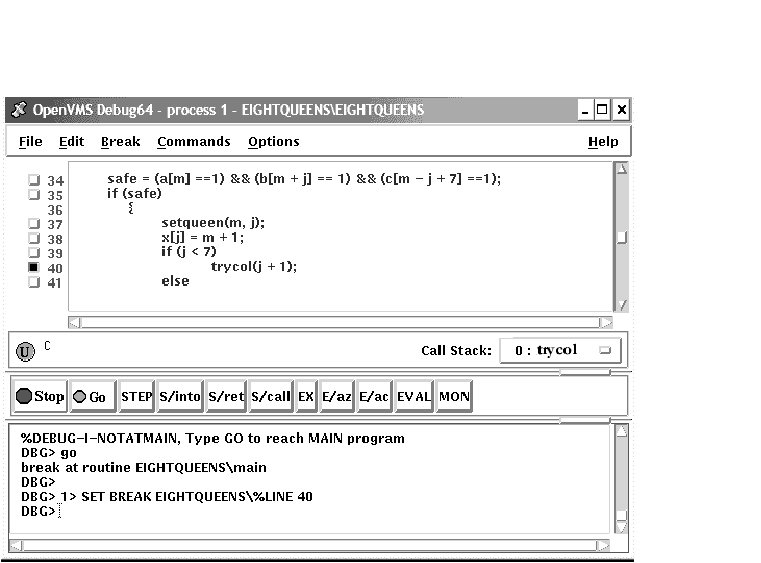
10.4.1 Setting Breakpoints on Source Lines
You can set a breakpoint on any source line that has a button to its
left in the source display. These are the lines for which the compiler
has generated executable code (routine declarations, assignment
statements, and so on).
To set a breakpoint on a source line:
- Find the source line on which you want to set a breakpoint (see
Section 10.1).
- Click on the button to the left of that line. (The breakpoint is
set when the button is filled in.) The breakpoint is set at the start
of the source line---that is, on the first machine-code instruction
associated with that line.
Figure 10-4 shows that a breakpoint has been set on the start of line
37.
Figure 10-4 Setting a Breakpoint on a Source Line
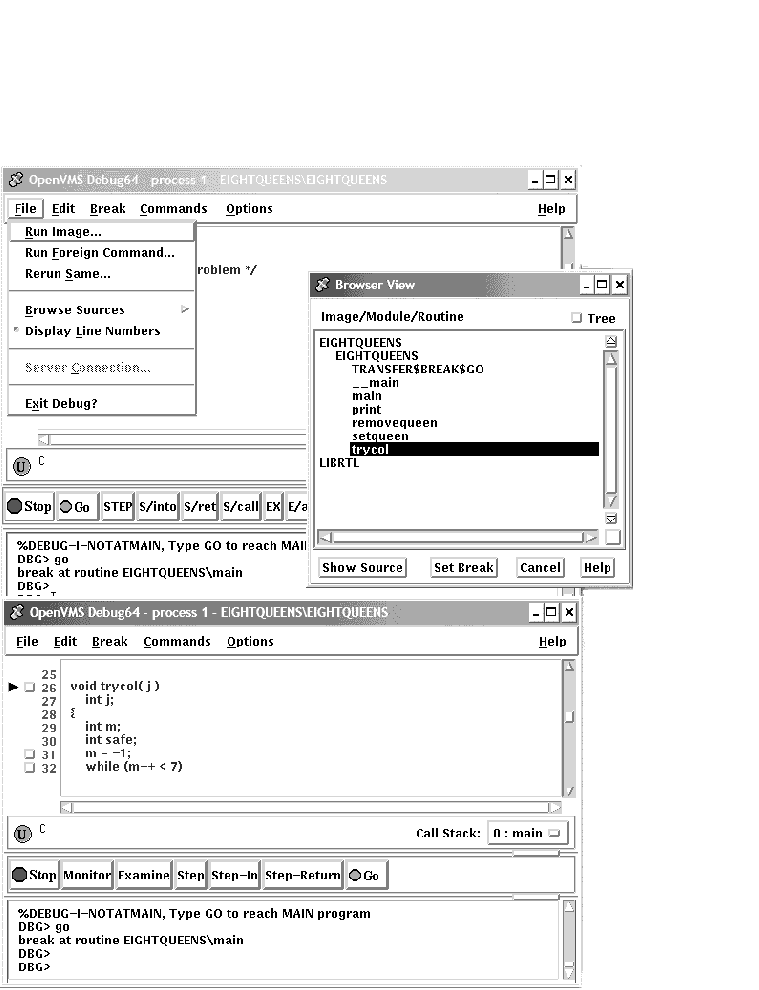
10.4.2 Setting Breakpoints on Routines with Source Browser
Setting a breakpoint on a routine enables you to move execution
directly to the routine and inspect the local environment.
To set a breakpoint on a routine:
- Choose Browse Sources from the File menu on the main window (see
Figure 10-2).
Select SYMBOLIC to display the names of all modules
linked in the image. Select ALL to display the names of only those
modules for which the debugger has symbolic information.
The Source
Browser dialog box displays the name of your executable image, which is
highlighted, and the class of shareable images linked with it (SYMBOLIC
or ALL). The name of a linked image is dimmed if no symbolic
information is available for that image.
- Double click on the name of the executable image. The names of the
modules in that image are displayed (indented) under the image name.
- Double click on the name of the target module. The names of the
routines in that module are displayed (indented) under the module name
(see Figure 10-5).
- Double click on the name of the routine on which to set a
breakpoint. The debugger echoes the results of your SET BREAKPOINT
command on the command line in the command view.
Alternatively, click once on the name of the routine, then click
the Set Breakpoint button in the Source Browser view. The debugger
echoes the results of your SET BREAKPOINT command on the command line
in the command view.
Figure 10-5 Setting a Breakpoint on a Routine
10.4.3 Setting an Exception Breakpoint
An exception breakpoint suspends execution when an
exception is signaled and before any exception handler declared by your
program executes. This enables you to step into the exception handler
(if one is available) to check the flow of control.
To set an exception breakpoint, choose On Exception from the Break menu
on the main window or the optional views window.
10.4.4 Identifying the Currently Set Breakpoints
There are three ways to determine which breakpoints are currently set:
- Scroll through your source code and note the lines whose
breakpoint button is filled in. This method can be time consuming and
also does not show which breakpoints were set and then deactivated (see
Section 10.4.5).
- Choose Views... from the Options menu on the main window or the
optional views window. When the Views dialog box appears, click on
Breakpoint View to display the breakpoint view (see Figure 8-4).
The breakpoint view lists a module name and line number for each
breakpoint (see Section 10.1). A filled-in button next to the
breakpoint identification indicates that the breakpoint is activated. A
cleared button indicates that the breakpoint is deactivated.
- Enter the SHOW BREAK command at the DBG> prompt in the command
view. The debugger lists all the breakpoints that are currently set,
including specifications for conditional breakpoints, and commands to
be executed at action breakpoints.
10.4.5 Deactivating, Activating, and Canceling Breakpoints
After a breakpoint is set, you can deactivate, activate, or
delete it.
Deactivating a breakpoint causes the debugger to ignore the breakpoint
during program execution. However, the debugger keeps the breakpoint
listed in the breakpoint view so that you can activate it at a later
time, for example, when you rerun the program (see Section 9.3). Note
the following points:
- To deactivate a specific breakpoint, clear the button for that
breakpoint in the main window or in the breakpoint view.
In the
breakpoint view, you can also choose Toggle from the Break menu, if the
breakpoint is currently activated.
- To deactivate all breakpoints, choose Deactivate All from the
Break menu.
Activating a breakpoint causes it to take effect during program
execution:
- To activate a breakpoint, fill in the button for that breakpoint
in the main window or in the breakpoint view.
In the breakpoint
view, you can also choose Toggle from the Break menu, if the breakpoint
is currently deactivated.
- To activate all breakpoints, choose Activate All from the Break
menu.
When you cancel a breakpoint, it is no longer listed in the breakpoint
view so that later you cannot activate it from that list. You have to
reset the breakpoint as explained in Section 10.4.1 and Section 10.4.2.
Note the following points:
- To cancel a specific breakpoint, choose Cancel from the Break menu
on the optional views window.
- To cancel all breakpoints, choose Cancel All from the Break menu.
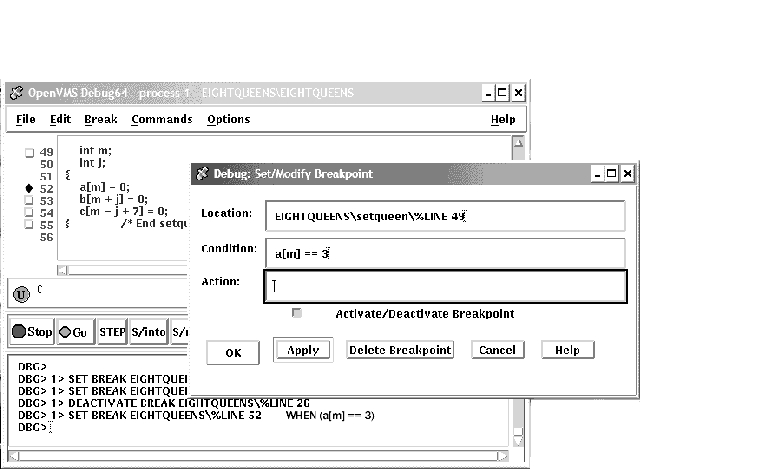
10.4.6 Setting a Conditional Breakpoint
The debugger suspends execution of the program at a conditional
breakpoint only when a specified expression is evaluated as true. The
debugger evaluates the conditional expression when program execution
reaches the breakpoint and ignores the breakpoint if the expression is
not true.
The following procedure sets a conditional breakpoint, whether or not a
breakpoint was previously set at that location:
- Display the source line on which you want to set the conditional
breakpoint (see Section 10.1).
- Do one of the following:
- Press Ctrl/MB1 on the button to the left of the source line. This
displays the Set/Modify Breakpoint dialog box, showing the source line
you selected in the Location: field (see Figure 10-6).
- Choose the Set or Set/Modify item from the Break menu. When the
Set/Modify Breakpoint dialog box displays, enter the source line in the
Location: field.
- Enter a relational expression in the Condition: field of the
dialog box. The expression must be valid in the source language. For
example, a[3] == 0 is a valid relational expression in the C
language.
- Click on OK. The conditional breakpoint is now set. The debugger
indicates that a breakpoint is conditional by changing the shape of the
breakpoint's button from a square to a diamond.
Figure 10-6 Setting a Conditional Breakpoint
The following procedure modifies a conditional breakpoint; that is, it
can be used either to change the location or condition associated with
an existing conditional breakpoint, or to change an unqualified
breakpoint into a conditional breakpoint:
- Choose Views... from the Options menu on the main window or
optional views window. When the Views dialog box appears, click on
Breakpoint View to display the breakpoint view.
- From the breakpoint view, do one of the following:
- Press Ctrl/MB1 on the button to the left of the listed breakpoint.
- Click on a breakpoint listed in the view, and choose the Set/Modify
item from the Break menu.
- Follow steps 3 and 4 of the previous procedure, as appropriate.
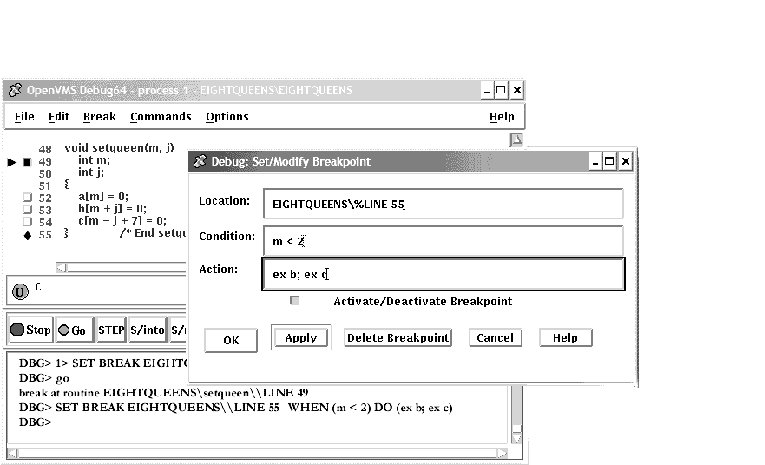
10.4.7 Setting an Action Breakpoint
When a program reaches an action breakpoint, the debugger suspends
execution of the program and executes a specified list of commands.
To set an action breakpoint, whether or not a breakpoint was previously
set at that location:
- Display the source line on which you want to set the action
breakpoint (see Section 10.1).
- Do one of the following:
- Press Ctrl/MB1 on the button to the left of the source line. This
displays the Set/Modify Breakpoint dialog box, showing the source line
you selected in the Location: field (see Figure 10-6).
- Choose the Set or Set/Modify item from the Break menu. When the
Set/Modify Breakpoint dialog box displays, enter the source line in the
Location: field.
- Enter one or more debugger commands in the Action: field of the
dialog box. For example:
DEPOSIT x[j] = 3; STEP; EXAMINE a
- Click on OK. The action breakpoint is now set (see Figure 10-7.)
Figure 10-7 Setting an Action Breakpoint
The following procedure modifies an action breakpoint; that is, it can
be used either to change the location or command associated with an
existing action breakpoint, or to change an unqualified breakpoint into
an action breakpoint:
- Choose Views... from the Options menu on the main window or
optional views window, then click on Breakpoint View when the Views
dialog box appears.
- From the breakpoint view, do one of the following:
- Press Ctrl/MB1 on the button to the left of the listed breakpoint.
- Click on a breakpoint listed in the view, and choose the Set/Modify
item in the Break menu.
- Follow steps 3 and 4 of the previous procedure, as appropriate.
10.5 Examining and Manipulating Variables
This section explains how to:
- Select variable names from windows
- Display the value of a variable
- Monitor a variable
- Watch a variable
- Change the value of a variable
See Section 10.6, which also applies to all operations on variables.
10.5.1 Selecting Variable Names from Windows
Use the following techniques to select variable names from windows for
the operations described in the sections that follow (see Section 10.5.2
for examples).
When selecting names, follow the syntax of the source programming
language:
- To specify a scalar (nonaggregate) variable, such as an integer,
real, Boolean, or enumeration type, select the variable's name.
- To specify an entire aggregate, such as an array or structure
(record), select the variable's name.
- To specify a single element of an aggregate variable, select the
entity using the language syntax. For example:
- The string
arr2[7]
specifies element 7 of array
arr2
in the C language.
- The string
employee.address
specifies component
address
of record (structure)
employee
in the Pascal language.
- To specify the object designated by a pointer variable, select the
entity following the language syntax. For example, in the C language,
the string
*int_point
specifies the object designated by pointer
int_point
.
Select character strings from windows as follows:
- In any window, to select a string delimited by blank spaces, use
the standard HP DECwindows Motif for OpenVMS word selection technique: position the
pointer on that string and then double click MB1.
- In any window, to select an arbitrary character string, use the
standard HP DECwindows Motif for OpenVMS text-selection technique: position the pointer
on the first character, press and hold MB1 while dragging the pointer
over the string and then release MB1.
- In the debugger source display, you also have the option of using
language-sensitive text selection. To select a string delimited by
language-dependent identifier boundaries, position the pointer on that
string and press
Ctrl/MB1.
For example, suppose the source display contains the
character string
arr2[m]
, then:
- To select
arr2
, position the pointer on
arr2
and press Ctrl/MB1.
- To select
m
, position the pointer on
m
and press Ctrl/MB1.
You can change the key sequence for language-sensitive text
selection as explained in Section 10.10.4.2.
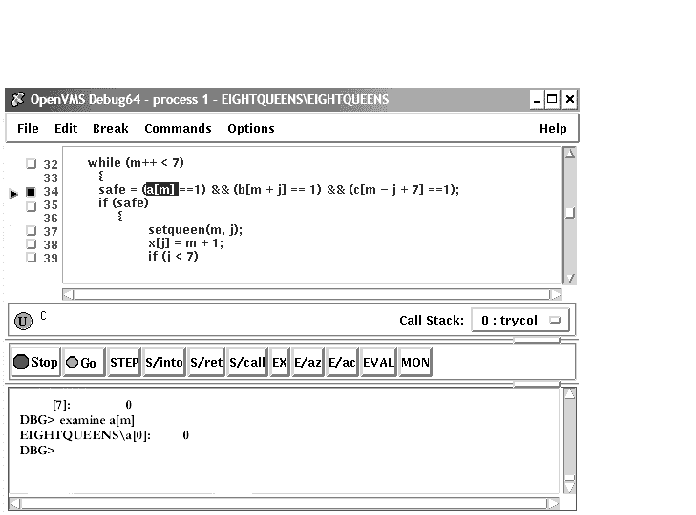
10.5.2 Displaying the Current Value of a Variable
To display the current value of a variable:
- Find and select the variable name in a window as explained in
Section 10.5.1.
- Click on the
EX button in the push button view. The debugger displays the variable
and its current value in the command view. The debugger displays the
value of a variable in the current scope, which might not be the same
as the source location you were intending.
Figure 10-8, Figure 10-9, and Figure 10-10 show how to display the
value of an integer variable, array aggregate, and array element,
respectively.
Figure 10-8 Displaying the Value of an Integer Variable
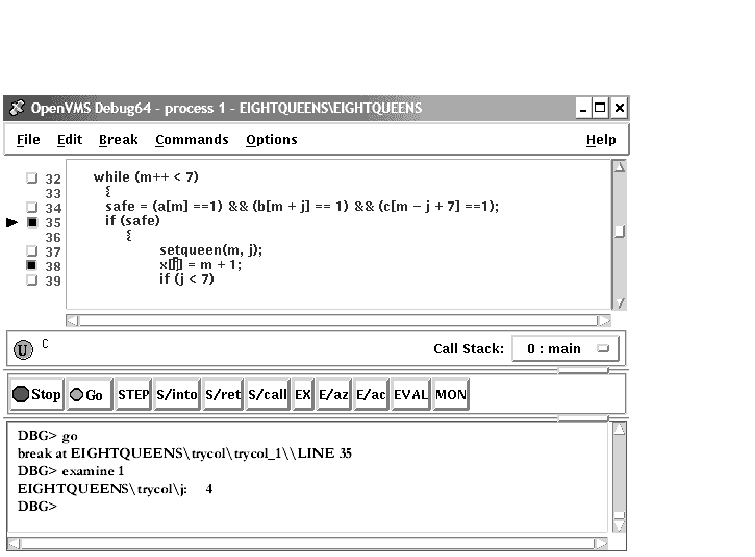
Figure 10-9 Displaying the Value of an Array Aggregate
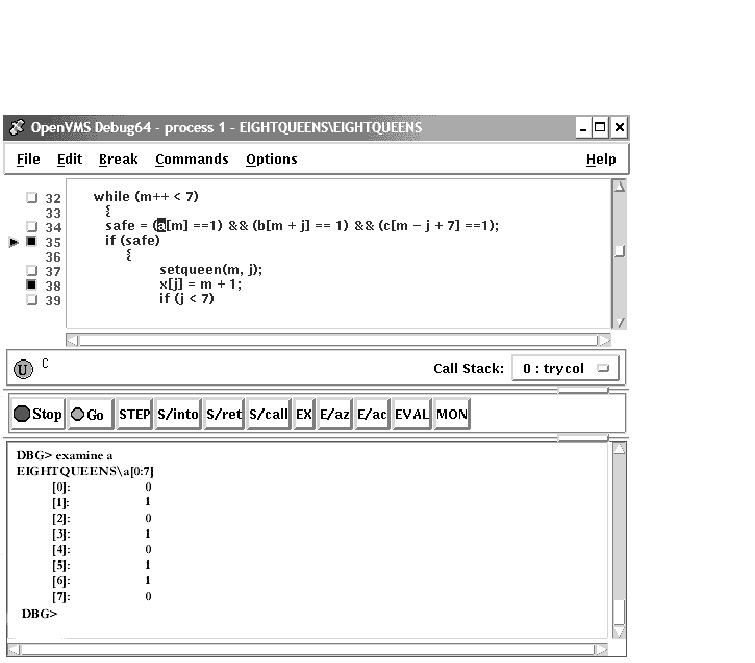
Figure 10-10 Displaying the Value of an Array Element
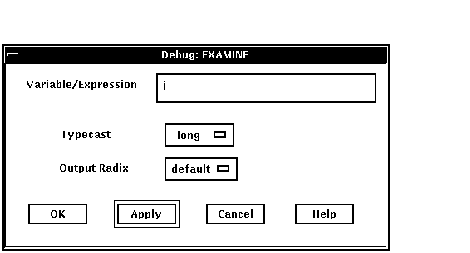
To display the current value in a different type or radix, use the
following alternative method:
- Find and select the variable name in a window as explained in
Section 10.5.1.
- Choose Examine... in the Commands menu in the main window. The
Examine dialog box appears with the name selected in the
Variable/Expression field.
- Choose the default, int, long, quad, short, or char* item from the
Typecast menu within the dialog box.
- Choose the default, hex, octal, decimal, or binary item from the
Output Radix menu within the dialog box.
- Click on OK.
The value, altered to your specification, appears in the command view.
Figure 10-11 shows that the variable j has been typecast as long.
Figure 10-11 Typecasting the Value of a Variable
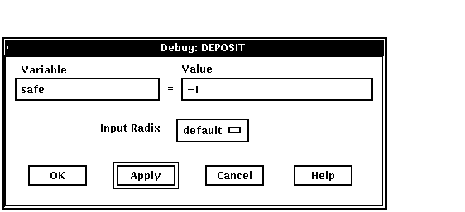
10.5.3 Changing the Current Value of a Variable
To change the current value of a variable:
- Find and select the variable name in a window as explained in
Section 10.5.1.
- Choose Deposit... from the Commands menu in the main window. The
Deposit dialog box appears with the name selected in the Variable field.
- Enter the new value in the Value field.
- Choose the default, hex, octal, decimal, or binary item from the
Input Radix menu within the dialog box.
- Click on OK.
The new value, altered to your specification, appears in the command
view and is assigned to the variable.
Figure 10-12 shows a new value for the variable safe.
Figure 10-12 Changing the Value of a Variable
|