HP OpenVMS Systems Documentation |
HP COBOL
|
| Previous | Contents | Index |
The Report Section in the Data Division provides specific information about the reports that are specified with the REPORT clause. Each report named in the Data Division File Section also must be defined in the Report Section.
To define a report, use a Report Description (RD) entry followed by one or more Report Group Description entries (01-level) in the Report Section. For example:
FILE SECTION.

FD  SALES-REPORT
    REPORT IS MASTER-LIST.
    .
    .
    .
REPORT SECTION.

RD  MASTER-LIST
    PAGE LIMIT IS   66
      HEADING        1
      FIRST DETAIL  13
      LAST DETAIL   30
      FOOTING       50.
|
The RD supplies information about the format of the printed page and
the organization of the subdivisions (see Section 10.8.4).
10.8.3 Defining a Report Writer Logical Page with the PAGE Clause
To define the logical page for a Report Writer report, you use the PAGE clause. This clause enables you to specify the number of lines on a page and the format of that page. For example, the PAGE clause allows you to specify where the heading, detail, and footing appear on the printed page. If you want to use vertical formatting, you must use the PAGE clause.
The RD entry example in Section 10.8.2 contains the following PAGE clause information:
| RD Entry Line | Meaning | |
|---|---|---|
| PAGE LIMIT IS | 66 | Maximum number of lines per page is 66 |
| HEADING | 1 | Line number on which the first report heading (RH) or page heading (PH) should print on each page |
| FIRST DETAIL | 13 | First line number on which a control heading (CH), detail (DE), or control footing (CF) should print on a page |
| LAST DETAIL | 30 | Last line number on which a CH or DE can print on a page |
| FOOTING | 50 | Last line number on which a control footing (CF) can print on a page (if specified, page footing (PF) and report footing (RF) report groups follow the line number shown in FOOTING) |
The PAGE LIMIT clause line numbers are in ascending order and must not exceed the number specified in the PAGE LIMIT clause (in this example, 66 lines).
Section 10.8.4 describes report group entries in more detail.
10.8.4 Describing Report Group Description Entries
In a Report Writer program, report groups are the basic elements that make up the logical page. There are seven types of report groups, which consist of one or more report lines printed as a complete unit (for example, a page heading). Each report line can be subdivided into data items or fields.
Table 10-1 lists the seven types of report groups:
| Report Group Type | Description |
|---|---|
| REPORT HEADING | Prints a title or any other information that pertains to the entire report |
| PAGE HEADING | Prints a page heading and column headings |
| CONTROL HEADING | Prints a heading when a control break occurs |
| DETAIL | Prints the primary data of the report |
| CONTROL FOOTING | Prints totals when a control break occurs |
| PAGE FOOTING | Prints totals or comments at the bottom of each page |
| REPORT FOOTING | Prints trailer information for the report |
A Report Writer program can include both printable report groups and null report groups. Null report groups are groups that do not print but are used for control breaks.
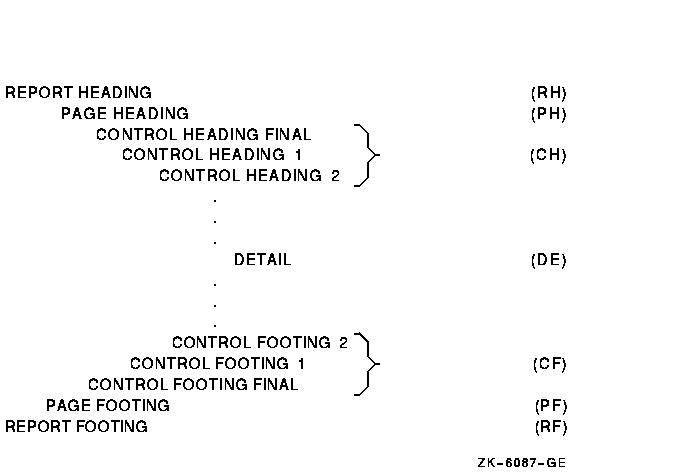
Figure 10-9 shows the report group presentation order found on a logical page. You must code at least one DETAIL report group (printable or null) in your program to produce a report. All other report groups are optional. Note that you can code a report group by using the abbreviations shown in Figure 10-9.
Figure 10-9 Presentation Order for a Logical Page

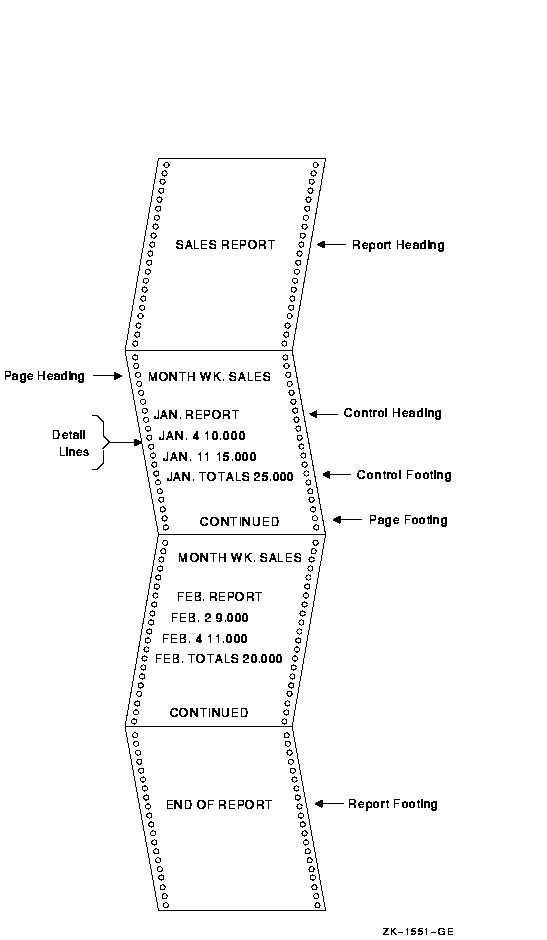
Figure 10-10 shows a report that uses all seven of the report groups listed in the preceding table.
Figure 10-10 Sample Report Using All Seven Report Groups

To code report groups, you use an 01-level entry to describe the physical and logical characteristics of the report group and the Report Writer TYPE clause to indicate the type of the report group. The TYPE clause can be preceded by a user-defined report group name. The CONTROL HEADING and FOOTING report groups use data names that are also specified as CONTROL clause names in the Report Description entry (see Section 10.8.10 for CONTROL clause information).
The following example shows how to use the TYPE and CONTROL clauses:
DATA DIVISION. REPORT SECTION. 01 REPORT-HEADER TYPE IS REPORT HEADING. 01 PAGE-HEADER TYPE IS PAGE HEADING. 01 CONTROL-HEADER TYPE IS CONTROL HEADING CONTROL-NAME-1. 01 DETAIL-LINE TYPE IS DETAIL. 01 CONTROL-FOOTER TYPE IS CONTROL FOOTING CONTROL-NAME-2. 01 PAGE-FOOTER TYPE IS PAGE FOOTING. 01 REPORT-FOOTER TYPE IS REPORT FOOTING. |
You use the LINE clause for positioning vertical lines within a report group or for indicating vertical line space between two report groups. The LINE clause indicates the start of an absolute print line (a specific line on a page) or where a relative print line (an increment to the last line printed) is to print on the page. You can use this clause with all report groups.
In the following example, the LINE clause indicates that this report group begins on absolute line number 5 on a page. LINE IS 7 indicates that this report group has a second line of data found on absolute line number 7. Absolute line numbers must be specified in ascending order.
01   PAGE-HEADER TYPE IS PAGE HEADING.
     02  LINE IS 5.
     .
     .
     .
     02  LINE IS 7.
|
In the following example the term PLUS in the LINE clause indicates that DETAIL-LINE prints two lines after the last line of the previous report group. If you used a CONTROL HEADING report group that ended on line 20 before DETAIL-LINE, then DETAIL-LINE would print beginning on line 22.
01   DETAIL-LINE TYPE IS DETAIL.
     02  LINE PLUS 2.
|
In the following example the LINE clause specifies that the REPORT FOOTING report group prints on line 32 of the next page:
01  REPORT-FOOTER TYPE IS REPORT FOOTING.
    02  LINE IS 32 ON NEXT PAGE.
|
You can code NEXT PAGE only for CONTROL HEADING, DETAIL, CONTROL FOOTING, and REPORT FOOTING groups, and only in the first LINE clause in that report group entry.
Within the report group, absolute line numbers must be in ascending order (although not consecutive) and must precede all relative line numbers.
You can use the NEXT GROUP clause instead of the LINE clause to control line spacing. In NEXT GROUP clause, you specify the amount of vertical line space you want following one report group and before the next. You use this clause in the report group that will have the space following it, as shown in the following example:
01    CONTROL-HEADER TYPE IS CONTROL HEADING CONTROL-NAME-1
      NEXT GROUP PLUS 4.

01    DETAIL-LINE TYPE IS DETAIL.
|
This example indicates relative line use. The report group (DETAIL) immediately following this CONTROL HEADING report group will print on the fourth line after the CH's last print line.
You can also specify absolute line spacing with the NEXT GROUP clause. An absolute line example---NEXT GROUP IS 10---places the next report group on line 10 of the page. In addition you can use NEXT GROUP NEXT PAGE, which causes a page-eject to occur before the NEXT GROUP report group prints.
NEXT GROUP can be coded only for REPORT HEADING, CONTROL HEADING, DETAIL, CONTROL FOOTING, and PAGE FOOTING report groups, and only at the 01 level.
A PAGE FOOTING report group must not specify the NEXT PAGE phrase of the NEXT GROUP clause.
Both the LINE and NEXT GROUP clauses must adhere to the page parameters specified in the PAGE clause in the RD entry.
In addition, the Report Writer facility keeps track of the number of lines printed or skipped on each page by using the LINE-COUNTER, which references a special register that the compiler generates for each Report Description entry in the Report Section. The Report Writer facility maintains the value of LINE-COUNTER and uses this value to determine the vertical positioning of a report.
| Previous | Next | Contents | Index |