|
 Once you have chosen
a network connection for your home
computers, you're ready to capitalize on sharing
resources over your network. You can share and swap
files between your network computers, and, best of all,
use your fastest printer for your entire network. Once you have chosen
a network connection for your home
computers, you're ready to capitalize on sharing
resources over your network. You can share and swap
files between your network computers, and, best of all,
use your fastest printer for your entire network.
There are a few steps to take
before you can start routing all your print jobs to your
high-performance printer. Irrespective of the
home network hardware device you have purchased, your computers must
be set up for Client for Microsoft Windows, which is a
piece of software designed for networks. Your Windows 98
Second Edition computer comes with this installed.
Since you have likely chosen to
install Windows 98 Second Edition on the newest computer
at home, you may also want to have the best printer
plugged into it, though this is not a requirement to
share a printer over your home network.
To set up Client for Windows on your host computer:
- Click Start, Settings, Control Panel.
- Click Network.
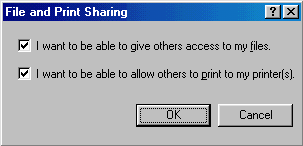
- On the Configuration tab, click File and Print
Sharing.
- Select the check box, I want to be able to
give others access to my files and I want to be able to allow
others to print to my printer.
- Click OK.

Or you can get to the configuration tab by right-clicking Network Neighborhood from the control panel.
Set up another computer
To set up print-sharing on your other network computer(s):
- Click Start, Settings, Printers.
- Click Add Printer, which launches the Add Printer Wizard.
- Click Next.
- Select Network Printer and click Next.
To allow your computer to find
the shared printer, you must specify its location. Click Browse if you are
unsure, then select the designated printer.
An icon of a hand appears under a
printer after it becomes shared.
Note: For networks to function, all
linked computers must be identified separately. If you
have not previously given your computer a name (you can
call it literally anything), here's how to do so:
- Click Start, Settings, Control Panel
- Click the Network icon
- Select the Identification tab. Enter a name in the box.
If you choose, enter the other information (workgroup
and a description of the computer, such as Pentium
II) but this is not required.
More than one
You can set up more than one
printer to be shared on your home network. Simply repeat
the steps described above. You can also set one printer
as your default printer. To specify the default
printer:
- Click Start, point to Settings, and then
click Printers.
- Right-click the icon for
the printer you want to use as the default printer.
- Click Set As Default.
If there is a check mark next to this command,
the printer is set as the default printer.
Once you're wired together in a
network, everyone in the household gets to enjoy the
benefits of your sharpest and fastest printer.

Gordon Black has concluded his printer at home is nearing
retirement.
|
What kind of computer do I need for a network?
At least one of your computers
must run Windows 98 Second Edition. But the other
machines in your home network can run Windows 98,
Windows 95, Windows for Workgroups, even Macintoshes.
For this article we will assume that the printer you
want to share on the network is plugged into the
computer running Windows 98 Second Edition, which is the
host machine on your network. If all the computers on
your network are running Windows 98 Second Edition, any
one of them will work as the host
computer.
|
