HP OpenVMS Systems Documentation |
Using DECwindows Motif for OpenVMS
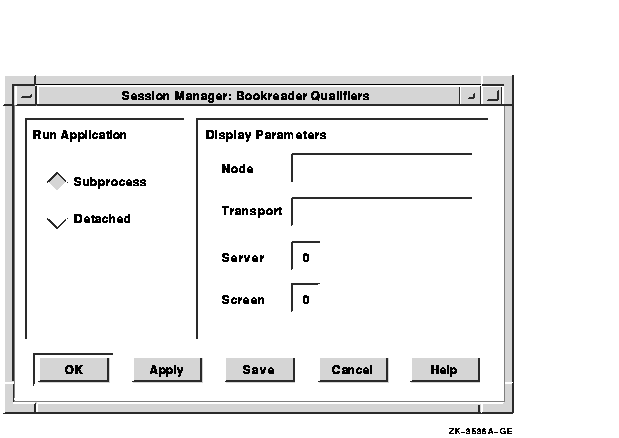
4.4.2 Using Advanced Print SettingsClick on the Options... button in the Print dialog box to display another print dialog box that lets you specify advanced print settings for your print job.
Some of these settings, including File Start Sheet and Message Log,
correspond to qualifiers available from the DCL command PRINT. See the
description of the DCL command PRINT in the OpenVMS DCL Dictionary for more
information. Other settings, including Sides and Layup Definition,
correspond to options available on certain PostScript printers. See the
manual for your printer for more information about specifying these
settings.
Many applications let you change default colors by choosing your own colors. If an application provides this option, it displays a color mixing dialog box when you choose certain settings.
This section describes color mixing dialog boxes and explains how to
use them to specify your own colors.
The color mixer offers the following color models for selecting and defining colors:
You can use each of these models alone, or you can use them in any combination. For example, you can use any color model to select a color and use the Picker Color Model to blend the selected color.
The following subsections describe how to use each of the color models
to choose your own colors.
The Picker is the default color model for the color mixer. It contains the following components: 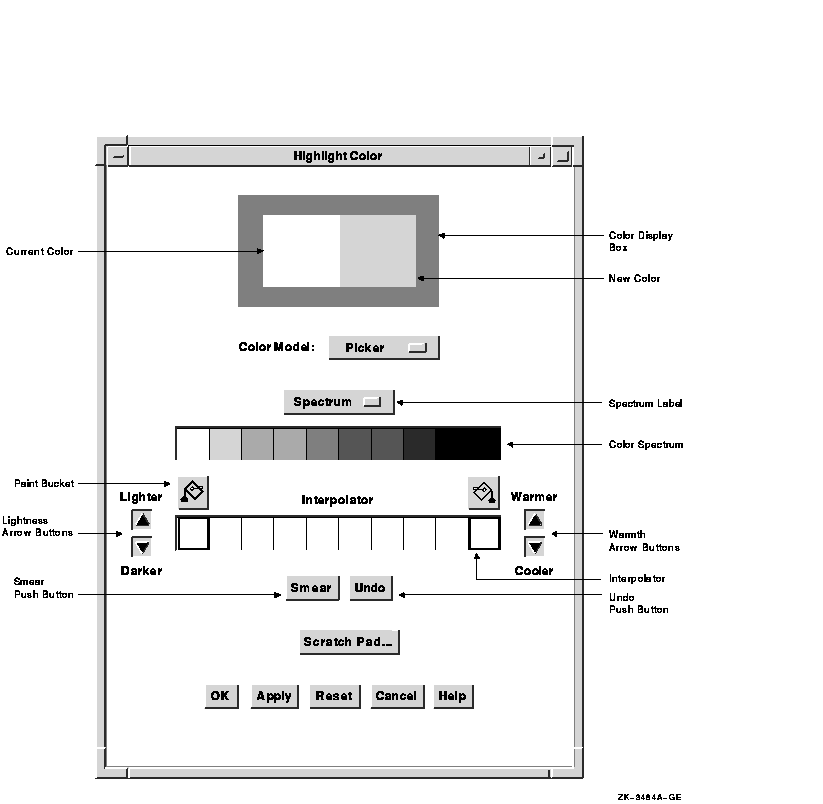
The color display box displays colors as you mix them. The color spectrum is a static collection of colors. The Spectrum options menu lets you set the spectrum to one of the following common color palettes:
The four color palettes provide a wide variety of colors from which you can choose. The Spectrum options menu also includes any palettes specific to an application. When you click MB1 on a spectrum tile or interpolator tile, that color becomes the new color. The tile also becomes highlighted, identifying it as the currently selected color. You can use the selected color without modification, or you can do one or more of the following tasks:
Use the two paint buckets to load the interpolator with the colors to smear:
As an alternative to the paint buckets, you can use the eyedropper to load the interpolator. Clicking and holding MB1 on a spectrum or interpolator tile, the original color tile, or the new color tile causes the pointer to become an eyedropper filled with the color of that tile. You can move this eyedropper to the interpolator and use it to fill one of the two end tiles by clicking MB1 on one of the tiles. If you do not position the eyedropper directly on one of the two end tiles, the tile closest to the end is filled with the eyedropper color. Note that the cursor must be inside the interpolator.
Use the Undo button to reverse the last interpolator action, which can
be a smear, the filling of an end tile, or the activation of one of the
warmth or lightness adjustment buttons.
In the Hue, Lightness, Saturation (HLS) color model, you specify a color by three characteristics: hue, lightness, and saturation.
The HLS color model contains three scales that represent the ranges of hue, lightness, and saturation. 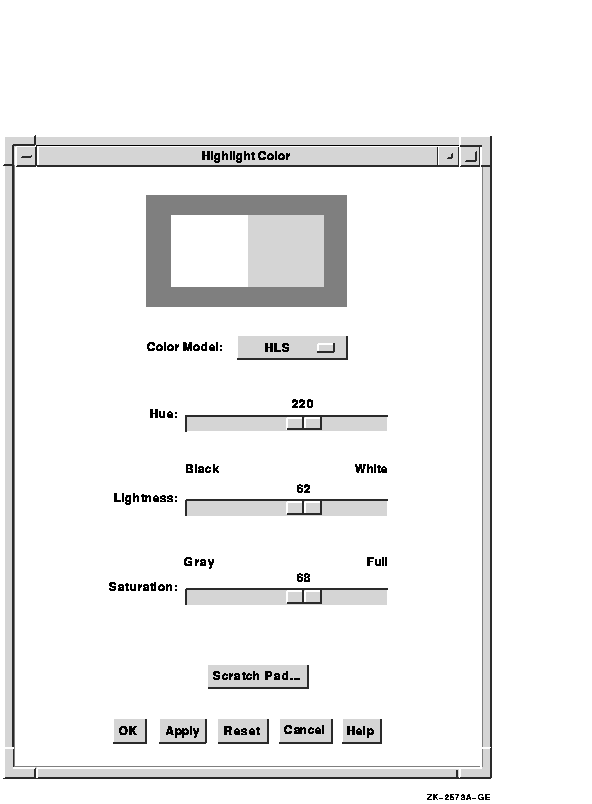
4.5.1.3 Red, Green, Blue Color ModelIn the RGB color model, you specify a color as a mixture of different intensities of red, green, and blue. The RGB color model contains three scales that represent the ranges of intensity of red, green, and blue. 
The RGB color model is the default color model on monochrome systems.
The Browser color model is a scrolled window that displays a list of X11 named colors. Each button in the scrolled window shows the name of an X11 color. Use the scroll bar to scroll through this color list. When you click MB1 on a color in the list, the color display box becomes filled with that color. 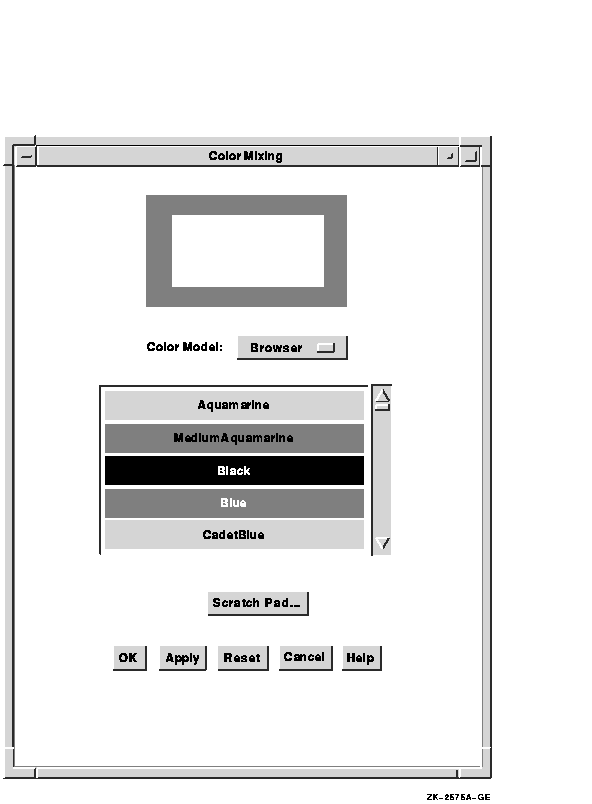
The color browser is available on all systems.
The Greyscale color model contains a scale that lets you mix gray shades ranging from black to white. Note that switching to the Greyscale color model converts the current new color to gray. 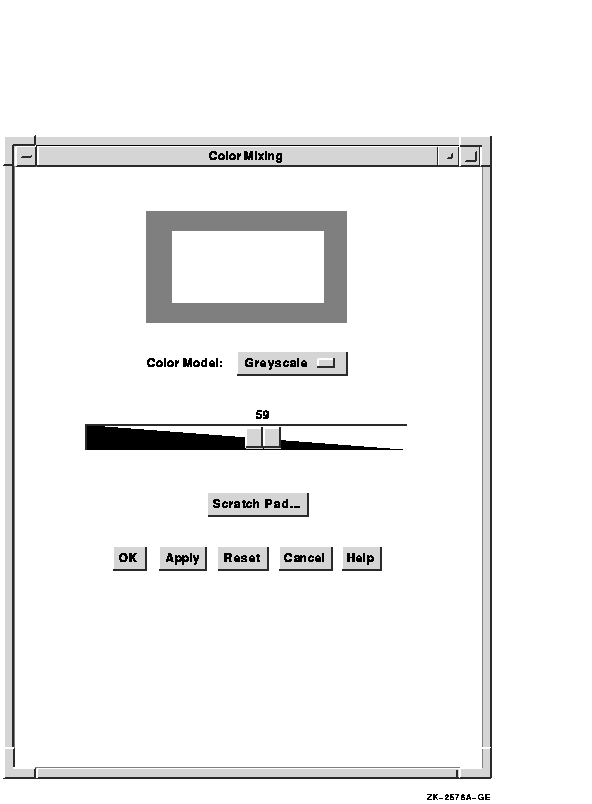
4.5.2 Scratch PadThe scratch pad lets you store intermediate colors for later use in color mixing. To access the scratch pad, click on the scratch pad button in any of the color models. 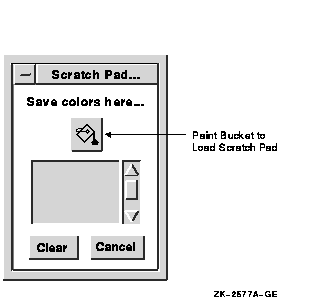
To store the currently selected color in the scratch pad, click on the paint bucket above the scratch pad color tile. The scratch pad adds that color to its list of stored colors. You can scroll through the list with the scroll bar. Use the Clear button to cancel this list and return the scratch pad to its initial state. Note that the currently selected color can be one of many color tiles on the Picker model. When using other color models, however, you can select only the new and original color tiles. To set the new color tile to a scratch pad color, scroll to the new color and click on the scratch pad color tile. The new color tile changes, and the scratch pad tile is highlighted. In the Picker model, this highlighting indicates that the scratch pad color can now be dumped into one of the interpolator end tiles by using the paint bucket buttons.
Chapter 5
|
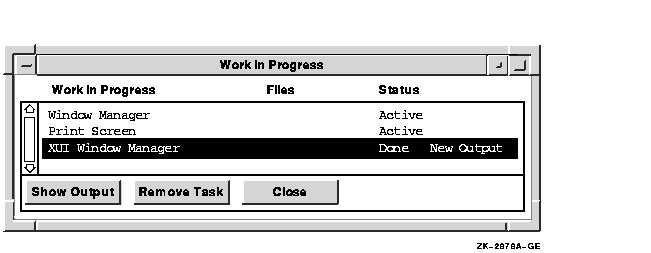
| Status | Meaning |
|---|---|
| Starting | Application is starting but is not yet displayed. |
| Active | Task is currently executing. |
| Pending | Task cannot execute because you have exceeded the number of tasks---called subprocesses---you are allowed to execute. If several other tasks are executing, this status changes to Active when those tasks are completed. |
| Error | FileView cannot execute the task successfully. |
| Done | Task is complete. |
| Stopped | Task has been requested to exit, but it is not terminated. When the task stops, Session Manager removes the task entry in the Work in Progress box, unless the task produces output. |
| Show Output | Task has produced output. To display task output, click on the Show Output button. |
To cancel a task while it is pending or executing, select it in the
Work in Progress dialog box and click on the Stop Task button. If the
task does not respond immediately, it will be put in the stopped state.
To remove a task entry that is stopped, click on the Remove Task button.
5.3.2 Looking at Task Output
If you use an application that produces output, the Show Output button in the Work in Progress dialog box is not dimmed. To display task output, click on the Show Output button. Session Manager opens a Task Output window.
If an application fails to start or terminates unexpectedly, you can use task output windows to read application error messages. |
Logical names let you give frequently used files, directories, and devices meaningful names that are easier to remember and type than the full file specifications. For example, you can define WORK as a logical name for your device DUA0, or STAFF as a logical name for the file specification $USERS:[JONES.STAFF].
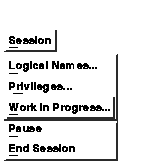
This section describes how to use Session Manager to define logical names. For more information about how you can use logical names, see Appendix B.
To define a logical name:
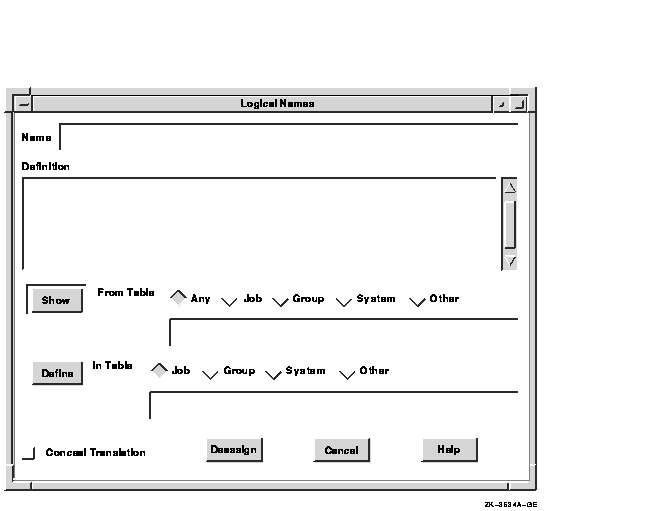
To display the definition of a logical name and the name of the logical name table in which it is stored:
If you choose the Any option, Session Manager searches the logical name
tables specified by the logical name LNM$FILE_DEV. If the logical name
exists in more than one logical name table, Session Manager displays
the logical name definition and the name of the logical name table in
which the definition was first encountered.
5.4.2 Deleting a Logical Name
To delete a logical name definition:
If you choose the Any option and the logical name definition is not
found in any logical name table, Session Manager reports that the
logical name is not defined.
5.5 Setting Process Privileges
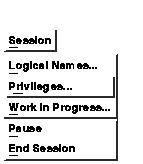
Your process privileges determine what commands and functions you are authorized to execute from your account. Your system manager authorized these privileges when your account was created.
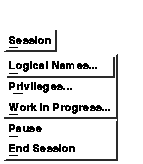
Some tasks require more powerful privileges. You can see which privileges are currently enabled by choosing Privileges... from Session Manager's Session menu.
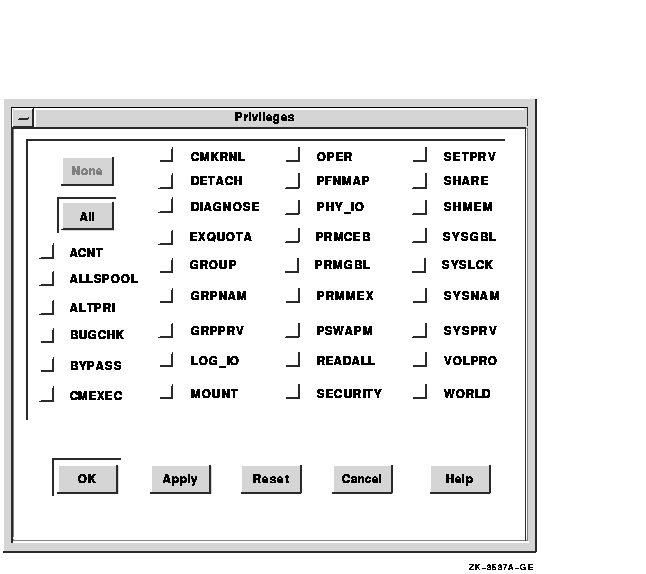
Click on the privileges you need to perform a specific task. You are
granted only those privileges you are authorized to hold; privileges
that you are not authorized to hold are dimmed.
5.6 Customizing Your Session
You can use Session Manager's Options menu to customize your DECwindows environment. To find out how to do this, see Chapter 7.
FileView is a graphic representation of the VMS operating system that lets you use a mouse to work with files and directories.
This chapter describes how you can use FileView to
The FileView window looks like this:
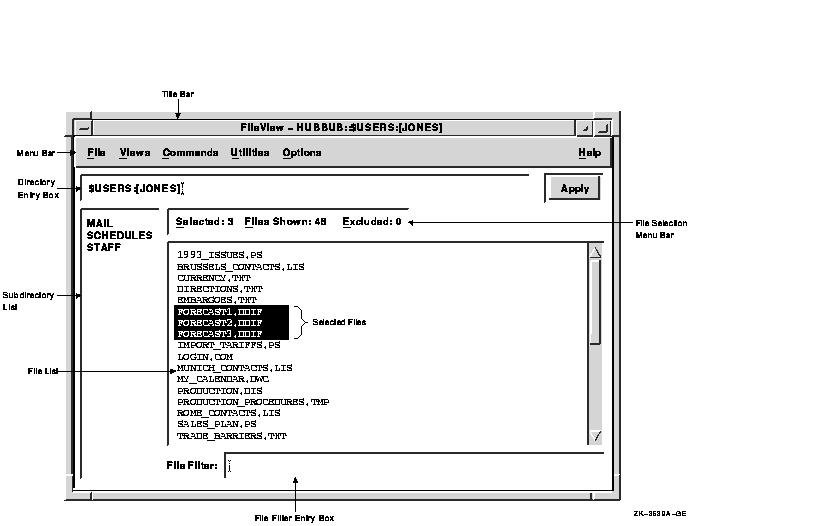

When you use the Apply button to create a new file list, you can use a wildcard in the File Filter or in another directory specification in the Directory entry box. For example, to list only the TXT files in your current directory, type *.TXT in the File Filter entry box and click on the Apply button. The file list displays the files you requested.
The Apply button changes to an Update button when you make changes to the contents of the current directory. If that change affects your file list, clicking on the Update button displays the altered version of the file list. For example, if you rename or delete a file in the file list, the Apply button changes to an Update button to remind you to update the file list. You can continue to work with other files and perform other tasks, updating the file list at your convenience.
When you start an update operation, the Apply or Update button becomes
a Cancel button. Clicking on the Cancel button stops the file search as
soon as possible. FileView displays whatever file information was
already collected along with a pop-up message box that indicates
missing information.
6.2 Selecting and Filtering Files
To perform a FileView task, you must select the file with which you want to work. FileView highlights the selected file, and the next command you choose affects that file. When you select or filter files, FileView displays the number of currently selected and filtered files on the File Selection menu bar.

If you do not select a file name before choosing a FileView command,
FileView displays a dialog box that asks you to type the name of the
file or files on which you want to perform the command.
6.2.1 Selecting a File from Your File List
To select a file from your file list:
Selecting one file at a time cancels the previous file selection.
6.2.2 Selecting Adjacent Files
To select adjacent files from the file list:
| Previous | Next | Contents | Index |