Using DECwindows Motif for OpenVMS
Using DECwindows Motif for OpenVMS
August 1991
This guide is designed to help new and experienced users learn and use
VMS DECwindows Motif software.
Revision/Update Information:
This is a new manual.
Operating System:
VMS Version 5.4.
Software Version:
VMS DECwindows Motif Version 1.0.
August 1991
© 1991.
The following are trademarks of Digital Equipment Corporation:
Bookreader, CDA, DEC, DECnet, DECwindows, DECwrite, Digital, Internet,
LinkWorks, LiveLink, LN03, MicroVAX, PrintServer, ReGIS, ULTRIX, VAX,
VAXcluster, VAXserver, VAXstation, VMS, VT, XUI, and the DIGITAL logo.
The following are third-party trademarks:
Motif is a trademark of the Open Software Foundation, Inc.
PostScript is a trademark of Adobe Systems Incorporated.
Preface
Purpose of This Guide
This guide is designed to help you explore and use VMS DECwindows Motif
software. It also describes how to customize your DECwindows
environment and includes advanced user information.
VMS DECwindows Motif is based on M.I.T.'s specification for the X
Window System, Version 11, Release 4 and OSF/Motif V1.1.1.
Note
All references to DECwindows in this guide refer to VMS DECwindows
Motif software.
|
Who Should Use This Guide
This guide is intended for new and experienced VMS DECwindows users,
who need not be familiar with the VMS operating system or the DIGITAL
Command Language (DCL).
If you are a first-time DECwindows user, this book guides you through
DECwindows techniques and features.
If you are an experienced DECwindows user, you'll find useful
information about the Motif interface, customizing your environment,
and advanced user topics.
How to Use This Guide
This guide is divided into four parts, which contain task-oriented
chapters.
- Part I includes all the information you need to get started. It
describes how to use windows, how to work with files, and how to run
applications.
- Part II explains how to customize your environment to suit your own
needs.
- Part III contains advanced user information.
- Part IV includes a troubleshooting table, a list of system
messages, and other reference information.
How you use the Using DECwindows Motif for OpenVMS depends on how much you already know about
using DECwindows.
If you are new to windowing systems, you should read Part I.
If you are familiar with graphical user interfaces, take a few minutes
and look over the first page of each part. Each part page gives a quick
summary of the contents of the part. You can quickly review what is
familiar about DECwindows and identify the areas you want to know more
about.
Note
Another way to gain hands-on DECwindows experience is to work through
the online tutorial, which is available from Session Manager's menu
bar. To start the tutorial after you have started a DECwindows session,
read Section 3.2.2 in Chapter 3. Then choose Tutorial from the Session
Manager's Help menu. The online tutorial will start and give you
instructions for using it.
|
For More Information
Although you need not be familiar with the VMS operating system or DCL
to use DECwindows, you can enhance your understanding of DECwindows,
particularly FileView, by becoming familiar with some of the topics
addressed in the OpenVMS User's Manual.
Conventions
The following conventions are used in this manual:
|
mouse
|
The term
mouse is used to refer to any pointing device, such as a
mouse, a puck, or a stylus.
|
MB1 (Select)
MB2 (Drag)
MB3 (Menu)
|
MB1 indicates the left mouse button, MB2 indicates the middle mouse
button, and MB3 indicates the right mouse button. (The buttons can be
redefined by the user.)
|
|
Ctrl+
x
|
A sequence such as Ctrl+
x (or Ctrl/
x) indicates that you must hold down the key labeled Ctrl
while you press another key or a pointing device button.
|
|
PF1
x
|
A sequence such as PF1
x indicates that you must first press and release the key
labeled PF1, then press and release another key or a pointing device
button.
|
|
[Return]
|
In some examples, a key name is shown enclosed in a box to indicate
that you press a key on the keyboard.
|
|
blue-green ink
|
Blue-green ink indicates information that you must enter from the
keyboard or a screen object that you must choose or click on.
For online versions of the book, user input is shown in
bold.
|
|
boldface text
|
Boldface text represents the introduction of a new term.
Boldface text is also used to show user input in online versions of
the book.
|
Part I
Getting Started with DECwindows
Part 1 contains all the information you need to start DECwindows,
run applications, and work with files. It includes the following
chapters:
- Chapter 1 introduces you to DECwindows and describes the main
components of the DECwindows interface.
- Chapter 2 describes how to start, pause, and end a DECwindows
session.
- Chapter 3, designed as a refresher for those users already
familiar with graphic windowing systems, describes in reference format
how to use DECwindows with a mouse or a keyboard.
- Chapter 4 covers basic DECwindows tasks such as getting help and
printing files.
- Chapter 5 tells you how to use the Session Manager to control
your current DECwindows session.
- Chapter 6 describes FileView, the graphic representation of the
VMS directory structure.
Chapter 1
Introduction
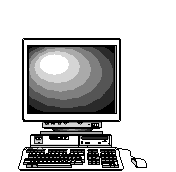
You are about to realize the full potential of your workstation.
DECwindows is an interface to the VMS operating system that lets you
divide your workstation screen into windows and design a working
environment to suit your needs. Application programs displayed in
windows are easy to use because DECwindows takes advantage of your
workstation's graphics.
With DECwindows, you can run applications simultaneously on a single
screen and switch between them. This means that you can run a program
in one window, read a mail message in a second window, and compose a
memo in a third.
The screen for a typical DECwindows session looks like this:
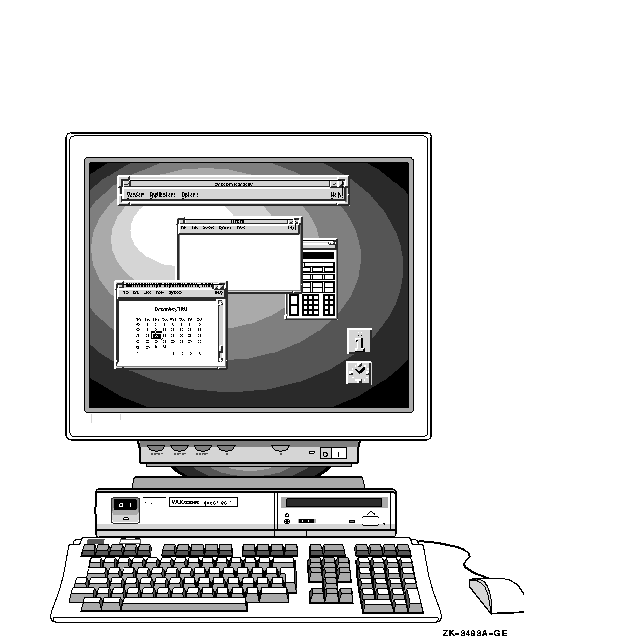
1.1 What Are Windows?
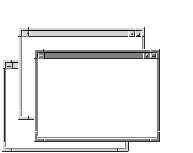
Think of your workstation screen as a desktop with overlapping sheets
of paper on it. You can shuffle the sheets of paper to place them in
front of or behind other papers.
In DECwindows, these sheets of paper are called
windows. A window is an area on your workstation
screen that represents all or part of an application. For example, you
can open one window that displays Bookreader. In this window, you can
read online documentation. Other windows can display applications like
Mail, which allows you to send and receive electronic mail, and
DECterm, which looks and functions like a VT300-series terminal.
For more information about how to move, size, and arrange windows, see
Chapter 3.
1.2 Interacting with DECwindows
DECwindows is an environment in which all applications look and respond
in a similar way. This means that you use the same techniques to
interact with each application. You can use the mouse---the hand-held
pointing device attached to your workstation monitor---and your
keyboard to work with DECwindows applications. Some tasks are easier to
perform with a mouse, and some are easier with the keyboard. For more
information about interacting with DECwindows, see Chapter 3.
1.3 DECwindows Components
DECwindows contains different components for performing specialized
tasks. This section defines and illustrates the main components of
DECwindows. For more information about working with them, refer to the
appropriate chapter in Part 1.
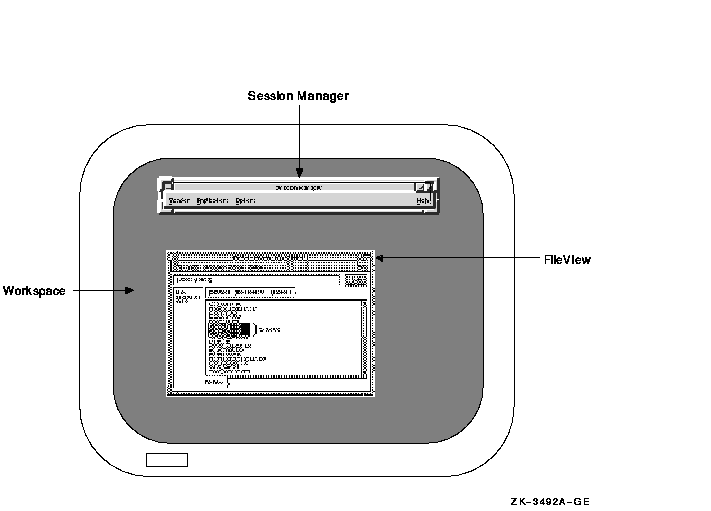
-
The Workspace is the screen on your workstation and is
the background of your DECwindows environment. All windows and objects
appear on the Workspace.
-
The Window Manager is a program that controls the
size, placement, and operation of windows on the workspace. The Window
Manager provides menus (Workspace and Window) that let you manage your
windows.
-
Session Manager helps control the look and feel of
your DECwindows session. Use it to start DECwindows applications and to
adjust workstation settings, such as keyboard features and pointer
shape.
-
FileView is a graphic interface to the VMS operating
system, which provides commands for you to work with your files and
directories.
Chapter 2
Opening and Closing DECwindows

To open DECwindows, you have to start a session. This chapter describes
how to start, pause, and end a DECwindows session. If any of the terms
or techniques in this chapter are new to you, refer to Chapter 3 for
more information.
2.1 Starting a Session
If the system startup procedure has been successful, DECwindows
displays Session Manager's Start Session screen.
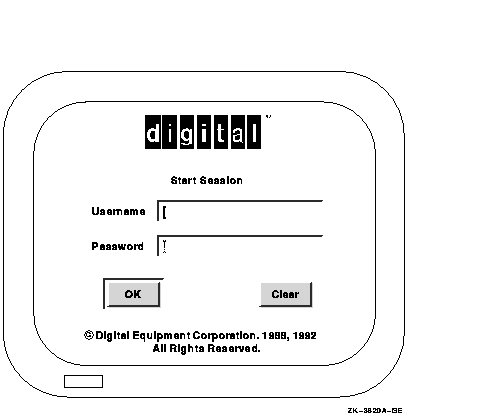
The Start Session screen is the gate through which you become
authorized to use your workstation. It prompts you for your user name
and password. When you or your system manager installed DECwindows, you
may also have established an account for yourself with an associated
user name and password. Your user name is unique and identifies you to
the system. In many cases, a user name is your first or last name. Your
password is for your protection. Keep it secret so that other users
cannot access your account.
To start a session:
- Type your user name.
- Select the Password entry box by pointing to the Password entry box
and clicking MB1.
- Type your password.
To preserve the secrecy of your password, the letters you type are not
displayed on the screen.
- Click on the OK button or press Return if you have entered your
user name and password correctly.
If you provide wrong information or make a typing mistake and do not
correct it, your system does not let you start a session. Instead, it
displays a warning that some information is incorrect.
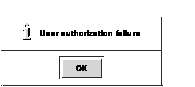
Press Return or click on the OK button to acknowledge the message. Then
retype your information and press Return.
If you repeatedly make typing mistakes (without correcting them) while
entering your user name and password, you can exceed the number of
allowable attempts to start your session. You won't be able to start
your session even when you enter the correct user name and password.
This security feature prevents unauthorized users from gaining access
to your system. Your system manager decides how many attempts are
permitted. When you exceed this number, you'll be denied access even
when you correctly enter your user name and password. If you encounter
this security feature, see your system manager.
Tip
The DECwindows screen timeout feature periodically causes the screen to
go blank. To restore the screen image, move the mouse or press any key.
|
If your user information is correct, your session begins and DECwindows
displays Session Manager's menu bar. For more information about using
Session Manager to run applications and manage your session, see
Chapter 5.
2.2 Pausing a Session
When you are working in a DECwindows session, you can put your current
session on hold indefinitely and lock your workstation without ending
your session. When you put your session on hold, your screen is cleared
but your session is maintained exactly as it was. Any applications you
started continue to run, and you can resume working without having to
re-create your screen environment.
Tip
Before you put your session on hold, make sure you save any files.
Then, if your system fails, you won't lose any information.
|
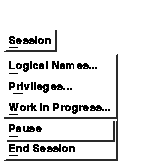
To put your current session on hold, choose Pause from Session
Manager's Session menu. Your screen is cleared and the Pause Session
screen is displayed.
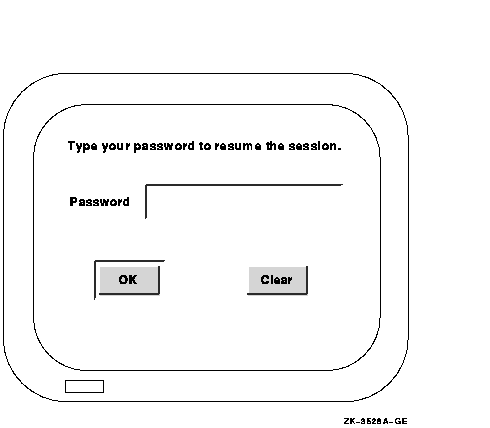
To continue your session, type your password. If you make a mistake
while typing, click on the Clear button to cancel what you've entered
so far. Then retype your password correctly and press Return.
Once the system verifies your password, your session resumes. If you
make a typing mistake and do not correct it, DECwindows notifies you
that your password is incorrect. Press Return to acknowledge the
message. Then retype your password and press Return.
As when you started a session, you might exceed the number of allowable
attempts to resume your session. This happens if you repeatedly make
typing mistakes while typing your password and you do not correct them.
If you enter your password again and continue to make more mistakes,
you will exceed the number of allowable attempts, and you won't be able
to resume your session, even when you enter the correct password. If
you trigger this security feature, see your system manager.
2.3 Ending a Session
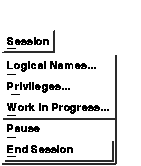
To end your session, choose End Session from Session Manager's Session
menu. Even if you choose End Session, you can still return to your
session. Session Manager displays a dialog box asking you to confirm
that you want to end your session.
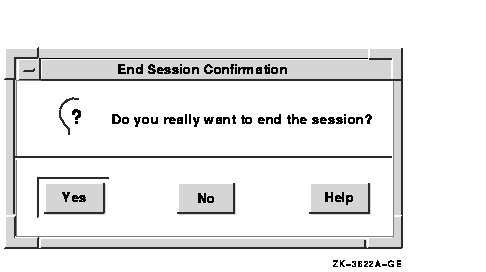
To return to your session, click on the No button. To end your session,
click on the Yes button. All windows are closed. DECwindows displays
the DIGITAL logo and the Start Session screen.
Chapter 3
Interacting with DECwindows
You can interact with DECwindows applications by
- Using a mouse
- Using a keyboard
As you work with DECwindows, you will find that some tasks are easier
to perform with a mouse and some are easier with a keyboard. Try both
mouse and keyboard techniques and use each where it works best for you.
Whether you use a mouse or a keyboard to interact with DECwindows, you
use the same techniques for each application. This chapter describes
basic DECwindows techniques using mouse procedures and summarizes
keyboard techniques. For more information about keyboard techniques and
procedures, see Appendix A.
3.1 Using the Mouse

Traditional computing requires you to interact with your screen by
typing text and pressing keyboard keys. The mouse makes using
DECwindows as easy as pointing to an object on your screen and clicking
a button. You can use the mouse to choose commands from a menu, to
enlarge and shrink windows, and to rearrange windows on your screen.
The mouse has three buttons. MB1 (for "mouse button 1") is on
the left, MB2 is in the middle, and MB3 is on the right. Most often,
you use MB1 to interact with applications. This button arrangement
naturally suits right-handed users; if you are left-handed, you can
easily rearrange this configuration. See Chapter 5 for information
about customizing the mouse buttons.

When you work with the mouse, make sure that the cable connecting it to
the workstation is pointing away from you. Place the mouse on a smooth
surface. As you move the mouse, watch your screen to see how moving the
mouse moves the pointer on the screen in exactly the
same way. If you are using the mouse and run out of room on your desk,
just lift the mouse and put it down where you have more room. The
pointer does not move when you lift the mouse.
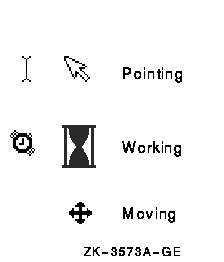
Usually the pointer is shaped like an arrow, but it can change shape to
reflect the state of an application. For example, it becomes an
hourglass or a wristwatch when DECwindows is performing a task that
needs a little more time to complete.
3.1.1 Mouse Techniques
By mastering the following mouse techniques, you can work with any
DECwindows application:
-
Point: Using the mouse, move the pointer to where you
want the next action to occur.
-
Click: Quickly press and release MB1. You should hear
and feel a faint click.
-
Press: Point to the menu name, scroll bar stepping
arrow, or wherever you want the action to occur. Without moving the
mouse, press and hold MB1.
-
Drag: Press and hold MB1 (or MB2), move the pointer,
and release MB1 (or MB2).
-
Double click: Point to the object and click MB1 twice
in quick succession. For more information about double clicking with
files, see Chapter 6.
-
Shift click: Point to the object. Press and hold the
Shift key and click MB1. Release the Shift key.
3.2 Working with Menus
Menus contain items that let you tell DECwindows what you want to do or
what you want to work with. To interact with DECwindows, you select a
menu and choose a menu item from that menu. The names of menus
available in an application appear on the menu bar.
DECwindows provides three types of menus:
- Pull-down menus
- Pop-up menus
- Options menus
Each of these types of menus can contain submenus. An arrow next to a
menu item indicates that DECwindows will display a submenu when you
choose that menu item.
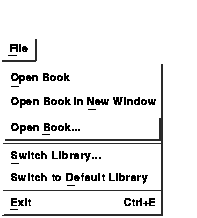
Any menu item followed by three periods (...) is your cue that a dialog
box will be displayed if you choose that menu item.
The following sections describe how to work with menus and submenus.
3.2.1 Selecting Menus
To select a menu:
- On the menu bar, point to the name of the menu you want to display.
- Press and hold MB1.
This highlights the menu name and displays
or pulls down the menu.
- If you click MB1 on the menu name, the menu will be displayed until
you choose a menu item or click MB1 outside the menu.
Note
Menus contain two shortcuts that you can use with your keyboard:
accelerators and mnemonics.
An accelerator is a key on your keyboard that you can
use to execute a function in a menu. Accelerators are listed in the
menu to the right of the function items if they are available for that
function.
A mnemonic is an underlined letter in a menu name or a
menu item. Mnemonics let you display menus and perform tasks by typing
letters on your keyboard.
For more information about using keyboard accelerators, see
Section 3.3.10 and Appendix A.
|
3.2.2 Choosing Items from Pull-Down Menus
Some pull-down menus contain commands. Others list the
names of items you can work with.
To choose an item from a pull-down menu:
- On the menu bar, point to the name of the menu you want to display.
- Press and hold MB1.
- While holding MB1, drag to the menu item you want.
- Release MB1.
If you change your mind while looking at a pull-down menu, drag the
pointer outside the menu and release MB1. The menu disappears and no
action is taken.
Tip
Some applications, such as Mail, offer rectangular push
buttons to duplicate frequently used commands that are also
available as menu items. Push buttons are usually found underneath an
application's work area---where the application's text and graphics are
displayed. To execute these commands quickly, click MB1 on the push
button.
|
|