HP OpenVMS Systems Documentation |
DECwindows Motif Guide to Application Programming
3.8 Freeing Resources Allocated Through UILIf you use the MrmFetchxxxx routines to fetch resources allocated through UIL, you should free the memory associated with those resources when you are finished with them. Table 3-1 lists the UIL value types and the routines your application should use to free their associated resources.
Chapter 4
|
You can also use the DECwindows Help System to display general and context-sensitive information in response to a user request. The DECwindows Help System is described in Chapter 5. |
The help widget is a modeless widget that allows you to display appropriate, context-sensitive help text in response to a user query. Figure 4-1 shows a sample help widget from the OpenVMS DECburger demo application.
Figure 4-1 Sample Help Widget
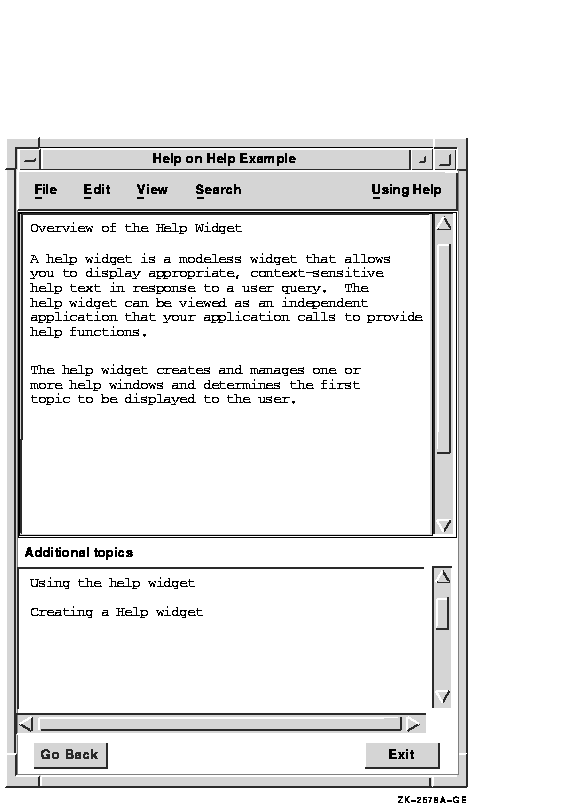
The help widget can be viewed as an independent application that your application calls to provide help functions. Using the help widget, you can create and manage one or more help windows and determine the first topic to be displayed to the user. The modeless behavior of the help widget permits an application to support one or more concurrent help widgets.
Your application is responsible for invoking a help pull-down menu widget with push-button widgets (or gadgets) for your chosen help topics. The labels for the push buttons should indicate the types of help available.
The OSF/Motif Style Guide suggests that applications include the following topics in the help pull-down menu widget, when appropriate to the application:
You can also add application-specific help topics.
4.1.1 Invoking the Help Widget
A user can invoke the help widget four ways:
As an application developer, you must decide which Help invocation
methods to support. Most DECwindows applications support invoking the
help widget by clicking on a help option in the menu bar and through
context-sensitive help.
4.1.2 Help Widget Terminology
This chapter uses the terms defined in Table 4-1 to describe the help widget.
| Term | Definition |
|---|---|
| help widget | The general name for all modules that compose the widget. |
| help window | The window that contains all of the help information. There is one help window for each help widget. Help display is synonymous with help window. |
| help session | All the help interactions (requests, answers, and so on) that occur while an application is running. A help session can be composed of several help widgets. |
Neither UNIX systems nor Windows NT systems have a librarian utility. On these systems, the help widget reads the .HLP file directly. The information contained in this section applies only to OpenVMS systems.
This section describes how to use OpenVMS help libraries with the help widget. For general information about the OpenVMS Librarian Utility, see the VMS Librarian Utility Manual.
When you create a help widget on an OpenVMS system, you pass an OpenVMS help library specification to the help widget creation routine. The help widget uses this specification to locate and read the help files. The help libraries for OpenVMS DECwindows applications are conventional OpenVMS help libraries. You can use a command similar to the following to create an OpenVMS help library:
$ LIBRARY/HELP/CREATE DECBURGER.HLB DECBURGER.HLP |
The help widget includes two resources that you use to specify the OpenVMS help library and its type. The DXmNlibrarySpec resource specifies an OpenVMS help library file specification. An OpenVMS help library has a default file type of HLB and defaults the file type of input files to HLP.
The DXmNlibraryType resource has a predefined value of DXmTextLibrary.
For applications running on OpenVMS, the help widget uses these resources to identify the location and type of the help topic database. Once you have invoked the help widget, you can navigate only within the selected OpenVMS help library.
The help widget includes an OpenVMS help library cache, specified by the DXmNcacheHelpLibrary resource. The DXmNcacheHelpLibrary resource is a Boolean attribute that specifies whether the text of the OpenVMS help library is stored in the help widget's cache memory. If true, the library is initialized when it is first opened and is cached in memory until the application closes down.
If DXmNcacheHelpLibrary is false, the text is not
stored in cache memory. The default is false.
4.2.1 OpenVMS Help Library Modules
The files you insert into OpenVMS help libraries are text files you build using a program or a text editor. Each help input file can contain one or more modules; each module contains a group of related keys numbered key 1 to key 9. Each key represents a hierarchical level within the module.
The OpenVMS Librarian Utility stores a key-1 name as its module name.
The key-2 through key-9 names identify subtopics related to the key-1
name. For the purpose of making the HLP file easier to maintain, it is
good practice to associate top-level help topics with key-1 names.
However, there is no requirement to do so.
4.2.1.1 Accessing OpenVMS Help Library Modules
Your OpenVMS application can access a module from the key-1 name or from any key in the module. For example, if you have help push-button widgets for On Window, On Version, and On Help top-level topics, you might maintain the OpenVMS help library as one file called APPLICATION.HLP and create an OpenVMS help library called APPLICATION.HLB. The APPLICATION.HLP file would contain a separate module, identified by a key-1 name, for each top-level topic. You can also maintain the OpenVMS help library modules in multiple HLP files.
When a user asks for help about the On Window topic, your OpenVMS application could determine from the push-button widget activate callback that the user wanted overview help. Your OpenVMS application could then create a help widget and, through the DXmNfirstTopic resource, pass to the help widget the string that identifies the correct help topic. This string would identify a key-1 name or another key in the module.
The help widget uses the key-name hierarchy to find the help topic. For example, if you want to directly access the help topic identified by a key-3 name, you must also specify the key-1 and key-2 names that form a path to the key-3 name.
The help widget looks in the specified OpenVMS library for the module defined by the string and displays the text. If the string identifies a key-1 name, any key-2 subentries in the Overview module automatically appear as additional topics.
If the user then asks for help on a key-2 subentry, the help widget
displays the key-2 text, and the key-3 subentries appear as additional
topics, and so on.
4.2.1.2 Specifying OpenVMS Help Library Key Names
There are two ways to specify the OpenVMS help library key names:
The help widget provides several extensions to the OpenVMS Librarian Utility. These extensions give the help widget more sophisticated search capabilities and take the form of help widget commands (special text lines) in conventional OpenVMS help topics. These commands have the following format:
=name operand(s) |
The following syntax rules apply to all commands:
The extensions to the OpenVMS Librarian Utility are described in Table 4-2.
| Command Name | Description |
|---|---|
| =TITLE |
Permits a case-sensitive
title to be associated with the help topic. This title is displayed in
situations where a topic is identified. For example,
Overview of the Help Widget.
If no title is provided, the OpenVMS help library topic key becomes the topic title. The help widget Search menu lets users search by keyword and title. |
| =KEYWORD | Permits one or more case-insensitive keywords to be associated with the help topic. If more than one keyword is specified, the individual keywords must be separated by a comma or at least one space. The help widget Search menu lets users search by keyword and title. |
| =NOSEARCH | Disables search operations for title and keywords on a specific topic. |
| =INCLUDE | Permits help topics to be shared across modules within a single OpenVMS help library. The operand of the INCLUDE command is a help topic key name. See Section 4.6 for more information about help topic key names. The title of the included topic is automatically added as an additional topic. |
Example 4-1 shows a portion of the DECBURGER.HLP help file. Note that the DECBURGER.HLP file is presented only as an example; refer to the DECwindows Companion to the OSF/Motif Style Guide for the recommended content and style of a help file.
| Example 4-1 Sample Help File |
|---|
(1)1 overview (2)=Title Overview of the Help Widget (3)=Keyword overview (4)=Include programming creating create_help_widget A help widget is a modeless widget that allows you to display appropriate, context-sensitive help text in response to a user query. The help widget can be viewed as an independent application that your application calls to provide help functions. The help widget creates and manages one or more help windows and determines the first topic to be displayed to the user. (5)2 functions_1 =Title Using the help widget =Keyword overview functions To use the help widget, you perform the following steps: 1. Use the OpenVMS Librarian Utility (LIBRARIAN) to create an OpenVMS help library. 2. Create a Help menu bar item for your application. The Help menu item should be located at the right of the menu bar. If the menu bar is wider than a line, the Help menu item should be located at the bottom right. 1 about =Title About the Help Widget =Keyword about =Include programming creating create_help_widget This topic provides version information. 1 onhelp =Title Help Widget On Help =Keyword on-help =Include programming creating create_help_widget This topic provides help-on-using-help information. 1 menu_bar =Title Menu Bar Context Sensitive Help =Keyword menu 1 file_menu =Title File Menu Context Sensitive Help =Keyword file 1 edit_menu =Title Edit Menu Context Sensitive Help =Keyword edit 1 not_implemented =Title Not Yet Implemented =Keyword 1 order_menu =Title Order Menu Context Sensitive Help =Keyword order 1 order =Title Order Context Sensitive Help =Keyword order =Include programming creating create_help_widget Order menu context-sensitive help 2 burgers =Title Burgers For Us =Keyword burger 3 burgers_rare =Title Burgers Rare For Us =Keyword burger rare 3 burgers_medium =Title Burgers Medium For Us =Keyword burger medium 3 burgers_well =Title Burgers Well For Us =Keyword burger well . . . 1 options =Title Help on Custom Colors =Keyword options 1 print =Title Help on Print Order =Keyword print 1 programming =Title Programming Help =Keyword programming Programming help. 2 creating =Title Creating a Help widget =Keyword programming Creating a help widget. 3 create_help_widget =Title Creating a Help widget =Keyword programming Programming help for creating a help widget. 1 glossary =Title Help Widget Glossary =Keyword glossary =Include programming creating create_help_widget This topic provides glossary information. . . . |
| Previous | Next | Contents | Index |