|
To see the encoded contents, exit the
configuration utility and view the CSR file.
$ TYPE OPENSSL_ROOT:[CSR]SERVER.CSR
What you see is exacly what is required by
the certificate authority. You may be required to send the file
itself or just the contents of the file to your CA (according to the
CA's instructions).
For example:
-----BEGIN CERTIFICATE REQUEST-----
MIIB/TCCAWYCAQAwgbwxCzAJBgNVBAYTAlVTMRYwFAYDVQQIEw1OZXcgSGFtcHNo
aXJlMQ8wDQYDVQQHEwZOYXNodWExHjAcBgNVBAoTFUNvbXBhcSBDb21wdXRlciBD
b3JwLjEcMBoGA1UECxMTT3BlblZNUyBFbmdpbmVlcmluZzEaMBgGA1UEAxMRRkxJ
UDMuWktPLkRFQy5DT00xKjAoBgkqhkiG9w0BCQEWG3dlYm1hc3RlckBGTElQMy5a
S08uREVDLkNPTTCBnzANBgkqhkiG9w0BAQEFAAOBjQAwgYkCgYEA0/y8RxuE/COy
nVpeK00GgvbgFWxX1o89ULQTMVUSwmAzhdzbi3DZL5s85YRGdPVgYW2rWs1t2SQg
jMSlFTxta/CwW6Vwwn9GmdaJwkqGFxnpw2LmugexLfj+4t97AZyIR2O7gJxCINS5
CWg3tcn1ZUmqswjkrG8WehUN+2C6IBcCAwEAAaAAMA0GCSqGSIb3DQEBBAUAA4GB
ABzgiiojPAcojLXGI2OFxJ5apORAHHHAyc0YCuhFXS1Rs2BIXHmM5xQuxk8yitc4
yViQfHhGDzpDmOwMKkK7t09UjQh9humKEUlAnS4VYLL4VlgenwLybcLLB0Q3aiQN
UjQw9RrXNWWZYVDenvrOwtbK9dFefb4PlZIAS2/Z4jLP
-----END CERTIFICATE REQUEST-----
If sending the contents, copy and paste
everything and send to the CA using secure email or the appropriate
enrollment form. What the CA returns to you will be a digitally
signed certificate.
For example:
-----BEGIN CERTIFICATE-----
MIICeDCCAiICEEdpjxOzmJPyh5TiG8BRA70wDQYJKoZIhvcNAQEEBQAwgakxFjAU
BgNVBAoTDVZlcmlTaWduLCBJbmMxRzBFBgNVBAsTPnd3dy52ZXJpc2lnbi5jb20v
cmVwb3NpdG9yeS9UZXN0Q1BTIEluY29ycC4gQnkgUmVmLiBMaWFiLiBMVEQuMUYw
RAYDVQQLEz1Gb3IgVmVyaVNpZ24gYXV0aG9yaXplZCB0ZXN0aW5nIG9ubHkuIE5v
IGFzc3VyYW5jZXMgKEMpVlMxOTk3MB4XDTAwMDcwNzAwMDAwMFoXDTAwMDcyMTIz
NTk1OVowgZAxCzAJBgNVBAYTAlVTMRYwFAYDVQQIEw1OZXcgSGFtcHNoaXJlMQ8w
DQYDVQQHFAZOYXNodWExHjAcBgNVBAoUFUNvbXBhcSBDb21wdXRlciBDb3JwLjEc
MBoGA1UECxQTT3BlblZNUyBFbmdpbmVlcmluZzEaMBgGA1UEAxQRRkxJUDMuWktP
LkRFQy5DT00wgZ8wDQYJKoZIhvcNAQEBBQADgY0AMIGJAoGBANP8vEcbhPwjsp1a
XitNBoL24BVsV9aPPVC0EzFVEsJgM4Xc24tw2S+bPOWERnT1YGFtq1rNbdkkIIzE
pRU8bWvwsFulcMJ/RpnWicJKhhcZ6cNi5roHsS34/uLfewGciEdju4CcQiDUuQlo
N7XJ9WVJqrMI5KxvFnoVDftguiAXAgMBAAEwDQYJKoZIhvcNAQEEBQADQQAySLLe
U7nMLJ+QkRld6iqKjU2VotphPvgWMGsJ+TKqUI4MXaAv0zQxtBni1N8s0LXVNCuJ
lEzBYjSbgbgEhJJA
-----END CERTIFICATE-----
The CA-signed certificate contains the following:
-Your organization's common
name (www.<yourserver>)
-Additional identifying
information (IP and physical address)
-Your public key 
-Expiration date of the
public key
-Name of the CA that issued
the ID
-A unique serial
number. Every certificate issued by a CA has a serial
number that is unique to the certificates issued by that CA.
-CA's digital signature 
Installing
certificates
A signed certificate needs to be
installed, along with the key you generated when creating the
request, by saving or copying the respective files to their correct directories and
restarting the server. For the
certificate file, this is either APACHE$COMMON:[CONF.SSL_CRT]
or APACHE$SPECIFIC:[CONF.SSL_CRT]
.
For the key file, this is either APACHE$COMMON:[CONF.SSL_KEY]
or APACHE$SPECIFIC:[CONF.SSL_KEY].
For example:
$ COPY
APACHE$SPECIFIC:[OPENSSL.CRT]SERVER.CRT APACHE$SPECIFIC:[CONF.SSL_CRT]
$ COPY
APACHE$SPECIFIC:[OPENSSL.KEY]SERVER.KEY APACHE$SPECIFIC:[CONF.SSL_KEY]
See
also
Installing a server certificate
Create a self-signed certificate
Creating a self-signed certificate is an
essential first step after installing CSWS
with SSL. The server will not start without the presence of a
properly signed and installed certificate. This procedure is performed for you automatically by the CSWS installation process when you run APACHE$CONFIG.COM and choose to enable
mod_ssl  . Therefore, this command is only required if the
certificate file requires changing or replacing because it has expired. . Therefore, this command is only required if the
certificate file requires changing or replacing because it has expired.
Do the following:
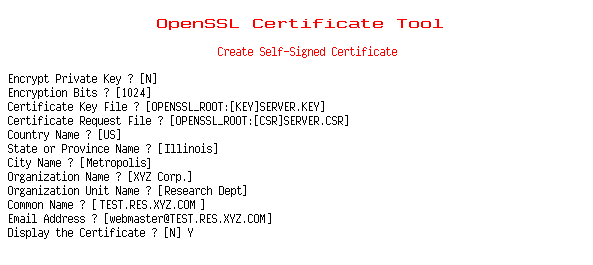
1. Enter the required information for the
self-signed certificate:
-Encrypt Private Key? Using
an encrypted private key forces the Pass Phrase dialog to appear at
startup time.
-Encryption Bits? 1024
bits is the largest recommended size.
Explanation:
Encryption strength is often described in terms of the size of the
keys used to perform the encryption: in general, longer keys provide
stronger encryption. Key length is measured in bits. Private key
sizes larger than 1024 bits are incompatible with some versions of
Netscape Navigator and Microsoft Internet Explorer.
-Certificate Key File? Use
OpenVMS syntax
(usually, [OPENSSL_ROOT:[KEY]SERVER.KEY])
-Certificate File? Use
OpenVMS syntax
(usually, [OPENSSL_ROOT:[CRT]SERVER.CRT])
-Country Name? The
remaining questions determine your server's Distinguished
Name 
-State or Province Name?
-City Name?
-Organization Name?
-Organization Unit Name?
-Common Name?
This
must be the same as your server's DNS host name (or virtual host
name, if name-based virtual hosting is used).
Explanation:
Browsers compare the common name in the server certificate with the
host name of the server they are connecting to. These must match.
-Email Address?
-Display the Certificate?
Important:
All
fields must be completed to create a valid self-signed certificate.
The inception time of
a certificate is based on UTC (Coordinated Universal Time). Check
with your system administrator that your computer's UTC is set
correctly if you want to use the self-signed certificate right away.  Setting
Correct Time Zone Information on Your System
|
 |
The self-signed certificate is generated after
responding to the last question.
2. View the details of the self-signed
certificate (if you chose to display the certificate):
-Version SSL
3.0 protocol
-Serial number
Certificates
issued by a CA have a serial number that is unique to the
certificates issued by that CA.
-Signature Algorithm 
-Issuer 
-Validity (inception and
expiration dates)
-Public key information

Create a certificate authority
Creating a certificate authority (CA)
means you can issue certificates using your own private key. The
corresponding CA public key is itself contained within a certificate,
called a CA Certificate. You must distribute this certificate to
clients for them to access your server. A browser must contain this
CA Certificate in its "trusted root library" in order to
"trust" certificates signed by the CA's private key.
Do the following:
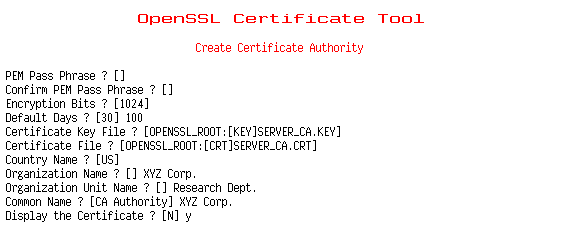
1. Enter the required information to
create a certificate authority:
-PEM Pass Phrase? 
-Confirm PEM Pass Phrase?
-Encryption Bits? 1024
bits is the largest recommended size.
Explanation:
Encryption strength is often described in terms of the size of the
keys used to perform the encryption: in general, longer keys provide
stronger encryption. Key length is measured in bits. Private key
sizes larger than 1024 bits are incompatible with some versions of
Netscape Navigator and Microsoft Internet Explorer.
-Default Days? The
default number of days until expiration for certificates issued by
the CA.
Usage note:
A large number, such as 1825 (5 years), is usually appropriate so that certificates signed with this key do not
expire too soon.
-Certificate Key File? Use
OpenVMS syntax
(usually, OPENSSL_ROOT:[KEY]SERVER_CA.KEY)
-Certificate File? Use
OpenVMS syntax
(usually, OPENSSL_ROOT:[CRT]SERVER_CA.CRT)
-Country Name? The
remaining questions determine your server's Distinguished
Name 
Usage
note: A certificate authority may define a policy
specifying which distinguished names are optional and which are
required. It may also place requirements upon the field contents, as
may users of certificates. As an example, a Netscape browser requires
that the common name for a certificate representing a server has a
name that matches a wildcard pattern for the domain name of that
server, such as *.xyz.com. Source:
mod_ssl Documentation
-State or Province Name?
-City Name?
-Organization Name?
-Organization Unit Name?
-Common Name?
This can be any text string that you wish to use to identify the authority. It may be
generic, such as "CA Authority", or more specific, such as
"<NodeName>CA".
-Email Address?
-Display the Certificate?
Important:
All fields must be completed to create a valid CA certificate.
|
 |
The certificate request is generated after
responding to the last question.
2. View the details of the certificate
authority (if you chose to display the certificate):
-Version SSL
3.0 protocol
-Serial number
Certificates
issued by a CA have a serial number that is unique to the
certificates issued by that CA.
-Signature Algorithm 
-Issuer Your
distinguished name 
-Validity (inception and
expiration dates)
-Public key information

Sign a certificate request
Signing someone else's certificate request
is the function of a certificate authority. When you send a
signed certificate back, it can be used to start the server with the pass phrase they have. Embedded in the
certificate is your public key. It must match the public key you
distribute to clients using this server.
1. Enter the required information to sign
a certificate by specifying the following:
-Certificate File specification
Use OpenVMS syntax
(usually, OPENSSL_ROOT:[CRT]SERVER.CA.CRT)
-Certificate Key File
specification Use OpenVMS syntax
(usually, OPENSSL_ROOT:[KEY]SERVER_CA.KEY)
-Certificate Request File? Use
OpenVMS syntax
(usually, OPENSSL_ROOT:[CSR]SERVER.CSR)
-Signed Request File specification Use
OpenVMS syntax
(usually, OPENSSL_ROOT:[CRT]SIGNED.CRT)
-Default Days
The
default number of days until the
signed certificate expires.
-PEM Pass Phrase  This
is a verification field only. You must use
the same pass phrase you used to create the certificate authority
(Option 5).
Important:
The
inception time of a certificate is based on UTC (Coordinated
Universal Time). Check with your system administrator that your
computer's UTC is set correctly.  Setting
Correct Time Zone Information on Your System
 |