Using Your Zip® Drive
IMPORTANT: A 100MB*
Zip® disk is not included in the package
and will need to be purchased in order to use the Zip drive. Your Zip Parallel Port
drive uses only 100MB Zip disks; 250MB Zip disks do not work in the
Zip® 100™ Parallel Port drive.
To use the Zip® drive, insert a 100MB*
Zip disk, then select the Zip drive letter or disk icon on your computer. You can
store and copy files to and from the Zip drive using the same methods you use for other drives
on your system. If you need instructions on how to copy files, refer to the help
files for your operating system.
* 100MB where 1MB=1 million bytes. The
capacity reported by your operating system may vary.

|
top of page |
Powering Your Zip®
Drive and Other Devices
On some computers, it is important to power up the computer before
or at the same time as devices connected to the parallel
port. Iomega recommends connecting the computer, your
Zip® drive, and
your printer to a power strip, and using the switch
on the power strip to turn all three devices on and
off at the same time. If you do not use a power strip,
power on the computer first, then turn on your printer
and immediately connect power to the Zip drive. Power
must be applied to the Zip drive before your operating
system begins to load.
|
top of page |
Inserting
Zip®
Disks
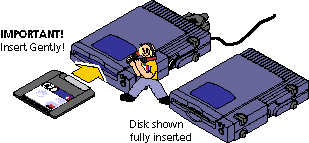
When you insert a Zip®
disk, the green activity light in the button will dim
slightly, then glow steadily. (If the light continues
to blink slowly, push the disk eject button to eject
the Zip disk, then reinsert it.)

CAUTION! Never
put anything into your Zip®
drive except 100MB Zip®
disks with the genuine Zip®
symbol. Using disks that do not have these symbols may
cause damage to your drive or loss of data.
| top of page
|
Ejecting Zip®
Disks
Windows® 95/98
and Millennium systems—Push the disk eject
button or use the IomegaWare™
software eject command. This command is available when
you right click the drive icon in My Computer or Windows® Explorer.
Windows® NT®
4.0 and Windows®
2000 systems—Use the IomegaWare™
software eject command.
CAUTION! To
avoid damage to your Zip®
drive or Zip disk, always remove the disk before disconnecting
or moving your Zip drive.
| top of page
|
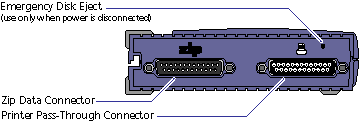
Disk Eject in Case of Power Loss
The Zip® drive must be powered on for normal
disk insertion and removal. If you need to eject a disk during a power failure,
disconnect the power supply from the Zip drive and push a straightened paper
clip into the disk eject hole on the back of the drive.
CAUTION! Never remove a disk manually while the
power supply is connected to the Zip®
drive. Never force a disk into or out of the Zip drive as this could damage the drive.

Use this method only when power is disconnected from the
Zip® drive.
| top of page
|
Drive Sleep
The Zip® drive has an automatic
sleep mode that spins down a Zip disk after 15 minutes
of inactivity. This feature minimizes power consumption
when the Zip drive is not being accessed. During drive
sleep, the green power light remains on, and the Zip
disk automatically spins up again when accessed.
| top
| home
| previous
| next
|
