HP OpenVMS Systems Documentation |
DECnet-Plus for OpenVMS
|
| Previous | Contents | Index |
You can configure the device and modem control
entities using WANDD$STARTUP on OpenVMS systems
(X25$CONFIGURE and NET$CONFIGURE automatically
invokes WANDD$STARTUP if needed). For more information on
running wansetup, refer to the X.25 documentation.
8.2.1 Managing WAN Communications Device Firmware
On OpenVMS systems, you can load microcode into the DSB, DSF, DSV, and DSW communications devices and dump microcode from these devices back to the host system by using the device entity. If you use the WANDD$STARTUP.COM procedure, the information discussed in this section is set up automatically.
The following example creates and enables the device unit. Characteristics associated with the device unit, such as load and dump file specifications, are created by default as part of the create command. You can specify these characteristics manually with the set command.
ncl> create device unit device-name name dsv-0 ncl> enable device unit device-name |
If the communications device fails, you will need to reload it manually, unless you have set the auto load attribute for device unit to true. Use the following command:
ncl> load device unit device-name |
If you have set auto load to true, the communications device tries to load its microcode automatically.
The WANDD$STARTUP procedure sets the auto load attribute to false for the DSB, DSV, and the DSW. It sets it to true for the DSF. Therefore, if you want autoloading, you must manually specify true as in the following example:
ncl> set device unit device-name auto load true |
To configure any synchronous link, you must first create the Modem Connect module to set up the underlying physical lines.
You can find additional information about synchronous links and about writing your own data link protocols that make calls to the Frame module in DECnet/OSI for VMS VAX WANDD Programming. Note that the QIO programming interface for WANDD exists on OpenVMS VAX systems only.
If you use the NET$CONFIGURE.COM, NET$STARTUP.COM, X25$STARTUP.COM,
PSI$STARTUP.COM, and WANDD$STARTUP.COM procedures, then
modem connect lines for HDLC links, DDCMP links, and X.25 links are set
up automatically.
8.2.2.1 Entities Created Automatically That Might Compete for Needed Resources
Note that data linkand other entities are created automatically by certain scripts or procedures. On OpenVMS systems, for example, the NET$CONFIGURE.COM, NET$STARTUP.COM, and WANDD$STARTUP.COM procedures set up modem connect line and (hdlc data link) entities automatically. An automatically created entity can use resources needed for another entity. For instance, when you configure DECnet and X.25 together, the automatically created hdlc data link entity uses the Modem Connect line, preventing you from enabling your LAPB link, which needs the modem connect line. Tables 8-1 and 8-2 list scripts and procedures that automatically create entities on OpenVMS Alpha and VAX systems, respectively, and indicate how to delete these entities if they are not needed. All scripts and procedures listed here are located in SYS$STARTUP.
| Automatically Created Entity | Source File | How to Delete the Entity |
|---|---|---|
| csma-cd station | NET$CONFIGURE | Edit NET$CSMACD_STARTUP.NCL+ |
| modem connect line | X25$CONFIGURE | Edit NET$HDLC_STARTUP.NCL+ and NET$MODEM_STARTUP.NCL+ |
| hdlc | NET$CONFIGURE | Edit NET$HDLC_STARTUP.NCL+ |
| lapb, llc2 | X25$CONFIGURE | @X25$CONFIGURE |
| lapb link, llc2 sap link | X25$CONFIGURE | @X25$CONFIGURE |
| Automatically Created Entity | Source File | How to Delete the Entity |
|---|---|---|
| csma-cd station | NET$CONFIGURE | Edit NET$CSMACD_STARTUP.NCL+ |
| modem connect line | PSI$CONFIGURE or NET$CONFIGURE | Edit NET$HDLC_STARTUP.NCL+, NET$MODEM_STARTUP.NCL+, and NET$DDCMP_STARTUP.NCL+ |
| ddcmp | NET$CONFIGURE | Edit NET$DDCMP_STARTUP.NCL+ |
| hdlc | NET$CONFIGURE | Edit NET$HDLC_STARTUP.NCL+ |
| lapb, llc2 | X25$CONFIGURE, PSI$CONFIGURE | Edit PSI$CONFIGURE.NCL+ |
| lapb link, llc2 sap link | X25$CONFIGURE, PSI$CONFIGURE | Edit PSI$CONFIGURE.NCL+ |
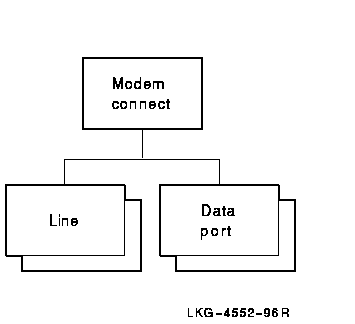
This section shows the commands to create the Modem Connect module to set up your lines. For the variables, substitute values appropriate to your configuration. DIGITAL, however, recommends that you accept the default settings for the various attributes and change these only if you need to. For more information about these attributes, refer to the DECnet-Plus Network Control Language Reference. Figure 8-1 shows the modem connect entity and subentities.
Figure 8-1 Modem Connect Entity
The following steps show the commands for creating the Modem Connect module to set up your lines:
ncl> create modem connect line hdlc-0 - _ncl> communication port comm_port_device_name, - (1) _ncl> profile "normal", - (2) _ncl> duplex full (3) ncl> set modem connect line hdlc-0 modem control full (4) ncl> enable modem connect line hdlc-0 |
| dev | The first three letters of the synchronous device controller name (such as the dsv in DSV11). |
| c | A decimal number (0 or a positive integer) designating a device's hardware controller. If the third letter of the device name is A, c equals 0. If the third letter of the device name is B, c equals 1, and so on. For example, SJB1: has a c value of 1. |
| u | The unit number of the device name; u is always equal to 0 or a positive integer. For example, SJB1: has a u value of 1. |
A data link connection allows DECnet Phase V systems to communicate with other nodes. If you want to create a new connection, or modify an existing one, you need to create, set up, and enable appropriate datalinkentities. DIGITAL recommends that you use your DECnet-Plus configuration procedure to configure data links. To modify the hdlc, ddcmp, csma-cd, and fddi data links, run NET$CONFIGURE ADVANCED. To modify lapb and llc2 data links, run X25$CONFIGURE.
DECnet-Plus supports the following local area network (LAN) data linkentities, as described in Section 8.3.1:
DECnet-Plus supports the following wide area network (WAN) data linkentities, as described in Section 8.3.2:
For each type of data link you use, you need to manage a different
group of entities. For example, for each HDLC data link, you must
manage the hdlc data link entity plus the modem
connect and device Physical layer entities (see
Section 8.2). The type of data link you use on your node depends on
the communication hardware on the system. The following sections
provide examples and more detailed information about the supported
data linkentities.
8.3.1 Creating LAN Data Links
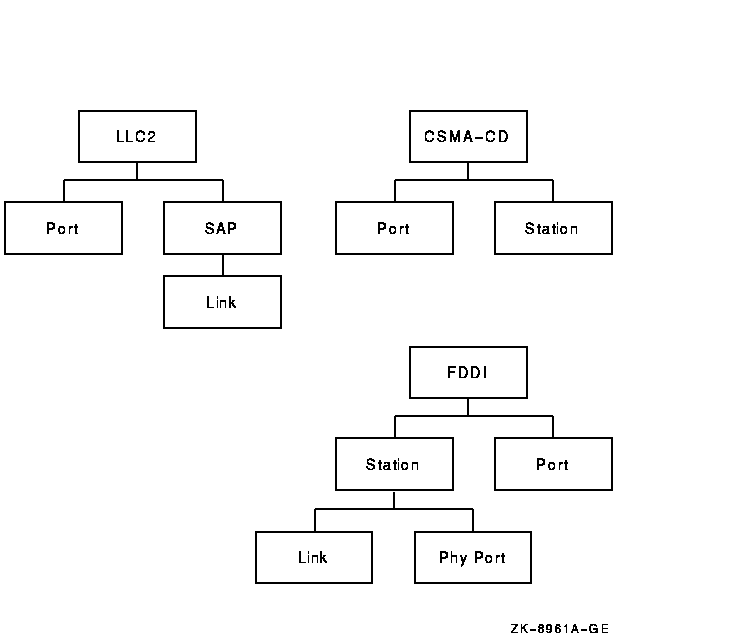
This section explains how to manually create LAN data links. Figure 8-2 shows the LAN data link entities for DECnet-Plus for OpenVMS systems:
Figure 8-2 LAN Data Link Entities
The following steps show the commands to create a CSMA-CD data link for an end system. DIGITAL, however, recommends that you accept the default settings (used in the example) for the various attributes and change these only if you need to. Refer to the DECnet-Plus Network Control Language Reference for more information about these attributes.
ncl> create csma-cd |
ncl> create csma-cd station csmacd-0 - _ncl> communication port port-name (1) ncl> enable csma-cd station csmacd-0 |
The Routing layer uses only those CSMA-CD stations that have an associated routing circuit entity. See Section 8.4.2 for further details. |
The following steps show the commands to create an FDDI data link for an end node. DIGITAL, however, recommends that you accept the default settings (used in the example) for the various attributes and change these only if you need to. Refer to the DECnet-Plus Network Control Language Reference for more information about these attributes.
ncl> create fddi |
ncl> create fddi station fddi-1 - _ncl> communication port port-name (1) ncl> enable fddi station fddi-1 |
The Routing layer uses only those FDDI stations that have an associated routing circuit entity. See Section 8.4.2 for further details. |
For information about creating LLC2 data links, see the appropriate
X.25 documentation.
8.3.2 Creating WAN Data Links
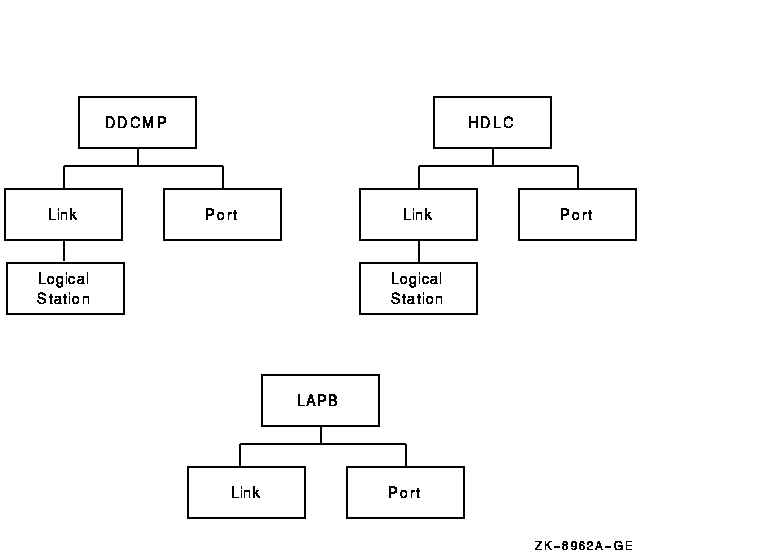
This section explains how to manually create WAN data links. Note that to configure any synchronous link, you must first create the Modem Connect module to set up the underlying physical lines. See Section 8.2 for more information. Figure 8-3 shows the WAN data link entities for DECnet-Plus for OpenVMS systems:
Figure 8-3 WAN Data Link Entities
The following steps show the commands to create an HDLC data link for an end system. (As implemented by DECnet-Plus, HDLC is DIGITAL's variant of the HDLC protocol. It interoperates with some implementations of HDLC from other vendors.) DIGITAL recommends that you accept the default settings for the various attributes and change these only if you need to. Refer to DECnet-Plus Network Control Language Reference for more information about these attributes. You can configure the device and modem control entities using WANTDD$STARTUP on OpenVMS systems (NET$CONFIGURE automatically invokes WANDD$STARTUP if needed). For further information on running wansetup, refer to the X.25 for OpenVMS documentation.
ncl> create node 0 hdlc |
ncl> create hdlc link hdlc-0 linktype balanced (1) ncl> create hdlc link hdlc-0 logical station hdlc-0 (2) ncl> set hdlc link hdlc-0 physical line - _ncl> modem connect line hdlc-0, - (3) _ncl> receive buffers 16, - (4) _ncl> preferred window size 16, - _ncl> acknowledge timer 3000, - (5) _ncl> preferred local station address 2 (6) ncl> enable hdlc link hdlc-0 ncl> enable hdlc link hdlc-0 logical station hdlc-0 |
The following steps show the commands to create a DDCMP data link for an end system. DIGITAL, however, recommends that you accept the default settings for the various attributes and change these only if you need to. For more information about these attributes, refer to the DECnet-Plus Network Control Language Reference.
NCL>create node 0 ddcmp |
ncl> create ddcmp link ddcmp-0 protocol point (1) ncl> create ddcmp link ddcmp-0 - _ncl> logical station ddcmp-0 (2) ncl> set ddcmp link ddcmp-0 - _ncl> physical line modem connect line ddcmp-0, - (3) ncl> receive buffers 16, - _ncl> retransmit timer 3000, - _ncl> transmit window 16 (4) ncl> enable ddcmp link ddcmp-0 ncl> enable ddcmp link ddcmp-0 logical station ddcmp-0 |
| Previous | Next | Contents | Index |