HP OpenVMS Systems Documentation |
DECnet-Plus for OpenVMS
|
| Previous | Contents | Index |
On OpenVMS systems, DECnet-Plus will only try to locate TCP/IP if the rfc1006 listener ports attribute set of the osi transportentity is not empty.
To disable DECnet over TCP/IP, issue the following command:
ncl> set osi transport rfc1006 listener ports {}
|
CTF can be used to trace all PDUs transmitted and received by DECnet over TCP/IP and OSI applications. See Appendix A in the DECnet/OSI for VMS CTF Use for a list of events that are recognized at this trace point.
Use the following command to invoke the CTF tracing utility:
$ TRACE START "trace-point" |
where trace-point is the trace point to be started, such as
"TPCONS TPKT *".
8.5.3.5 Recovering from Problems
If you have problems getting DECnet over TCP/IP to start up properly, check the following:
ncl> show osi transport template * with network service = rfc1006 |
$ ucx show device

                            Port                       Remote
Device_socket  Type    Local  Remote  Service           Host

  bg3         STREAM      23       0  TALENT           0.0.0.0
  bg4         DGRAM      520       0                   0.0.0.0
  bg7         STREAM     399       0                   0.0.0.0
  bg9         STREAM     102       0                   0.0.0.0
|
If IP addresses work but IP names do not, use your TCP/IP management
tool to verify that your BIND server knows about the name.
8.5.3.6 Connection Auditing
You can audit incoming connections for those connections that are made using DECnet over TCP/IP. The audit alarm is displayed as follows:
%%%%%%%%%%% OPCOM 9-FEB-1995 12:26:11.64 %%%%%%%%%%% Message from user AUDIT$SERVER on PETERB Security alarm (SECURITY) and security audit (SECURITY) on PETERB, system id: 12 331 Auditable event: DECnet logical link created Event time: 9-FEB-1995 12:26:11.59 PID: 000000A6 Process name: FAL_14010028 Username: SYSTEM Process owner: [1,3] Image name: SYS$COMMON:[SYSEXE]FAL.EXE Remote node id: 1560286224 Remote node fullname: MYNODE.LKG.ACME.COM Remote username: CAISSON DECnet logical link ID: 335609896 DECnet object name: FAL |
DECnet over TCP/IP allows you to use fully qualified domain names in your OpenVMS proxy database. For example:
UAF> add/proxy mynode.lkg.acme.com::caisson caisson/default |
A node can have more than one full name for a node. This means that
proxy records for each of the possible node names need to be added
using the Authorize utility. For example, if your system is set up to
use both DECdns and BIND (and you can see a remote node's name as
either of these), then you need to add proxy records for both nodes. To
represent the remote node stir, you would need to add these
proxy records: STIR.ENET.ACME.COMand DEC:.ZKO.STIR.
8.6 Managing Session Control
You can manage session control by adding network applications, deleting
network connections, and deleting network entities.
8.6.1 Adding a Session Control Network Application
The following example shows how to add a session control network application (which was known as a session control object in Phase IV):
ncl> create session control application application-name

ncl> set session control application application-name -
_ncl> image name image-name -

_ncl> user name user-name -
_ncl> data abstraction {message} -

_ncl> accept mode {deferred } -
_ncl> programming interface {Phase IV} -

_ncl> address {number = nn,....} (1)
|
ncl> set session control application mail addresses {number=27}
|
Table 8-8 maps NCP characteristics to NCL attributes.
| NCP Characteristic | NCL Attribute |
|---|---|
| user | user name |
| file | image name |
| number | address |
You can selectively delete connections on a local system while the network is running. For example:
ncl> delete session control port port-name |
If after deleting any child entities of session control, such as the
osi portand nspentities, you create them again, you
must use NCL to notify session control that the previously disabled
entities are available again. Sections 8.6.3.1 and 8.6.3.2
show the commands to use to delete and recreate the osi and
nspentities.
8.6.3.1 Requirements for Deleting and Creating the OSI Transport Entity
If the osi transportentity is deleted and subsequently recreated, you must issue the following directives to inform DNA session control that the OSI transport service is available:
ncl> delete session control transport service osi ncl> create session control transport service osi protocol %x05 |
You cannot issue the delete session control transport service
osi command while osi portentities exist.
8.6.3.2 Requirements for Deleting and Creating the NSP Entity
If the nsp entity is deleted and subsequently recreated, you must issue the following directives to inform DNA session control that the NSP transport service is available:
ncl> delete session control transport service nsp ncl> create session control transport service nsp protocol %x04 |
You cannot issue the delete session control transport service
nsp command while nsp portentities exist.
8.7 Managing OSAK
Open System Application Kernel (OSAK) is DIGITAL's implementation of the OSI upper layers. It provides OSI session, presentation and application services. These services are used by OSI applications such as FTAM and VT. You must use NCL to manage the OSAK software on your system. For further details of the NCL commands to use, refer to the DECnet-Plus Network Control Language Reference guide.
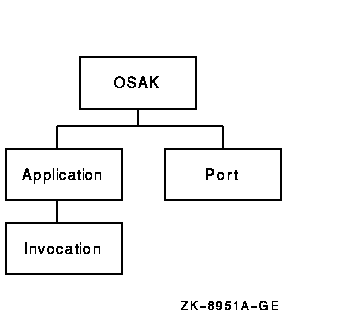
Figure 8-8 shows the osak entity and its subentities.
Figure 8-8 osak Entity

You can implement your OSI application using either of two types of application address: active or passive.
An active address is associated with a process that is already started on the system. A passive address is associated with a process that is started only when a connection request is received for that address.
Passive application functionality requires the OSAK server component, which is available only on OpenVMS systems. |
You cannot actively manage active addresses; NCL creates the necessary management entities when OSAK sends or receives an appropriate programming call. You use NCL to register passive addresses. This section describes how to register active and passive addresses.
Active
An application registers an active address by passing that address on a call to osak_open_responder or osak_open_initiator. NCL creates the appropriate entities. You can use the NCL show command to show attributes of these entities.
Passive
You register an application address using Network Control Language (NCL) commands to create an osak application entity and an osak application invocation entity. Use the startup information attribute of the osak application invocation entity to specify the values in Table 8-9.
| Item | Value | Description |
|---|---|---|
| Mandatory | ||
| user | name | The user name of the process that will respond to Connect requests received by this application |
| file | pathname | The name of the file to run to start up the named application |
| Optional | ||
| account | name | The account that is to start the process |
| max resp | integer | The highest permissible number of responders, for an application with the NEW setting for startup policy |
| password | password | The user's password |
| sversion | {1}, {2}, or {1,2} | The session version |
Further Information
For more information about the OSAK module, refer to the DECnet-Plus Network Control Language Reference
guide.
8.7.2 NCL and the OSAK Databases
OSAK maintains two databases: the application database and the port database. You must use NCL to inspect information held in the OSAK databases and to set attributes of entities in the OSAK module. Table 8-10 shows the mapping between NCL and OSAK management.
| OSAK Database | NCL Entity |
|---|---|
| Application database |
osak application
and osak application invocation |
| Port database | osak port |
This section describes how you can check that the OSAK component of DECnet-Plus is working correctly and support OSI applications that are running over this component.
To check whether an OSI application runs over the OSAK component of DECnet-Plus, refer to the documentation for that application. |
The best indication that the OSAK component is working normally is when any OSI application you are running behaves predictably and efficiently. However, there are tasks you can complete at convenient intervals to monitor the working of the software:
To check the number of connections, releases, and aborts that occur while your application is running, look at the values of the OSAK counters. You can discover what is normal for your application over a period of time; abnormal values may then be an indication that something is going wrong.
You can display the values of all the OSAK counters by using the following NCL command:
ncl> show [node node_id] osak all counters |
You can display the value of a specified OSAK counter by using the following command:
ncl> show [node node_id] osak counter_name |
where
| node_id | The identifier of the node on which the osak entity resides |
| counter_name | The name of the counter whose value you want to check |
You can monitor the occurrence of events, and find out the rate of occurrence that is normal and acceptable for the application you are running. A more frequent occurrence might be an indication that the application you are running is not working properly.
See Chapter 12 for information about the DECnet-Plus event
dispatching facility.
8.7.3.3 Checking Ports and Addresses
You can display the following information, which may help you to check that your application is running as you expect it to:
ncl> show [node node_id] osak port * |
ncl> show [node node_id] osak port port_id all |
ncl> show [node node_id] osak port *, - _ncl> with connection state = awaiting_inbound_connection |
DECnet-Plus and the software products that implement X.25 are packaged separately. They can be used independently on the same system.
DECnet-Plus for OpenVMS supports the following approaches for configuring and using the features of X.25 products:
These approaches are completely optional, but might be desirable for use with certain applications or for particular network configurations. They can function individually or together on the same system.
The Connection-Oriented Network Service (CONS) is an ISO specification for a reliable and transparent end-to-end data transfer function. OSI transport can use CONS in addition to the Connectionless-Mode Network Service (CLNS) implemented by DNA routing.
Note that applications using OSI transport (for example, FTAM or Virtual Terminal) need to be configured to operate over CONS before they can use CONS functionality.
Applications using routing over X.25 circuits do not require any
special configuration. X.25 serves as another communications path from
the local end system to the remote sytem.
8.8.1 Configuring DECnet-Plus to Use X.25
Once X.25 has been installed, you can use the DECnet-Plus configuration procedure (NET$CONFIGURE.COM) to first configure X.25 and then configure DECnet over X.25. You can use either the basic or advanced configuration option.
See DECnet-Plus for OpenVMS Applications Installation and Advanced Configuration for more information about configuring X.25 support on DECnet-Plus for OpenVMS systems.
Full details on how to configure the X.25 product are provided in the X.25 for OpenVMS documentation. This guide is available in a separate kit. Refer to the Software Product Description (SPD) for appropriate part numbers to use for ordering the X.25 kit.
The details of each type of configuration are described in Section 8.5.2.3 (OSI Transport using CONS) and Section 8.8.3.2 (for routing using X.25).
DIGITAL strongly recommends that you configure and test both DECnet-Plus and X.25 independently before attempting to configure DECnet-Plus to use X.25.
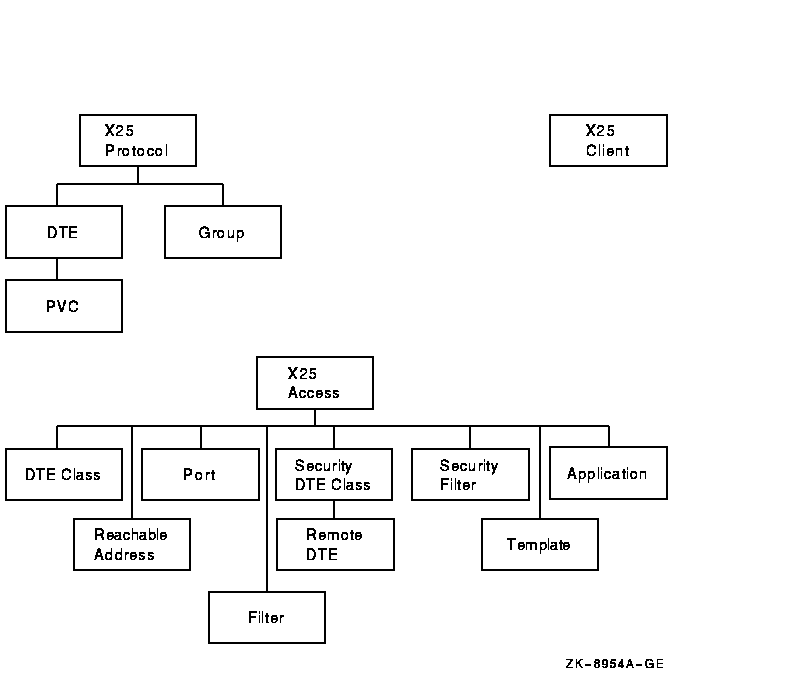
Figure 8-9 shows the x25 protocol entity and its subentities.
Figure 8-9 x25 protocol Entity

| Previous | Next | Contents | Index |