AlphaServer ES40 Emulation
An AlphaServer ES40 emulator is available, but how to operate it may not be obvious, especially to those unfamiliar with the Alpha platform. This document attempts to provide some guidance on setting up ES40 and booting Windows or Tru64 UNIX. This document is written for Windows users, but the details of operating ES40 should be much the same on other platforms.
Before begining, a few quick notes:
- At the time of writing (9-MAY-2026), support for anything other than OpenVMS guests is still very new in the es40 emulator.
- The state of network support is still in flux. It should be working on Windows now, but not Tru64 UNIX.
- It is quite a lot slower than a real AlphaServer ES40
- Some software (eg, Visual C++ 5/6, Mozilla) apparently doesn't work properly yet.
Contents
- Required Stuff
- ES40 Setup
- Installing Windows NT 4.0
- Installing Windows 2000
- Installing 64bit Windows build 2210
- Windows NT 3.x?
- Installing OpenVMS
- Installing Tru64 UNIX
Installing more than one operating system is left as exercise for the reader. It's not hard to do, but this document is already long and complicated enough without covering all the extra details that appear when installing additional operating systems (extra drives, boot menus, etc).
Required Stuff
The emulator itself requires a few 3rd-party components with non-free licenses, so they must be obtained separately:
- npcap (npcap may not be free depending on your use case).
- es40 - the emulator.
At the time of writing (9-MAY-2026) improvements are coming quite
rapidly
so this guide currently aims to track the latest state. So instead of
downloading the current release,
download the
latest CI build (github account required). Either way, you'll
probably want the windows-Release-x64 option unless you
can't install winpcap or npcap in which case grab
windows-Release.NN-x64. The suffixes on the various
download options mean:
- NS - No screen
- NN - No networking
- IDB - Integrated Debugger
- LSM/LSS - Lockstep master/slave
- 86c764x1.bin - S3 VGA BIOS
- cl67srmrom.exe which can be found in this zip file: https://ftp.zx.net.nz/pub/archive/ftp.digital.com/pub/DEC/Alpha/firmware/v7.3/es40/es40.zip
- The Alpha Systems Firmware Update v7.3 (part AG-RCFBX-BS) CD-ROM, available here: https://ftp.zx.net.nz/pub/archive/ftp.hp.com/pub/alphaserver/firmware/iso_images/v73.iso
Emulator Setup
This covers just getting the emulator itself setup. Most of this you'll only ever have to do once.
- Install winpcap or npcap (if you didn't download one of the no-networking variants
- Create a folder somewhere, and extract the ES40 files there. This document will be using C:\apps\es40 as an example.
- Create a rom folder (eg, C:\apps\es40\rom) and
place in it:
- 86c764x1.bin (the S3 VGA BIOS)
- cl67srmrom.exe (from inside es40.zip)
- Create a disks folder (eg, C:\apps\es40\disks) and place in it v73.iso (the Firmware Update CD-ROM).
- Run es40-cfg.exe. This will ask you a series of questions.
You may wish to answer differently to some of them, but the answers
below should work for Windows and Tru64 UNIX. This looks like a lot,
but for most questions you're just accepting the [default option] by
hitting the enter key.
- Do you want to have a GUI? - enter SDL
- Do you want to set a custom scale ratio for the display output? - hit enter (no)
- Should the display output be nearest or bilinear? - hit enter (bilinear)
- Enable runtime display scale changes via hotkeys? - hit enter (no)
- How much RAM memory do you want to emulate? - enter a sensible amount. 1G should be fine.
- Where can the SRM ROM image be found? - hit enter to accept the default (rom\cl67srmrom.exe).
- Where should the Flash ROM image be saved? - hit enter
- Where should the DPR EEPROM image be saved? - hit enter
- How many CPU's do you want in the system (Currently, only one is supported) - hit enter to accept the default (1)
- What should the reported to guest platform speed of the CPU's be in MHz? - hit enter. Note that this setting has no effect on the speed of the emulation; ES40 will try to run as fast as it can, which is still much slower than any CPU you could find in an AlphaServer ES40.
- What telnet port should serial 0 listen? - enter none
- What telnet port should serial 1 listen? - enter none
- Do you want to add any disks to the Floppy controller? - hit enter and jump ahead to step 25.
- How should disk0.0 be emulated? - hit enter
- What file should disk0.0 use?: - enter disks\floppy.img
- If the file doesn't exist, do you want us to create it? - hit enter
- What unit do you want to use to specify the disk size? - enter MB
- How many MBytes should the disk be? - enter 2. ES40 won't let you provide an exact size for a floppy disk, so if you need to use the floppy drive later you'll just have to replace the auto-created image with a proper one.
- Should disk0.0 be a read-only disk? - hit enter
- Would you like to set a disk model number? - hit enter
- Would you like to set a revision number? - hit enter
- Would you like to set a serial number? - hit enter
- Do you want to add any disks to the Floppy controller? - hit enter
- Do you want to add any disks to the IDE controller? - hit enter
- What (if any) VGA card do you wish to add to the system? - hit enter
- What PCI slot should the s3 card be on? - hit enter
- Where can the VGA BIOS ROM image be found? - enter rom\86c764x1.bin
- Would you like to add another PCI card to the system? - enter scsi
- In what PCI slot would you like to put the sym53c810 card? - hit enter
- Do you want to add any disks to the Sym53C810 controller? - enter 0
- How should disk0.0 be emulated? - hit enter
- What file should disk0.0 use? - enter disks\disk0.img
- Should disk0.0 be a disk or a cd-rom device? - hit enter
- If the file doesn't exist, do you want us to create it? - hit enter
- What unit do you want to use to specify the disk size? - enter GB
- How many GBytes should the disk be? - enter a sensible size. For Windows NT 4.0, the value should be no larger than 4GB. For Windows 2000 or Tru64 UNIX, 9GB should be safe.
- Should disk0.0 be a read-only disk? (no,yes) - hit enter
- Would you like to set a disk model number? - hit enter
- Would you like to set a revision number? - hit enter
- Would you like to set a serial number? - hit enter
- Do you want to add any disks to the Sym53C810 controller? - If you'd like to add another hard disk, enter the next available disk number and go back to step 31 . When done adding any additional hard disks, enter the next value and continue on with configuring a CD-ROM drive...
- How should disk0.1 be emulated? - hit enter
- What file should disk0.1 use? enter disks\v73.iso
- Should disk0.1 be a disk or a cd-rom device? - enter cd-rom
- Would you like to set a disk model number? - hit enter
- Would you like to set a revision number? - hit enter
- Would you like to set a serial number? - hit enter
- Do you want to add any disks to the Sym53C810 controller? - hit enter
- Would you like to add another PCI card to the system? - enter nic to add a Network Interface, or skip to step 53
- In what PCI slot would you like to put the dec21143 card? - hit enter
- What host network interface should we connect to - enter ? to get a list of the available options, then enter the number that corresponds to the network interface you'd like to attach ES40 to. If in doubt, pick your wired network interface.
- What should the NIC's MAC address be? - hit enter
- Would you like to add another PCI card to the system? - enter es1370 audio if you'd like to add a sound card, or skip to step 56.
- In what PCI slot would you like to put the es1370 card? - hit enter
- Would you like to add another PCI card to the system? - hit enter
- Would you like to emulate the MPU-401 MIDI device? - the MIDI device only works in Windows, but I don't think there is any harm in it being there for Tru64 or OpenVMS. So just hit enter to get MIDI audio, or type no and skip to step 58
- What MIDI out device should we connect to - if you're only given one number as an option, enter that number. Otherwise, type ? to see what the options are.
- Would you like to emulate the mouse? hit enter
- Where would you like console output to go? - hit enter
- Where would you like printer output to go? - hit enter
- Enable the M7101 power-management / ACPI device at PCI 0:17? - hit enter
- Enable the USB OHCI controller at PCI 0:19? - enter no
- With the config file created, you can now start the emulator by
running es40 Release.exe. Once its
finished starting up, you should be greeted with the SRM console:
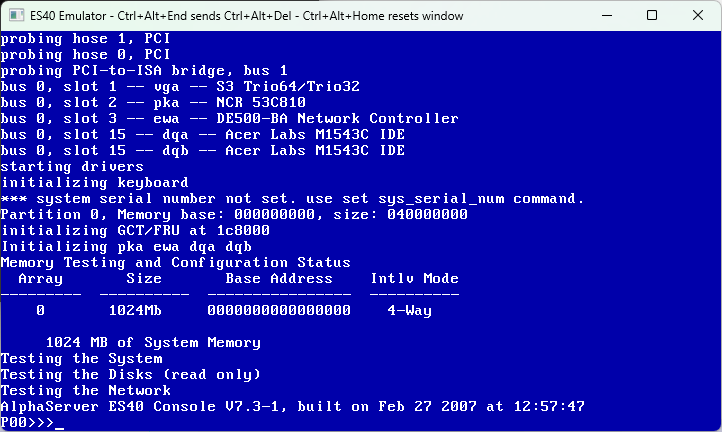
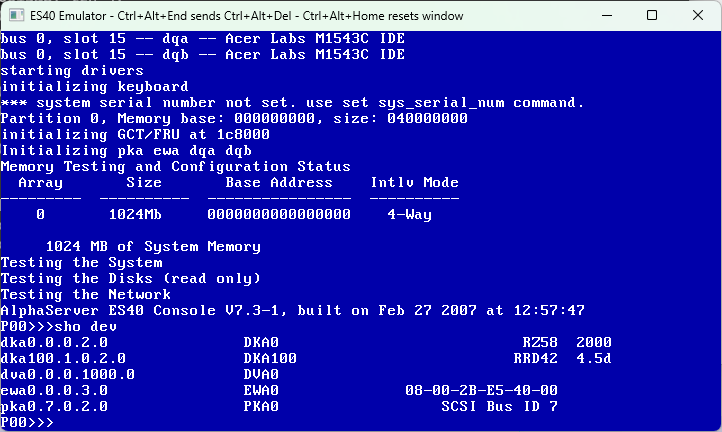
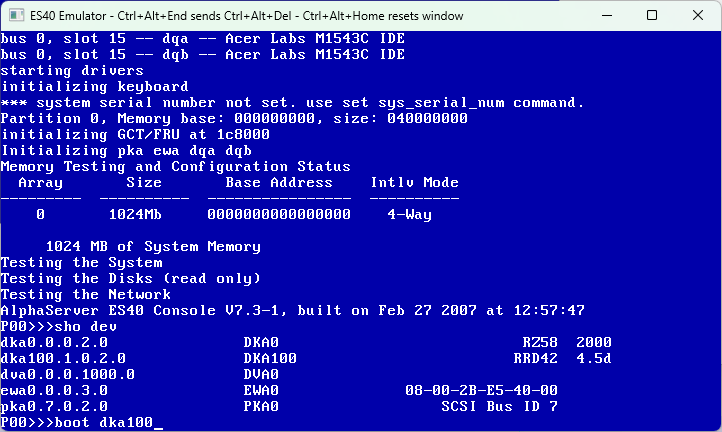
- At the SRM prompt, type sho dev and
hit enter. This will show you the available drives. The first
column shows where the drive is connected, the second column shows
the device name, and the rest is some identification information.
In the screenshot below, you can tell DKA100 is the CD-ROM device
as the drive model number is given as RRD42 (this is a DEC model
number for a CD-ROM drive):
- Boot from the CD-ROM drive identified above, by typing
boot dka100 and hitting the enter key.
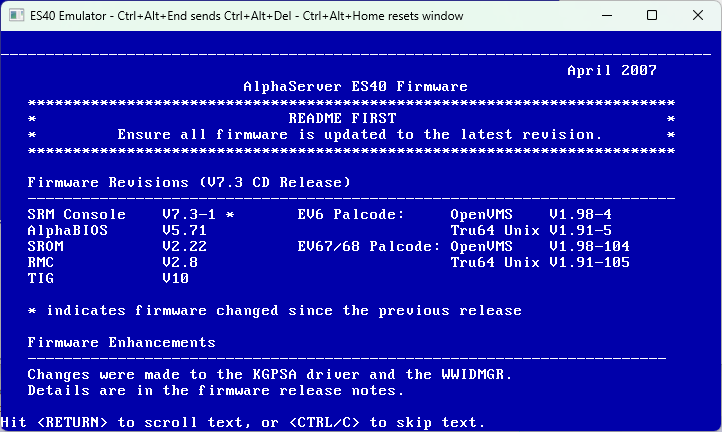
- After a few moments you should see the firmware update readme. Just
hit Ctrl+C to make it go away.
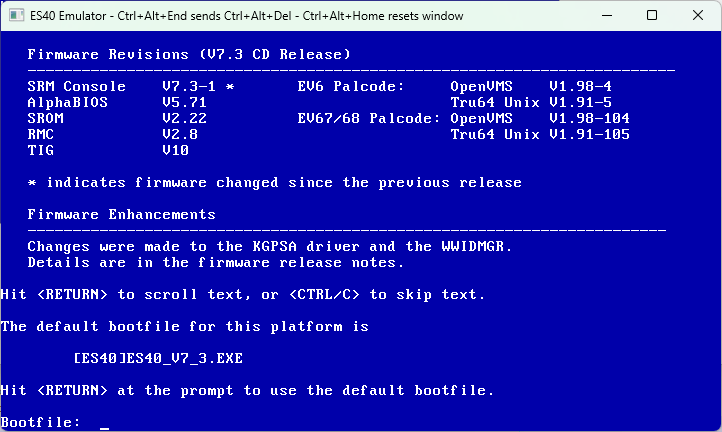
- At the bootfile prompt, type
[ES40]FWUPDATE.EXE and hit the enter
key.
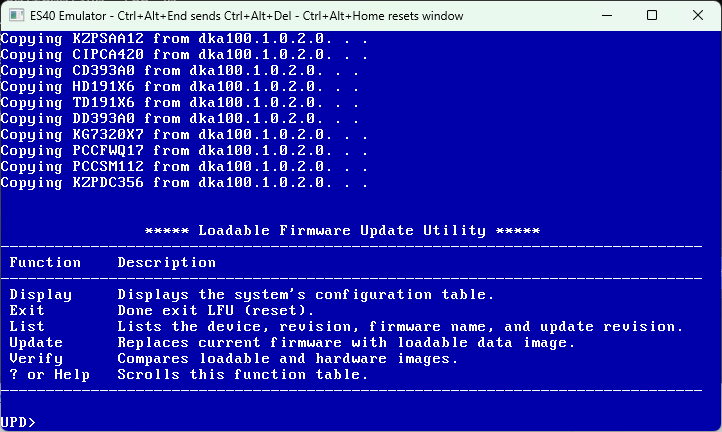
- Nothing will appear to happen for a few seconds, then the emulated
Alpha will reboot into the Loadable Firmware Update Utility:
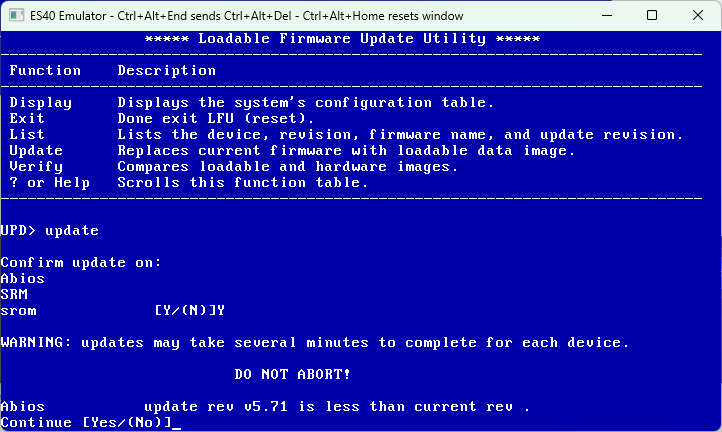
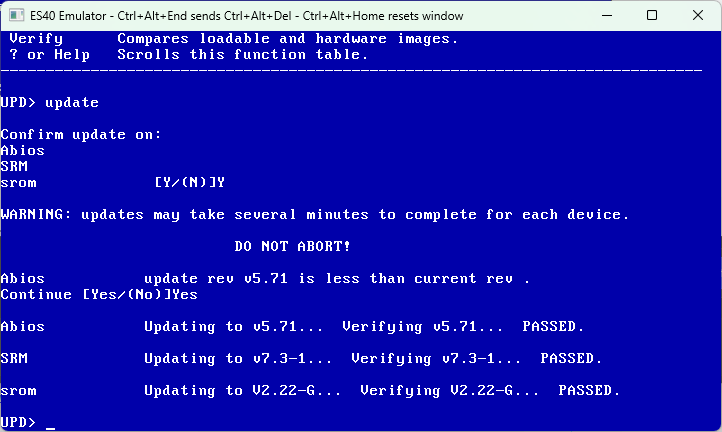
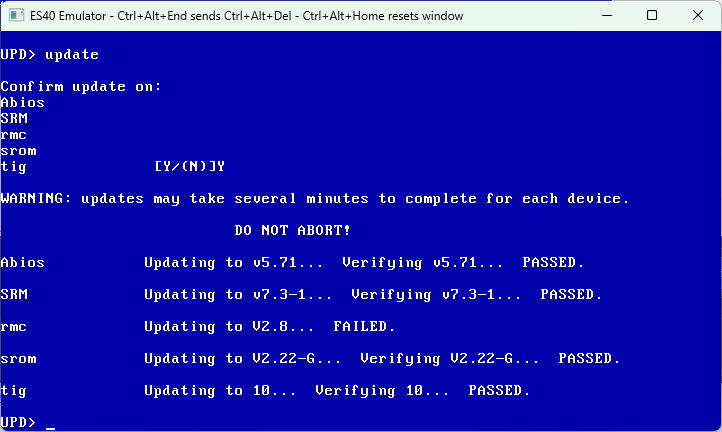
- At the UPD> prompt, type update and hit the enter key.
- You'll then be asked to confirm update on srom - type
Y and hit enter

- Tne you'll be asked if you want to continue.
Type Yes and hit enter:
- The Loadable Firmware Update Utility will proceed to update the
emulators firmware, and once it's done you'll be back at the UPD
prompt:
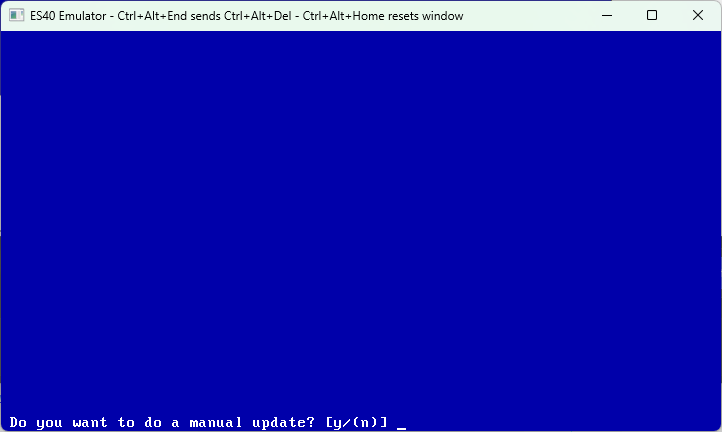
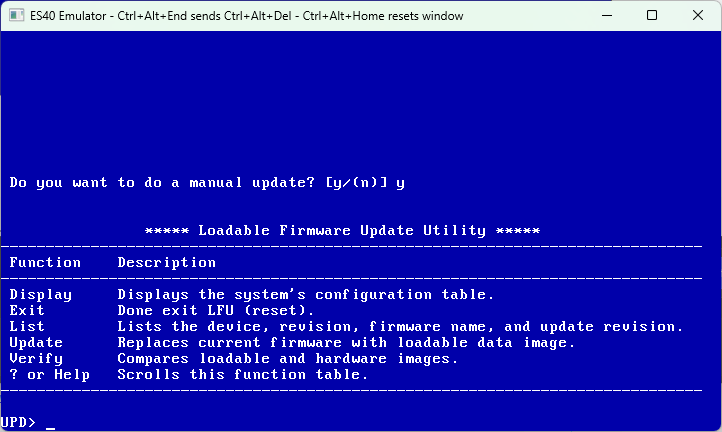
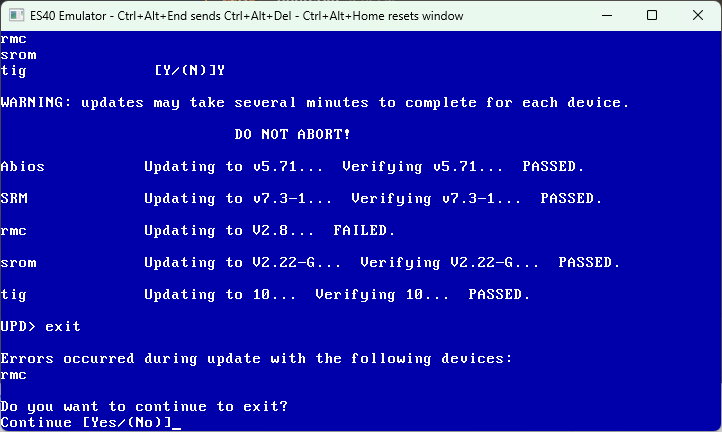
- At the UPD> prompt, type exit and
hit the enter key. You will then be asked if you want to do a manual
update. Type y and hit enter.
- And you'll be back in the Loadable Firmware Update Utility! At the
UPD> prompt, type update and hit enter.
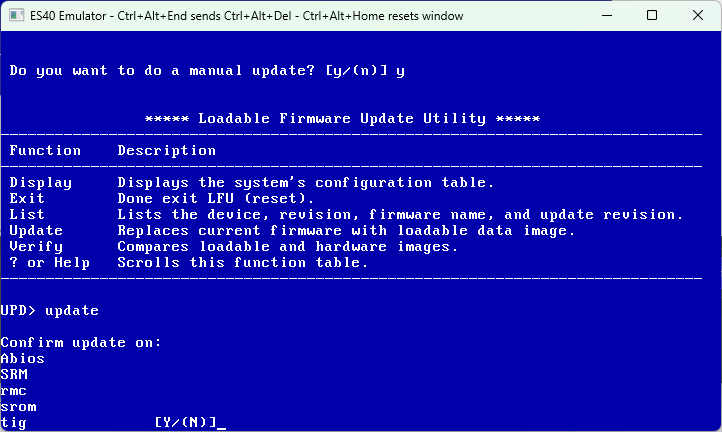
- On round 2, we get some more options! When asked to confirm update
on tig, type Y and hit the enter key:
- And the LFU will proceed to apply firmware updates again, but this
time it will update the TIG firmware. It will also try to update the
RMC firmware, but ES40 doesn't emulate the RMC so that will fail.
This is expected and normal. At the UPD> prompt, type
exit and hit the enter key.
-
LFU will complain that the RMC firmware update failed. This is fine,
type Yes and hit enter.
-
The emulated Alpha should now reboot and put you back at the SRM
prompt. ES40 is now configured and ready for an operating system
to be installed.

- Exit ES40 by closing the window.
Now that the emulator is all setup, you can move on to installing one of the supported guest operating systems:
- Windows NT 4.0
- Windows 2000
- 64bit Windows build 2210
- Tru64 UNIX
- OpenVMS
- Linux/*BSD
Installing Windows NT 4.0
Out of scope for this document currently as it relies on modified installation media due to problems with ES40s floppy drive emulation. When floppy emulation is fixed this section will be updated with installation steps.
The following things may be useful however if you do get it running:
- Sound driver
- Service Pack 6a
- FX!32 (lets you run x86 apps)
You can also find some pointers to native software on the Alpha NT Notes page.
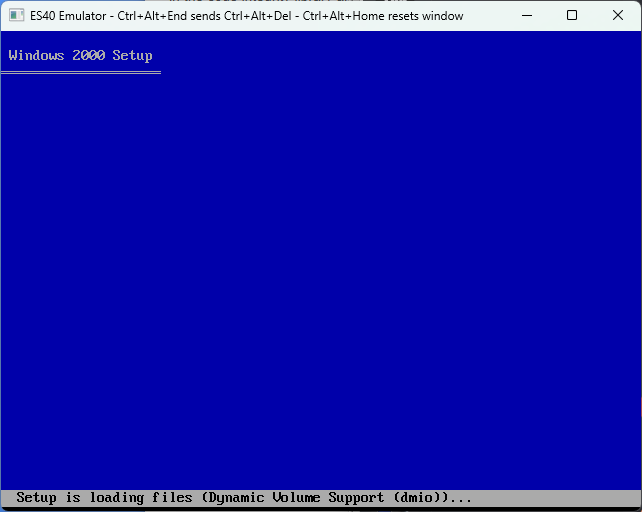
Installing Windows 2000
Unfortunately, Compaq killed the Alpha NT effort two weeks before the release of Windows 2000 RC2. So for a long time, RC1 was the latest known build of Win2k for the Alpha platform. For whatever reason Microsoft did build RC2 for Alpha, perhaps for internal use, and that build did eventually make it on to the internet. Today you can find Win2k RC2 (build 2128) for Alpha on archive.org. Download the ISO file to some place convenient for ES40 (eg, C:\apps\es40\disks\W2PAS_EN.iso).
Open the es40 config file (eg, C:\apps\es40\es40.cfg in notepad and find the configuration section for the CD-ROM drive. If you've just finished setting up ES40, then the Firmware Update CD-ROM will still be in the drive so just search for v73.iso to find a section like the following:
    disk0.1 = file
    {
      file = "disks\v73.iso";
      cdrom = true;
      read_only = true;
    }
Change the ISO file to the Windows 2000 one. Save and close the file:
    disk0.1 = file
    {
      file = "disks\W2PAS_EN.iso";
      cdrom = true;
      read_only = true;
    }
Now start ES40 by running es40 Release.exe
and wait for it to reach the SRM console firmware
P00>>> prompt:
At the P00>>> prompt, type
arc and hit the enter key. This will
switch from the SRM firmware (used for booting OpenVMS, Tru64 UNIX,
Linux, etc) to the AlphaBIOS firmware (used for booting Windows).
The attached telnet client might make some noise at this point, but you
can ignore it. Eventually you should see the VGA BIOS followed by a
nice logo:
![]()
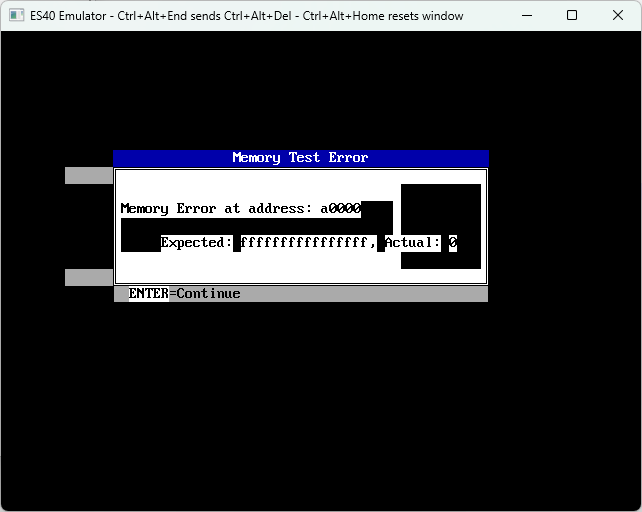
Next, AlphaBIOS will start doing a memory test. At the time of writing
a bug in the emulator will result in the screen going black. Eventually
some digits will appear in the middle of the screen and start counting
up until you get the error below. Just hit enter to continue.
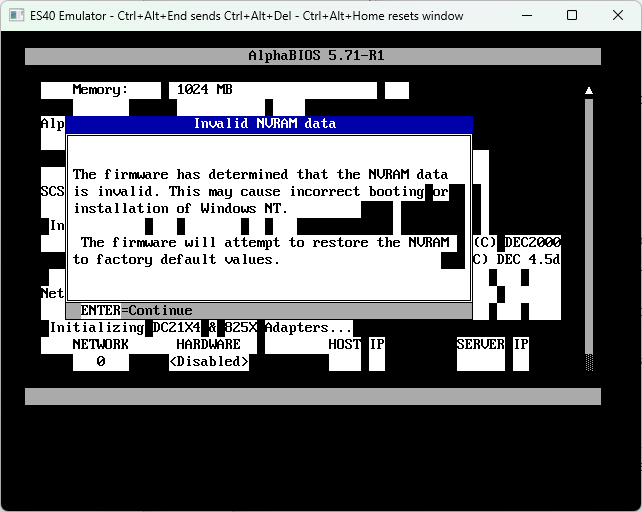
AlphaBIOS will continue with discovering hardware, before complaining
that the NVRAM data is bad. This will only happen once. Just hit enter,
AlphaBIOS will restart, you'll get the above Memory Error again (hit
enter again).
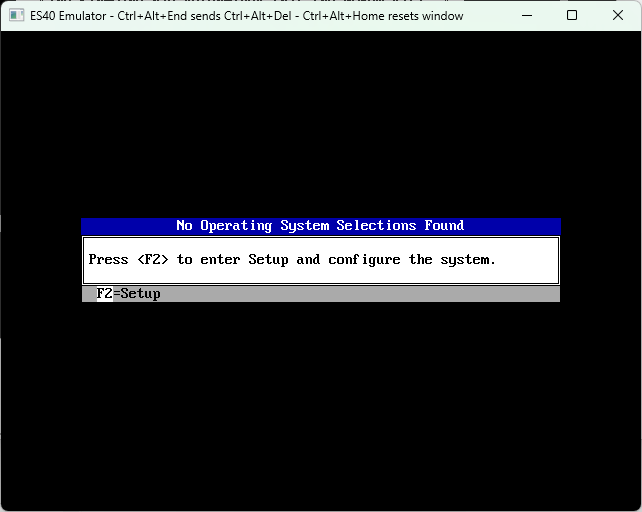
Next you'll be told there are no operating systems installed. Hit F2 to
enter setup:
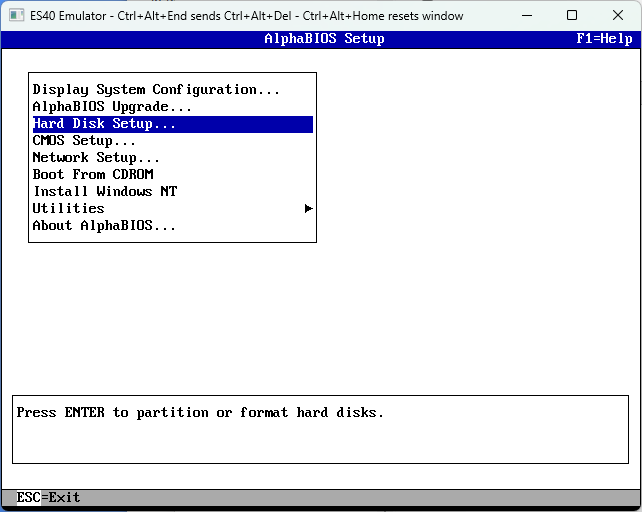
Use the arrow keys to select the Hard Disk Setup option, and
hit the enter key to select it:
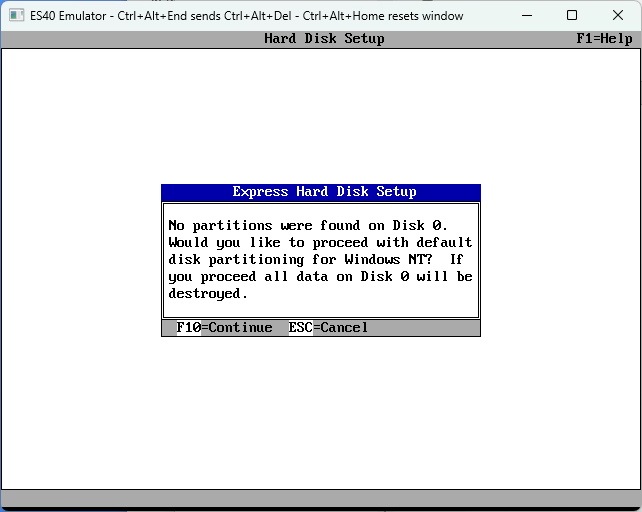
You'll be then told that no partitions were found on the hard disk.
Press the F10 key to let AlphaBIOS setup some sensible partitions for
Windows.
You'll then be told that two partitions have been created. Press the enter
key.
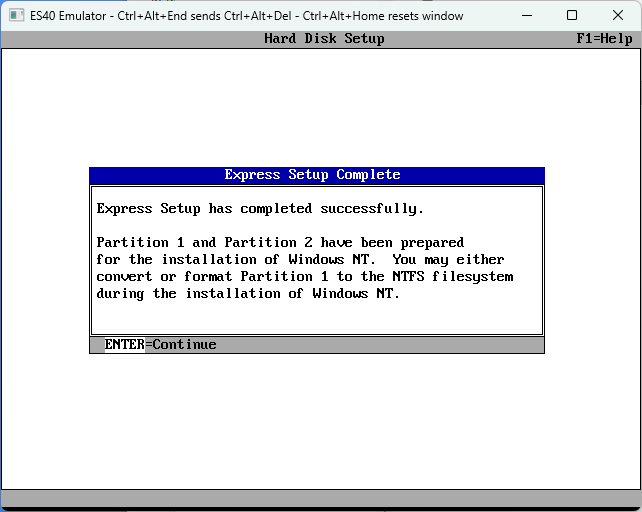
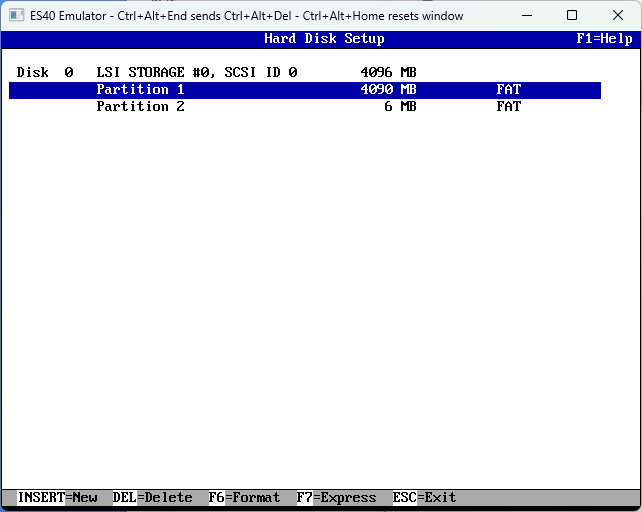
And you can now see the two partitions that were created. The big one is
where Windows will live, and the small one is the
ARC System partition which will contain some files that
AlphaBIOS needs in order to start Windows. Hit the Esc key to go back to
the menu.
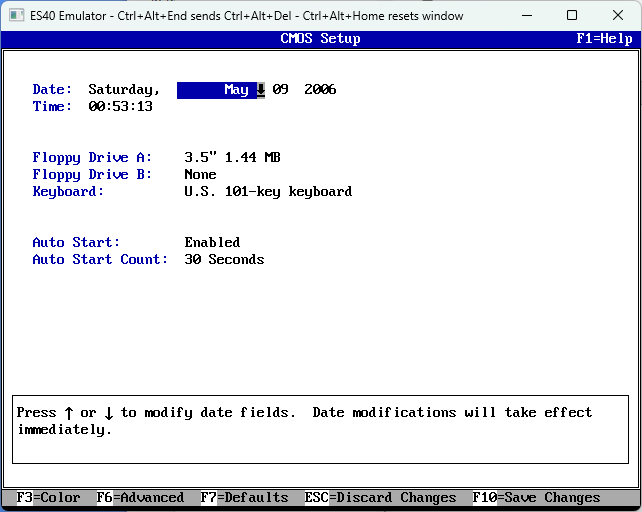
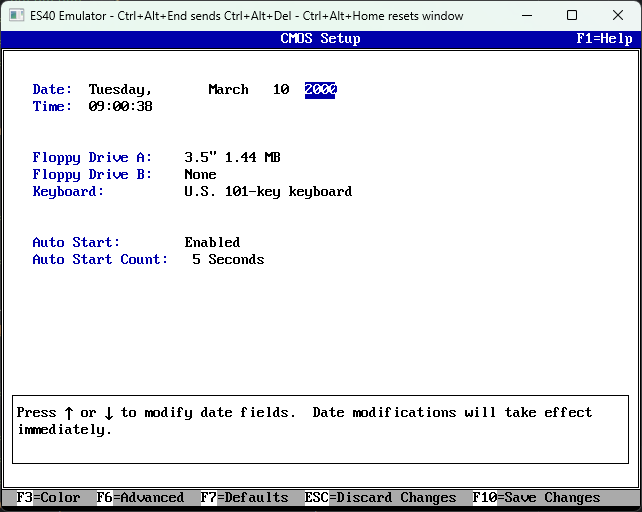
Next, go the CMOS Setup screen:

Here you can set the time and date to something sensible, then press the
F6 key to go to Advanced CMOS Setup.
On the Advanced CMOS Setup screen, use the tab key to get to
the Power-up Memory Test option, then use the arrow keys to select the
Disabled option and hit F10 to save. This will mean no more
screen going black or memory errors when entering AlphaBIOS. And back at
the CMOS setup screen, hit F10 again to save changes.
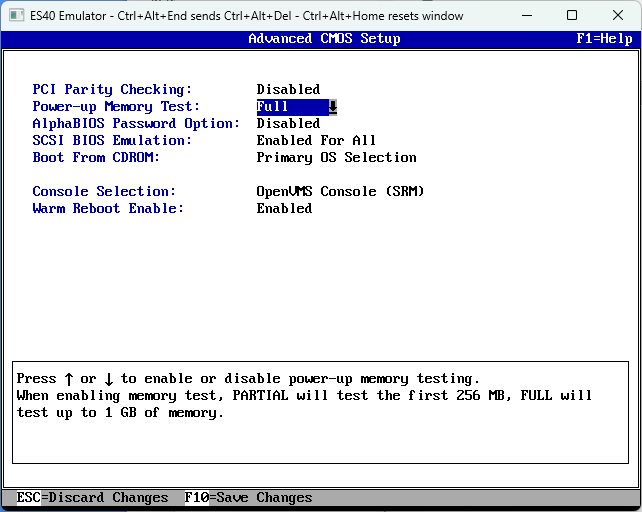
You'll be asked if you really want to save. Hit enter.
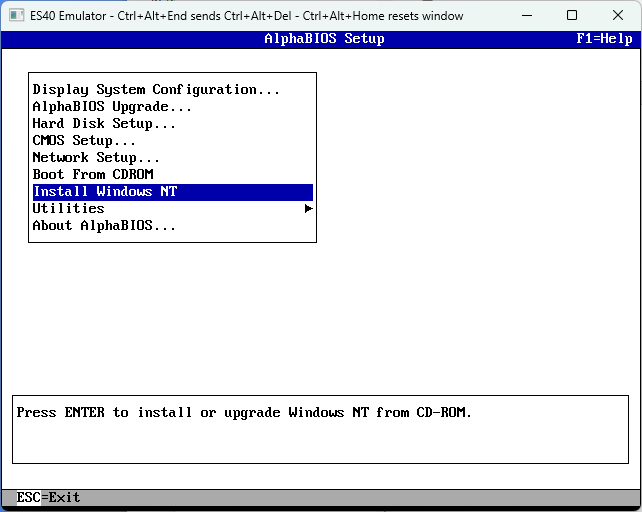
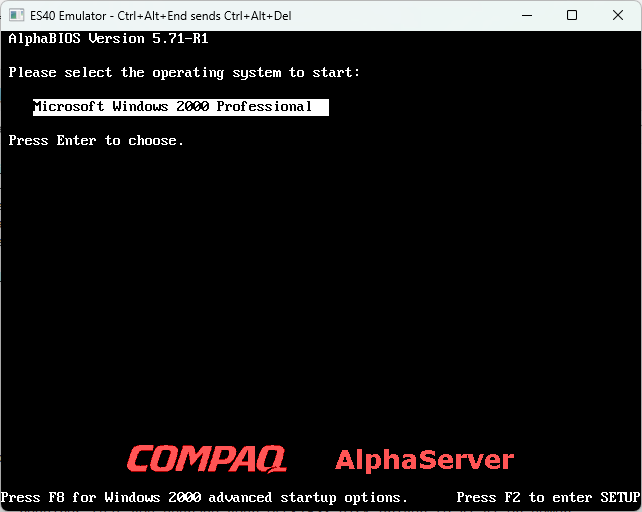
Back at the AlphaBIOS Setup menu, select the
Install Windows NT option and hit enter.
Windows 2000 Setup will start. You don't need to press F6 - Win2k knows
what an AlphaServer ES40 is and has all the required drivers and HAL.
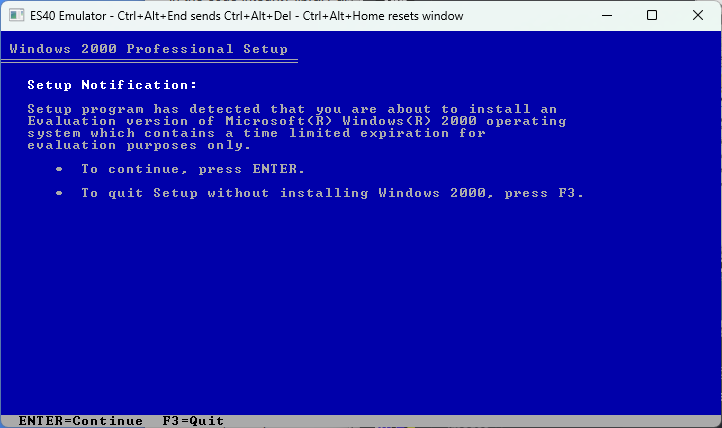
Windows complains that it's an evaluation version. Whatever, hit enter.
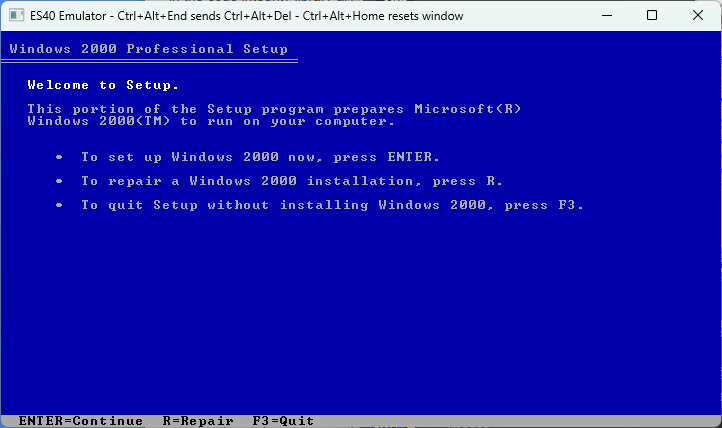
Press enter to install Windows...
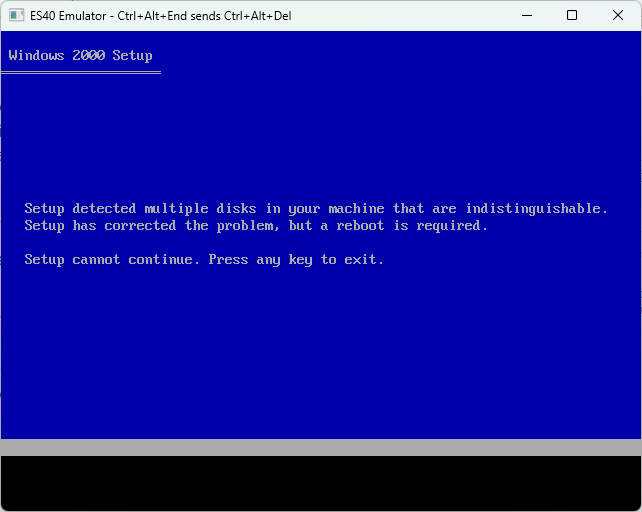
It's possible that you might now get a screen complaining that "Setup detected multiple disks in your machine that are indistinguishable" (like in this screenshot). This isn't a bug or user error - it can happen on real hardware too. Just press any key to let setup do its thing and restart. Setup won't relaunch automatically, so hit F2 when you get the No Operating System Selections Found screen, then go back to here to restart setup.
Press F8 to agree to the license, then you should be greeted with the
disk partitioning screen:

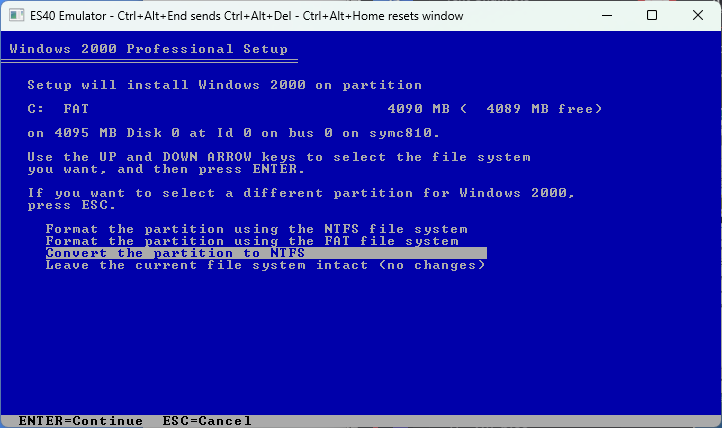
Install Windows to C:. You must leave the D: partition alone; don't delete it or format it.
You are however free to convert or format the C: partition as NTFS if
you wish.
From here the process is no different from installing Windows 2000 on some x86 box. No need for further explanation or screenshots; just go through the setup process how you normally would.
What Next
Windows 2000 for the Alpha platform isn't too much different from the regular x86 version. It can even run regular x86 apps thanks to having Digitals FX!32 utility built-in, though native 32bit Alpha software will perform better. You can find some pointers to native software on the Alpha NT Notes page.
Once you've finished installing and playing around with Windows 2000, if you need to exit and later re-launch ES40 you'll end up back at the SRM firmware. To get back to Windows you'll need to enter the arc command to switch to AlphaBIOS as you did earlier. Compaq never actually supported running Windows on the AlphaServer ES40, so unfortunately the normal setting to make AlphaBIOS start automatically on power-up (set os_type nt on other machines) doesn't work here.
Installing 64bit Windows build 2210
Contrary to popular opinion, at one point Digital/Compaq and Microsoft had every intention of releasing 64bit Windows on the Alpha platform. Digital/Compaq were even advertising that 64bit Windows would come to Alpha first, and listing which AlphaServers would be compatible. Then in mid-1999, Compaq canceled the Alpha NT effort putting an end to both Windows 2000 and the future 64bit Windows for the Alpha platform. From that point on, 64bit Windows for the Alpha was just an internal Microsoft development tool to help them sort out any 64bit portability issues while waiting for the Itanium hardware to arrive in volume.
Many years later, a 64bit build of Windows eventually made its way on to the internet. The story is documented in a series of posts on the Virtually Fun blog:
- Hiding in plain sight: The 64bit Dec Alpha C compiler
- Windows 2000 64-bit for Alpha AXP / AXP64 / ALPHA64 (build 2210)
- AXP64 2210 Installation Media Reconstruction
All of these are worth reading before getting started, and the third one will give you a link to the install media. If you skip reading the above, just keep in mind that build 2210:
- Is not a finished product, or even a beta. It was never intended to be seen outside of Microsoft.
- Can not run regular 32bit Alpha software from Windows NT/2000, probably because at this point its only reason for existing was to test 64bit software. It can run 32bit x86 software though; Microsoft didn't bother ripping out FX!32.
- The NTFS driver and filesystem checker is a bit buggy, and can lead to filesystem corruption.
To start, download the 2210 ISO file and save it somewhere convenient for es40 (eg, C:\apps\es40\disks\axp64-2210-installable.iso).
Open the es40 config file (eg, C:\apps\es40\es40.cfg in notepad and find the configuration section for the CD-ROM drive. If you've just finished setting up ES40, then the Firmware Update CD-ROM will still be in the drive so just search for v73.iso to find a section like the following:
    disk0.1 = file
    {
      file = "disks\v73.iso";
      cdrom = true;
      read_only = true;
    }
Change the ISO file to the Windows 2210 one. Save and close the file:
    disk0.1 = file
    {
      file = "disks\axp64-2210-installable.iso";
      cdrom = true;
      read_only = true;
    }
Now start ES40 by running es40 Release.exe
and wait for it to reach the SRM console firmware
P00>>> prompt:
At the P00>>> prompt, type
arc and hit the enter key. This will
switch from the SRM firmware (used for booting OpenVMS, Tru64 UNIX,
Linux, etc) to the AlphaBIOS firmware (used for booting Windows).
The attached telnet client might make some noise at this point, but you
can ignore it. Eventually you should see the VGA BIOS followed by a
nice logo:
![]()
Next, AlphaBIOS will start doing a memory test. At the time of writing
a bug in the emulator will result in the screen going black. Eventually
some digits will appear in the middle of the screen and start counting
up until you get the error below. Just hit enter to continue.
AlphaBIOS will continue with discovering hardware, before complaining
that the NVRAM data is bad. This will only happen once. Just hit enter,
AlphaBIOS will restart, you'll get the above Memory Error again (hit
enter again).
Next you'll be told there are no operating systems installed. Hit F2 to
enter setup:
Use the arrow keys to select the Hard Disk Setup option, and
hit the enter key to select it:
You'll be then told that no partitions were found on the hard disk.
Press the F10 key to let AlphaBIOS setup some sensible partitions for
Windows.
You'll then be told that two partitions have been created. Press the enter
key.
And you can now see the two partitions that were created. The big one is
where Windows will live, and the small one is the
ARC System partition which will contain some files that
AlphaBIOS needs in order to start Windows. Hit the Esc key to go back to
the menu.
Next, go the CMOS Setup screen:
Here you need to change the date to something 2210 can handle. The 10th
of March 2000 works. Then press the F6 key to go to Advanced CMOS Setup.
On the Advanced CMOS Setup screen, use the tab key to get to
the Power-up Memory Test option, then use the arrow keys to select the
Disabled option and hit F10 to save. This will mean no more
screen going black or memory errors when entering AlphaBIOS. And back at
the CMOS setup screen, hit F10 again to save changes.
You'll be asked if you really want to save. Hit enter.
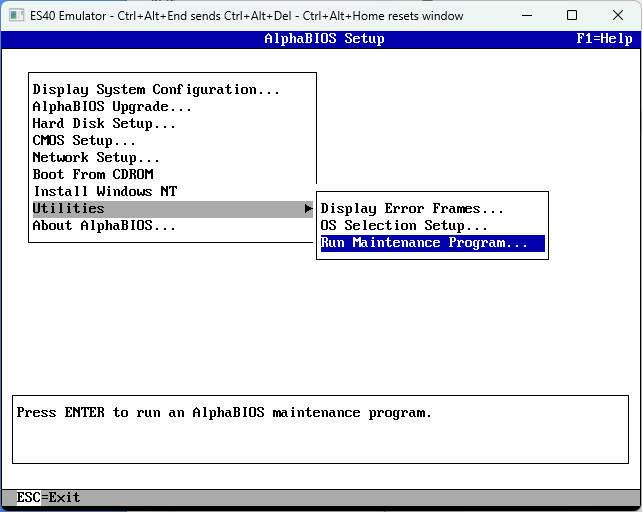
Back at the AlphaBIOS Setup menu, select the
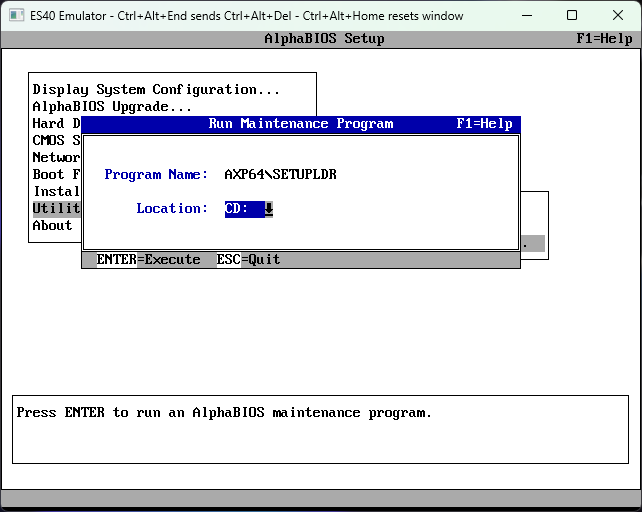
Utilties option, then Run Maintenance Program and hit enter.
Enter AXP64\SETUPLDR as the program name
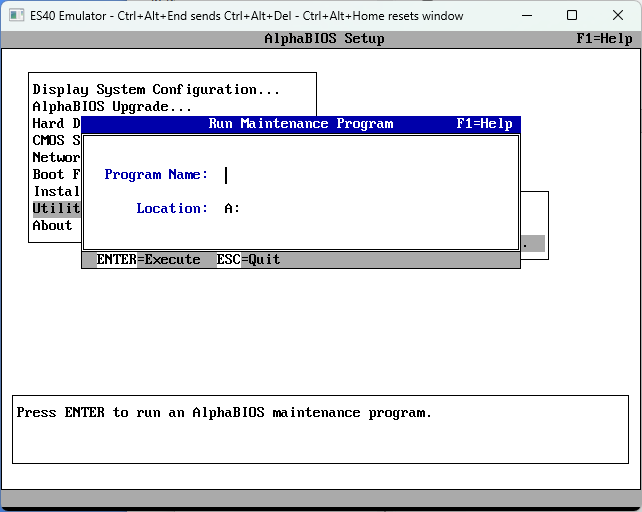
Then use the tab key to pick a location, and the arrow keys to select
the CD: option. Press Enter to run it.
Windows Setup will start. You don't need to press F6 - Windows knows
what an AlphaServer ES40 is and has all the required drivers and HAL.
Windows complains that it's an evaluation version. Whatever, hit enter.
Press enter to install Windows...
It's possible that you might now get a screen complaining that "Setup detected multiple disks in your machine that are indistinguishable" (like in this screenshot). This isn't a bug or user error - it can happen on real hardware too. Just press any key to let setup do its thing and restart. Setup won't relaunch automatically, so hit F2 when you get the No Operating System Selections Found screen, then go back to here to restart setup.
Press F8 to agree to the license, then you should be greeted with the
disk partitioning screen:
Install Windows to C:. You must leave the D: partition alone; don't delete it or format it.
You are however free to convert or format the C: partition as NTFS if
you wish. Remember the point at the start about the NTFS driver being
buggy though. Microsoft used NTFS with this build, and I always have
too, but I have also lost a filesystem (only one) due to
corruption caused by the bugs. So if you pick NTFS, take backups and
accept that you may get some more practice installing 2210 in the
future. Some people recommend using FAT instead to avoid the NTFS driver
bugs - I never have, so I can't comment if this truly works or not.
From here the install process isn't much different from Windows 2000, so I won't bother to include a mountain of screenshots of things you've probably already seen dozens of times before. Just pretend you're installing Win2k and go through setup as you normally would. Though note that the install process.
Right at the very end of setup after you click Finish, you'll probably
see a message saying errors occurred during install. This is normal.
Just click No to reboot.

Once setup has finished and you're about to boot the installed
system for the first time, there is one extra step you need to do!
Instead of booting into the installed system, hit F2 to go into
AlphaBIOS Setup.
Then navigate down to the Utilities menu option, and across to OS
Selection Setup...
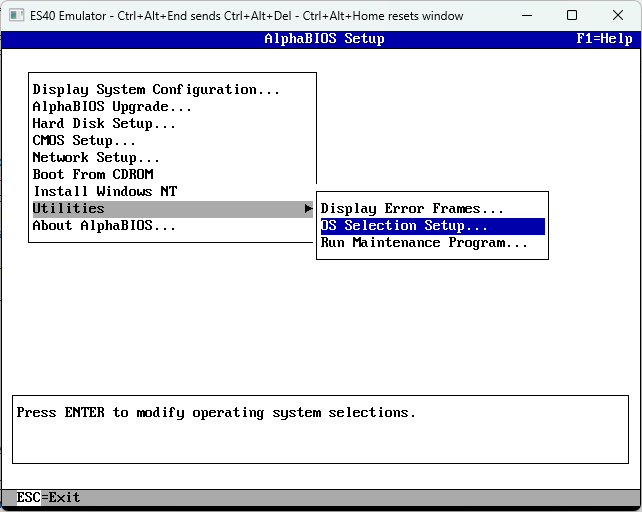
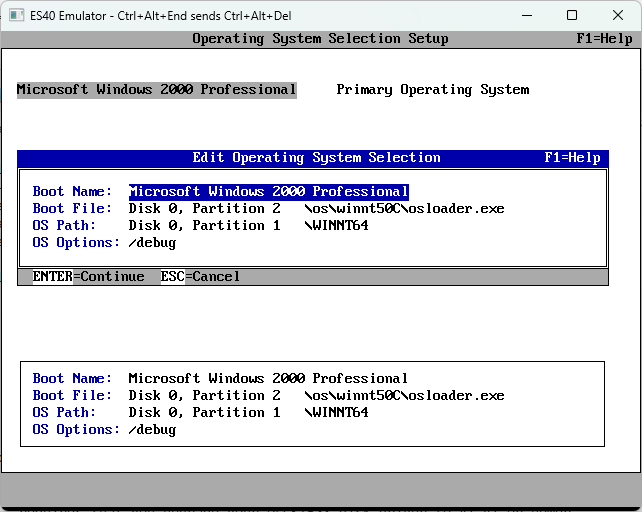
The only boot menu entry should be selected. Hit the F6 key to edit it.
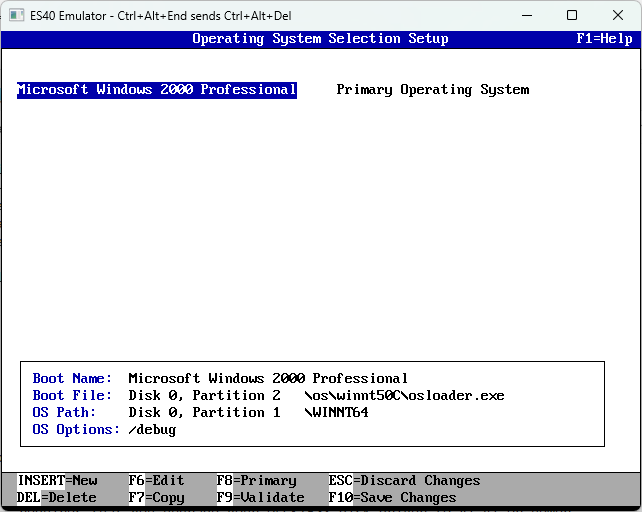
The Edit Operating System Selection dialog will appear. Tab down to the
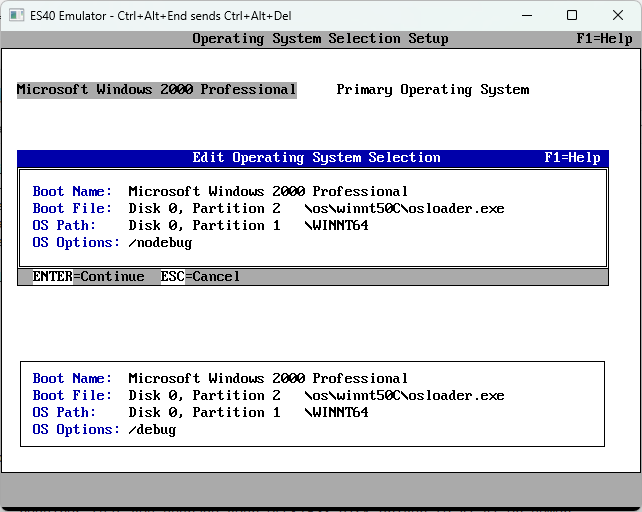
OS Options field, and replace /DEBUG with /NODEBUG.
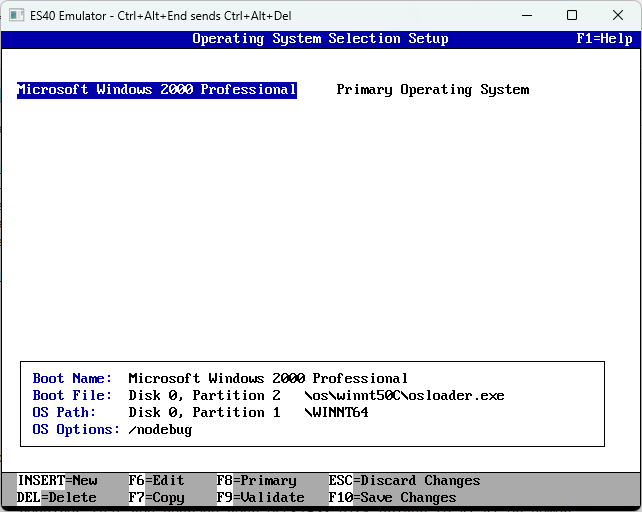
Then hit enter to continue, then F10 to save changes, pressing enter
again to confirm.
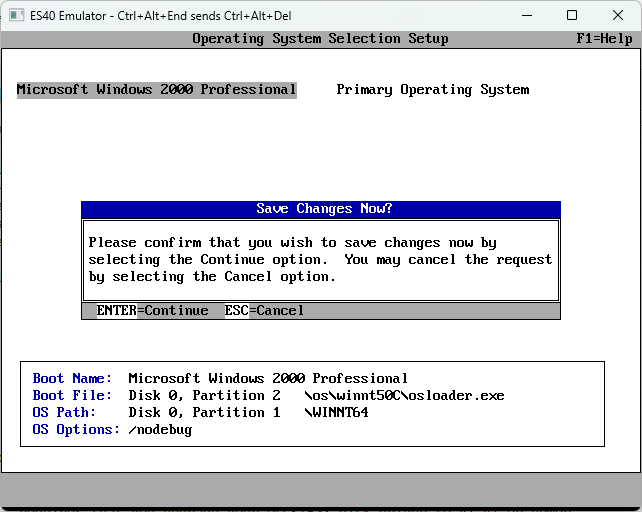
You can now exit AlphaBIOS setup (hit Esc twice) and boot Windows
normally. If windows tries to run a filesystem check, and you installed
on NTFS, cancel it. Letting it run autochk may result in filesystem
corruption.
What Next
Once you've finished playing around with Windows, if you need to exit and later re-launch ES40 you'll end up back at the SRM firmware. To get back to Windows you'll need to enter the arc command to switch to AlphaBIOS as you did earlier. Compaq never actually supported running Windows on the AlphaServer ES40, so unfortunately the normal setting to make AlphaBIOS start automatically on power-up (set os_type nt on other machines) doesn't work here.
Windows NT 3.x?
Just like a real AlphaServer ES40, the es40 emulator can not run Windows NT 3.1, 3.50 or 3.51. It is simply too new and too different from any Alpha system those versions of Windows know about.
In order to run the Alpha platform versions of Windows NT 3.x, an entirely different and much older Alpha system would need to be emulated. For example, the AlphaStation 200 officially supported Windows NT 3.50 and 3.51, while the DECpc AXP 150 was the only machine capable of running Windows NT 3.1 (plus a few machines based on the same hardware). At the time of writing there is nothing that can emulate either of these machines or anything else of a similar vintage.
Installing OpenVMS
ES40 is capable of running OpenVMS (this is in fact the primary goal of its maintainer). Unfortunately VMS Software has withdrawn the free hobbyist/community licenses so it is no longer possible to properly run OpenVMS without paying (a significant amount of money) for it. If you've bought a copy of OpenVMS, you already know how to use it so how to install it is out of scope for this document.
Installing Tru64 UNIX
HP Tru64 UNIX (formerly Compaq Tru64 UNIX, formerly Digital UNIX, formerly DEC OSF/1 AXP) is the native UNIX implementation for the Alpha platform. The first release to support the AlphaServer ES40 was Compaq Tru64 UNIX v4.0F, while the final release was HP Tru64 UNIX v5.1B-6. We'll focus on v5.1B here, but earlier releases should be much the same. The process described here isn't necessarly the best way to do it, but its sufficient for playing around. There is plenty of documentation on installing Tru64 (and more) if you really want to get into the weeds and do something customised.
Note that Tru64 does have license enforcement, so using certain features will require loading the appropriate Product Authorization Keys (PAKs). How you obtain these is up to you. I was lucky enough to get one of the non-commercial hobbyist/non-commercial licenses that HP/Compaq used to sell for a nominal fee in the early 2000s.
Firstly, you'll need to grab the Tru64 UNIX v5.1B Operating System Volume 1 ISO from somewhere (part number AG-RHB5F-BE) and save it someplace convenient for ES40 (eg, C:\apps\es40\disks\AG-RHB5F-BE.iso)
Open the es40 config file (eg, C:\apps\es40\es40.cfg in notepad and find the configuration section for the CD-ROM drive. If you've just finished setting up ES40, then the Firmware Update CD-ROM will still be in the drive so just search for v73.iso to find a section like the following:
    disk0.1 = file
    {
      file = "disks\v73.iso";
      cdrom = true;
      read_only = true;
    }
Change the ISO file to the Tru64 one:
    disk0.1 = file
    {
      file = "disks\AG-RHB5F-BE.iso";
      cdrom = true;
      read_only = true;
    }
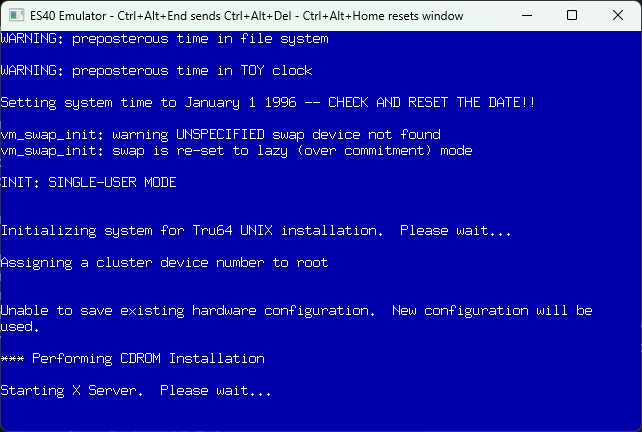
At the time of writing (11-MAY-2026), a bug in ES40s floppy controller emulation may prevent Tru64 from booting. So remove the fdc0 device from the config file too, then save and close the file:
    fdc0 = floppy
    {
    }
Now start ES40 by running es40 Release.exe
and wait for it to reach the SRM console firmware
P00>>> prompt:
At the SRM prompt, type sho dev and
hit enter. This will show you the available drives. The first
column shows where the drive is connected, the second column shows
the device name, and the rest is some identification information.
In the screenshot below, you can tell DKA100 is the CD-ROM device
as the drive model number is given as RRD42 (this is a DEC model
number for a CD-ROM drive):
Boot from the CD-ROM drive identified above, by typing
boot dka100 and hitting the enter key.
Tru64 will now start booting from the CD-ROM. This may take a while...

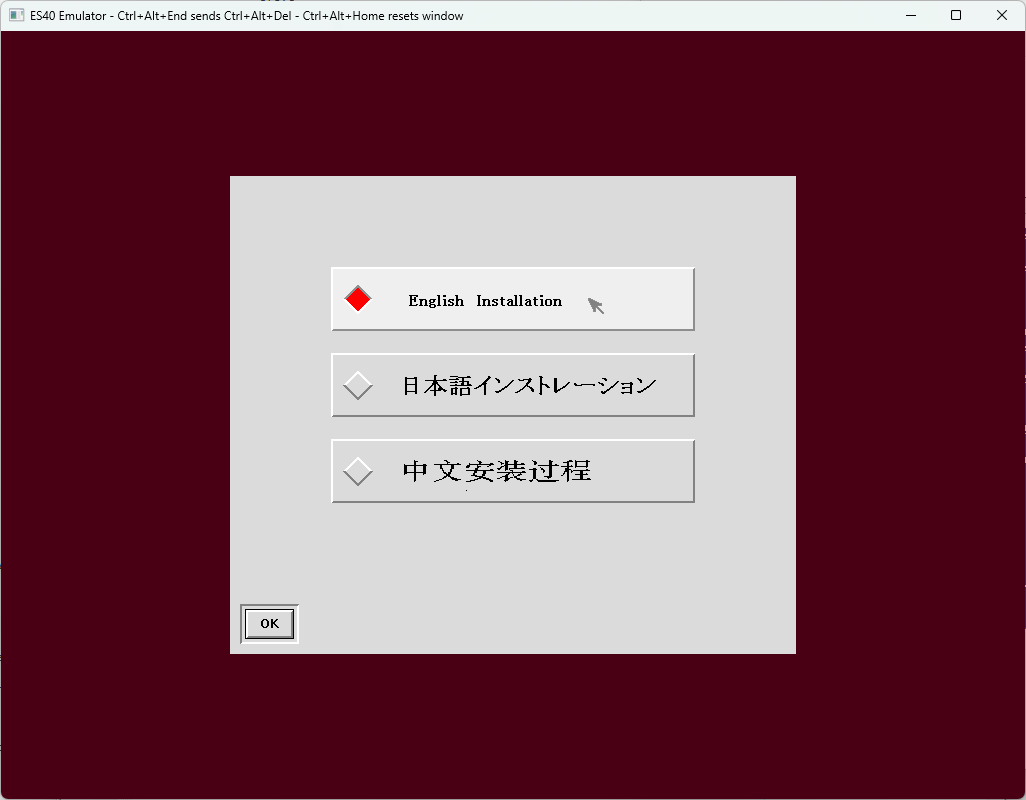
Eventually, X11 starts and you can pick a language! We're doing English
here, so pick that and click on OK
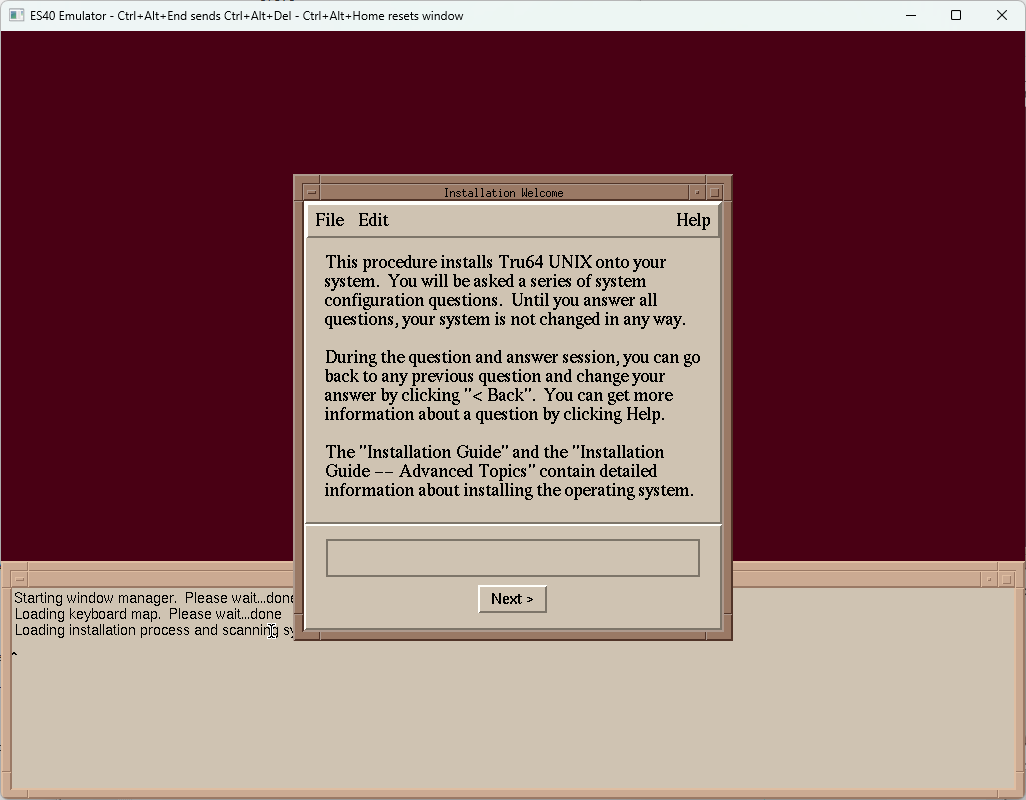
At the Welcome screen, click Next.
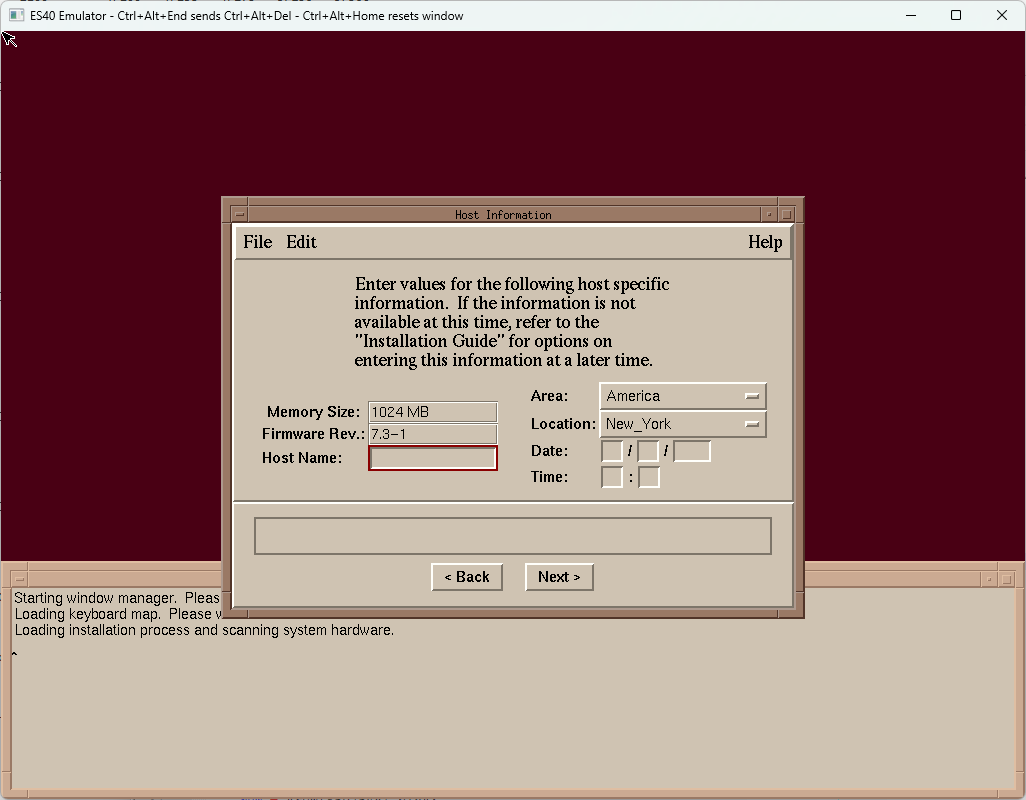
Enter a hostname, select a location, and enter the date and time.
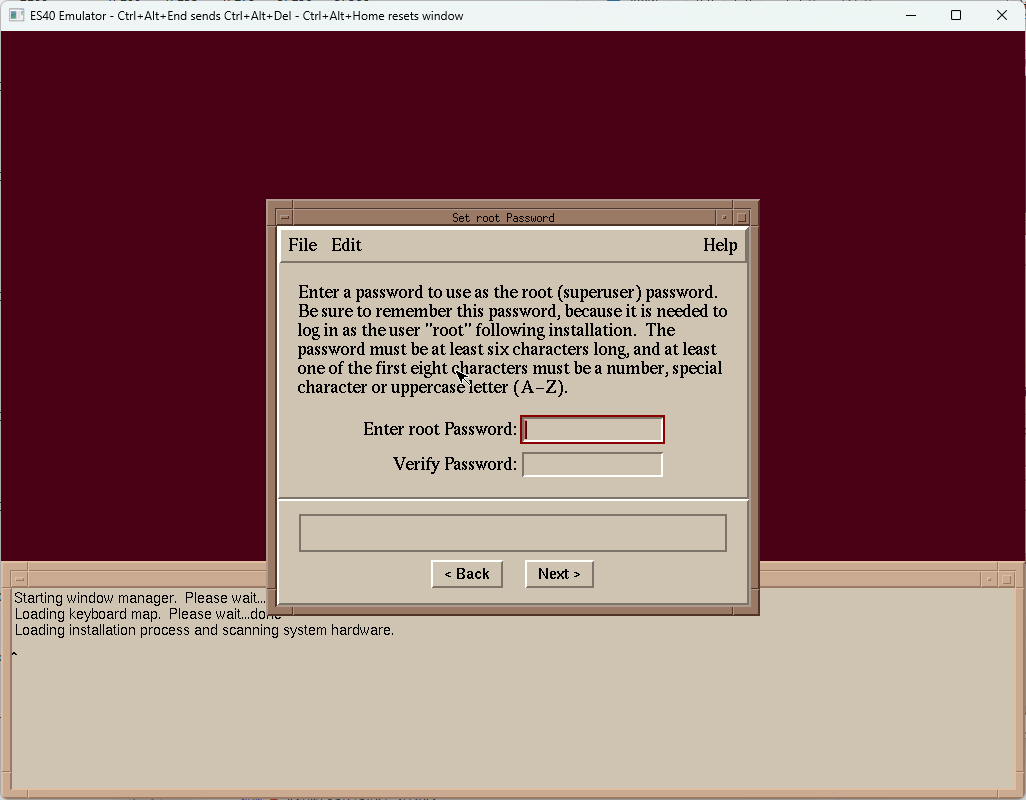
Enter a password for the root (admin) user.
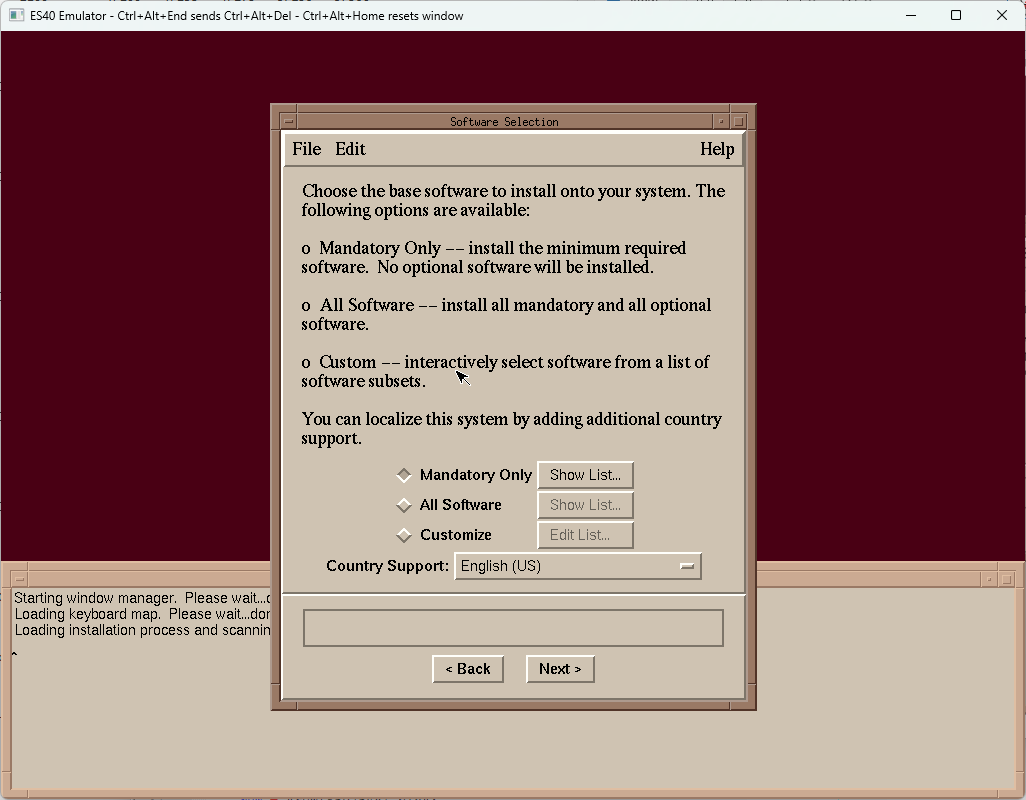
Select what to install. Pick the All Software option and click Next.
(this isn't actually all software - there are another two
Associated Products CDs, plus the Open Source Software Collection.
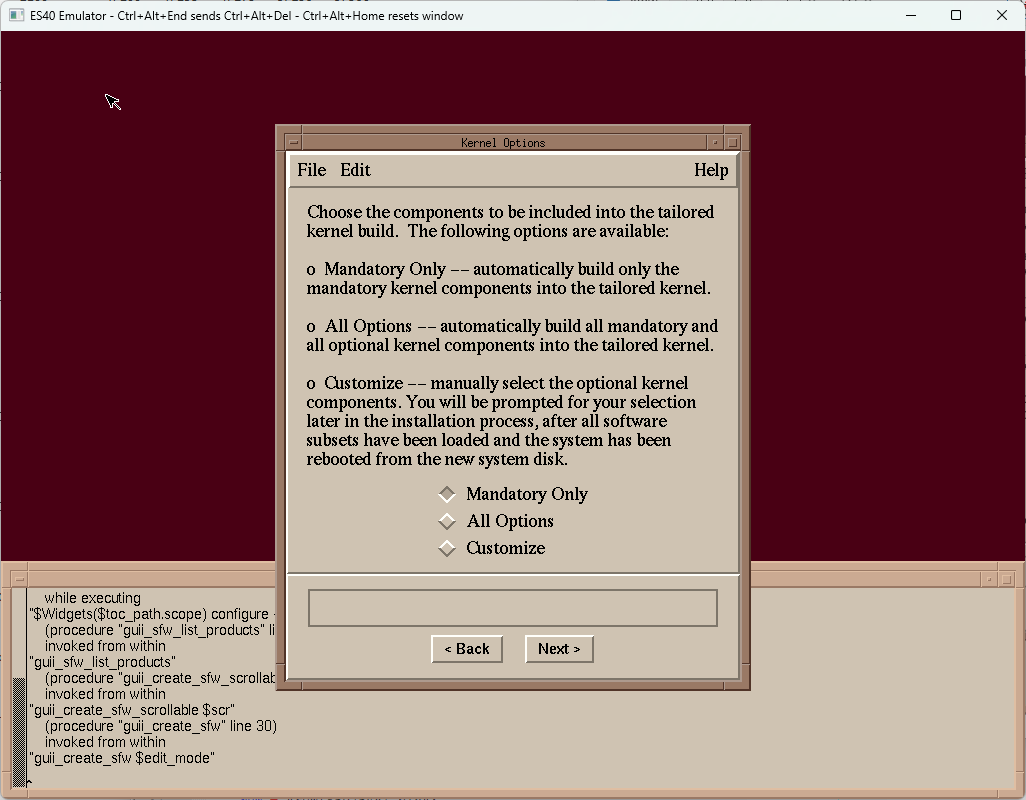
Select Kernel options. Pick the All Options option and click Next.
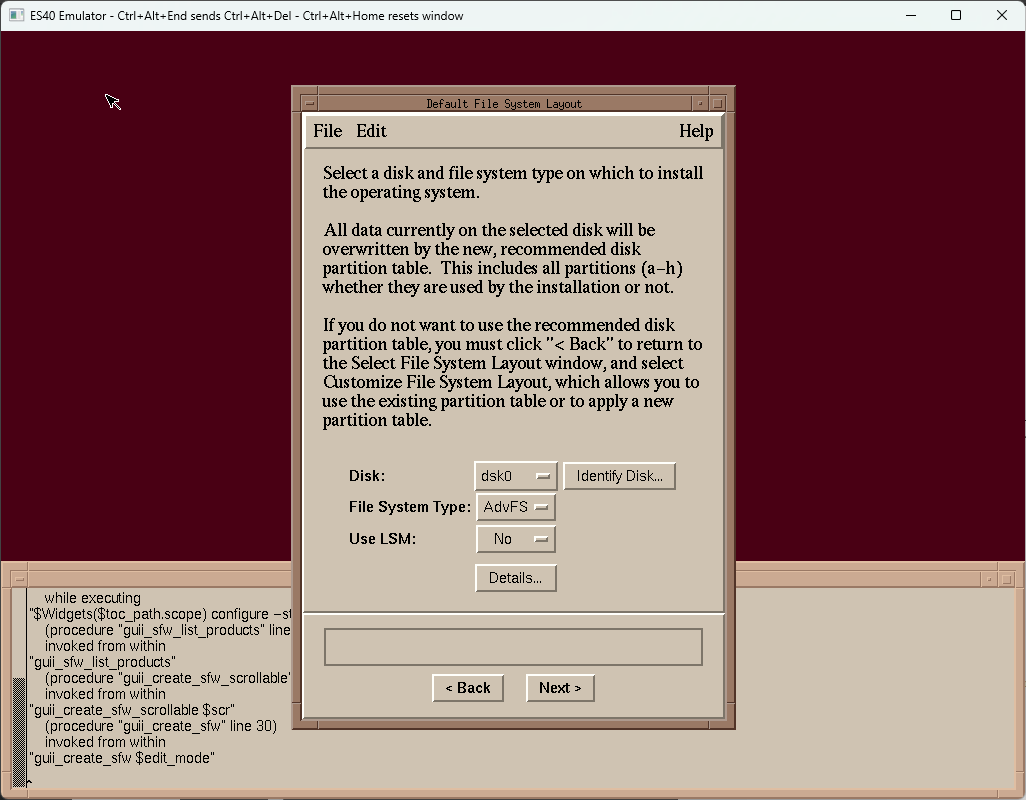
Just click Next to accept the default filesystem layout.

Click Next again to create a new AdvFS filesystem.
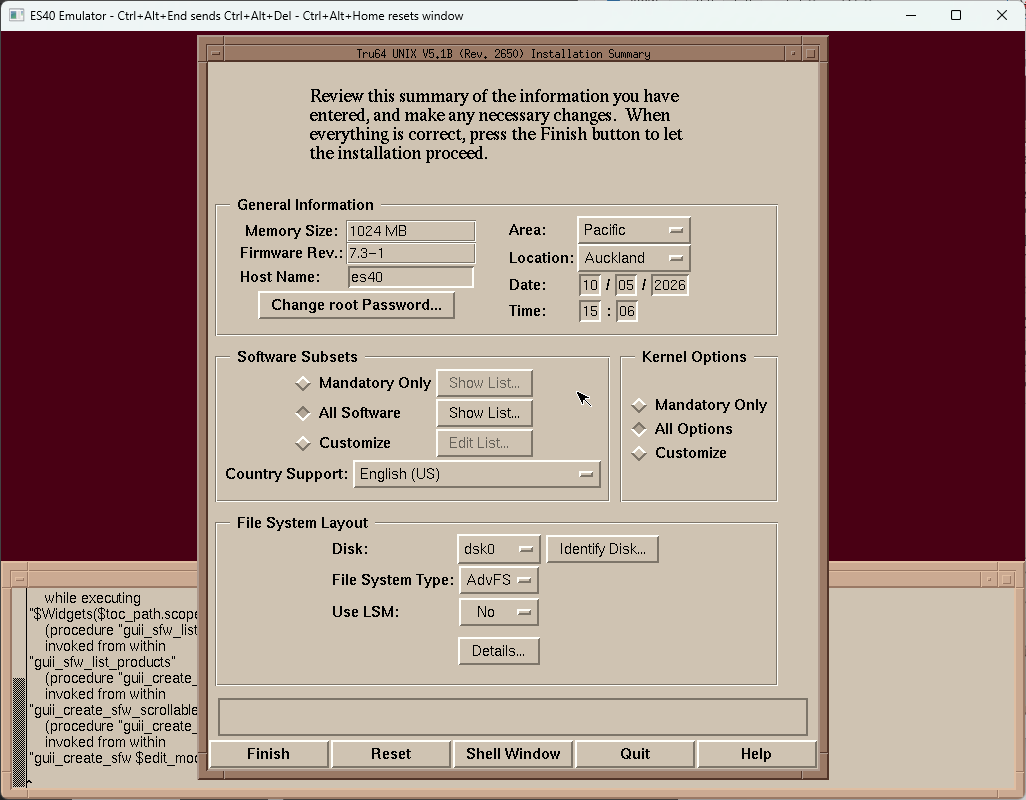
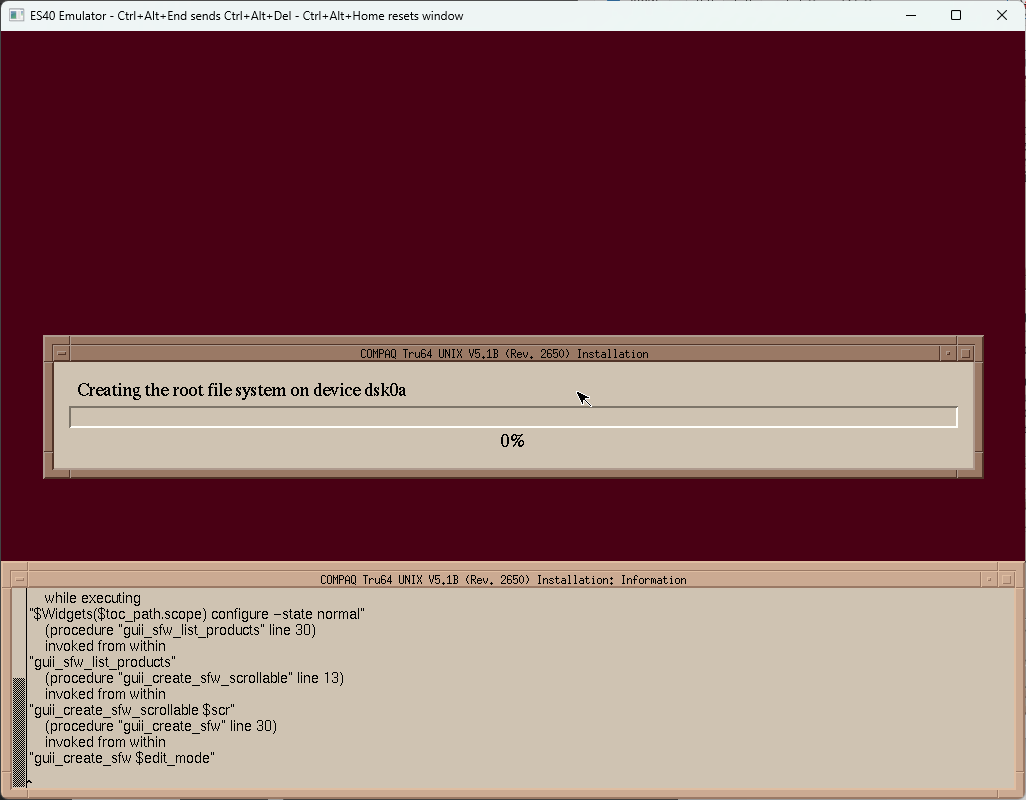
Click Finish to begin installing!
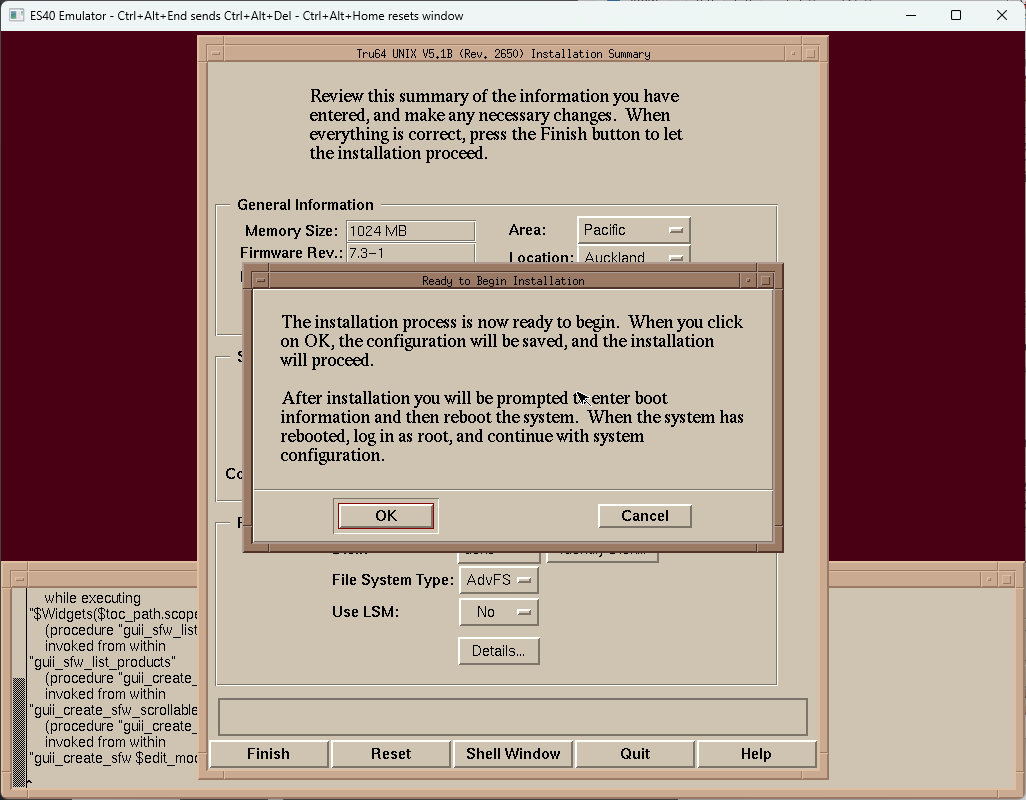
Click OK.
Wait for the installer to do its thing. It will take a while, especially
if you chose to install everything...
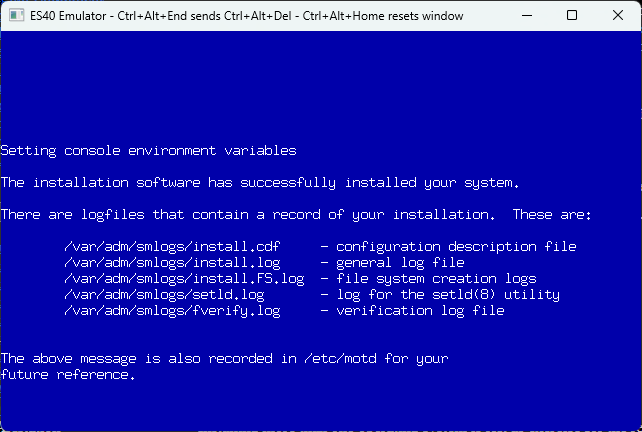
Once its finished, you'll see this come up on the screen briefly, then
the emulator will reboot.
You'll then see it go through configuring things. This will also take a
while...
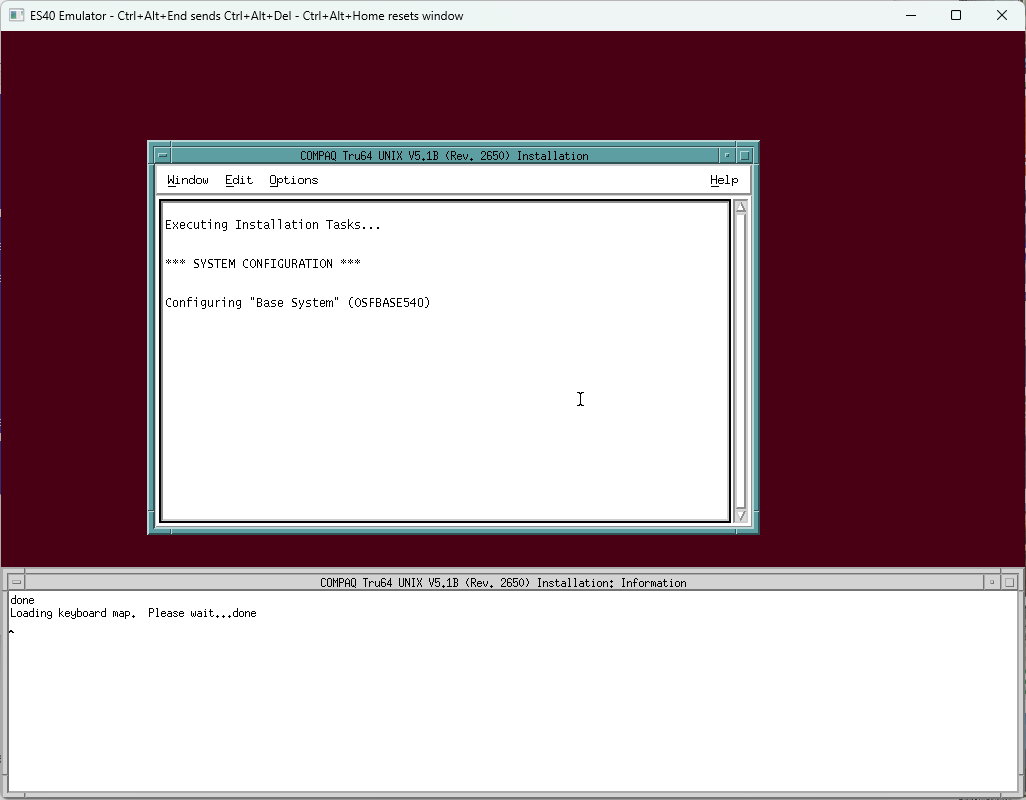
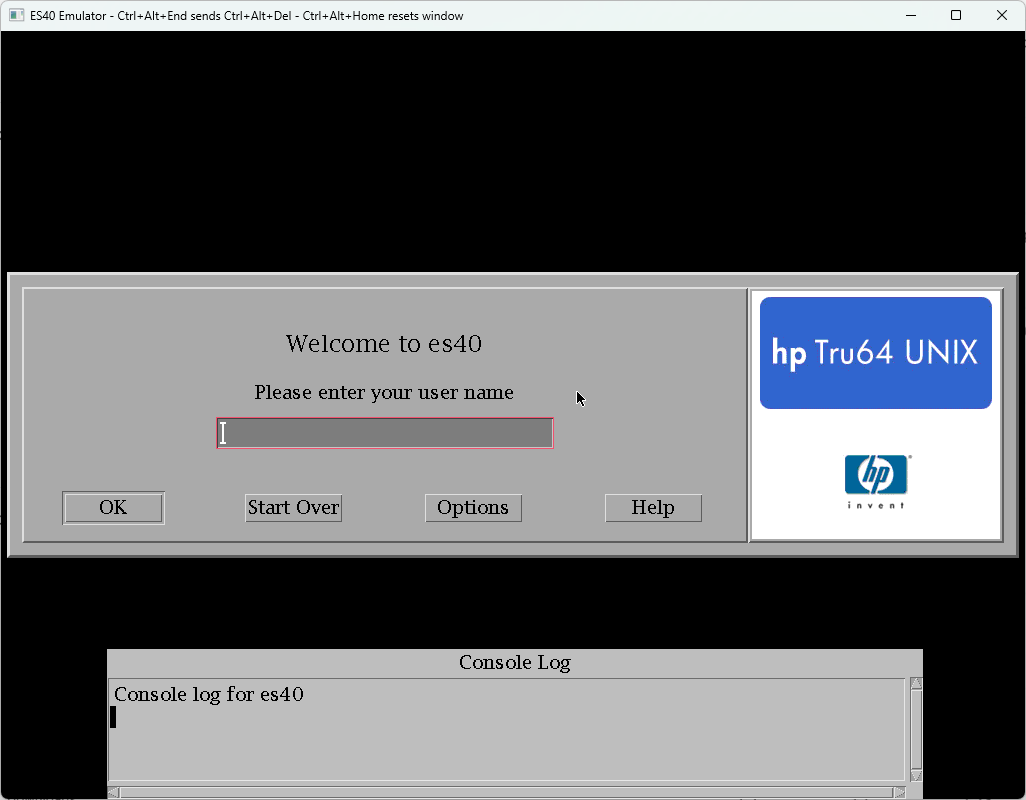
Once the configuration step has finished, the emulator will reboot again,
and eventually you'll be greeted with the login screen! Login with
root as the user, and whatever password
you chose earlier.
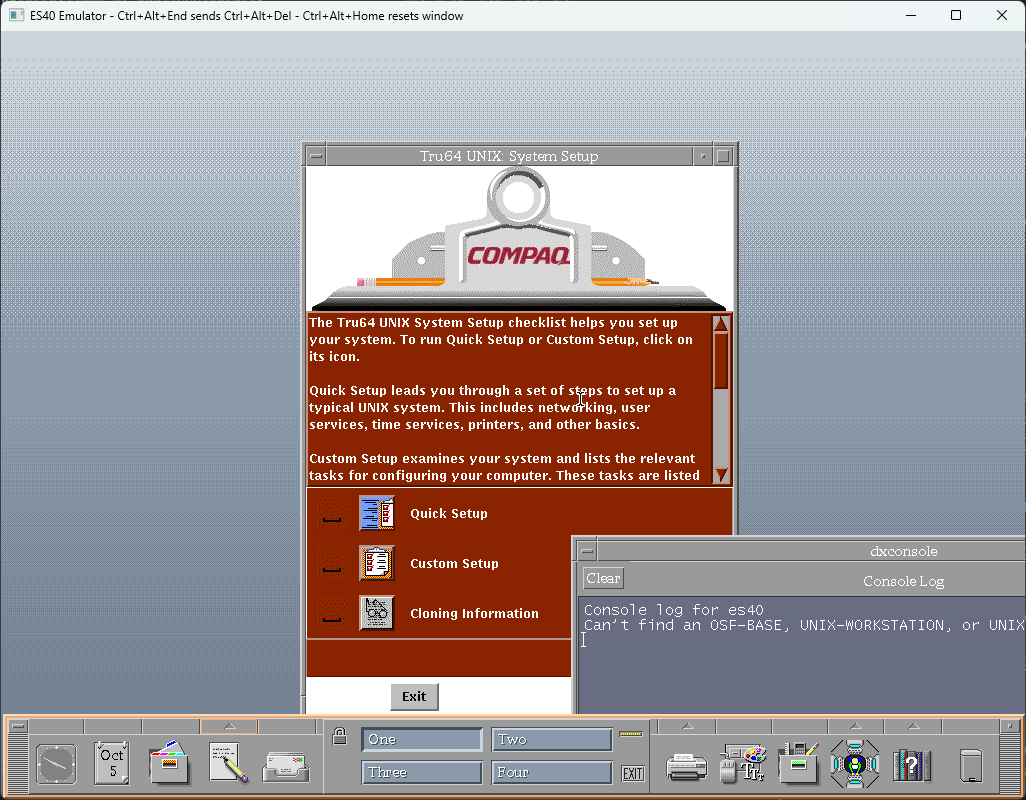
Once you're logged in, you're greeted with the CDE desktop. You'll see
in the corner that Tru64 is complaining that you haven't loaded any
license PAKs - this will limit what you can do a bit. You can use the
Quick Setup button in that System Setup window to do further
configuration which includes loading license PAKs and connecting to the
network.
What Next
- Complete the quick or custom setup to get it on the network and load license PAKs.
- Read the Documentation
- Install Patch Kit 8 to upgrade to v5.1B-6 (this will change the branding from Compaq to HP)
- Install some Software. The Developers Toolkit includes compilers, but a license PAK is required to use them.
- Explore what's on the Associated Products and Open Source Software CD-ROMs
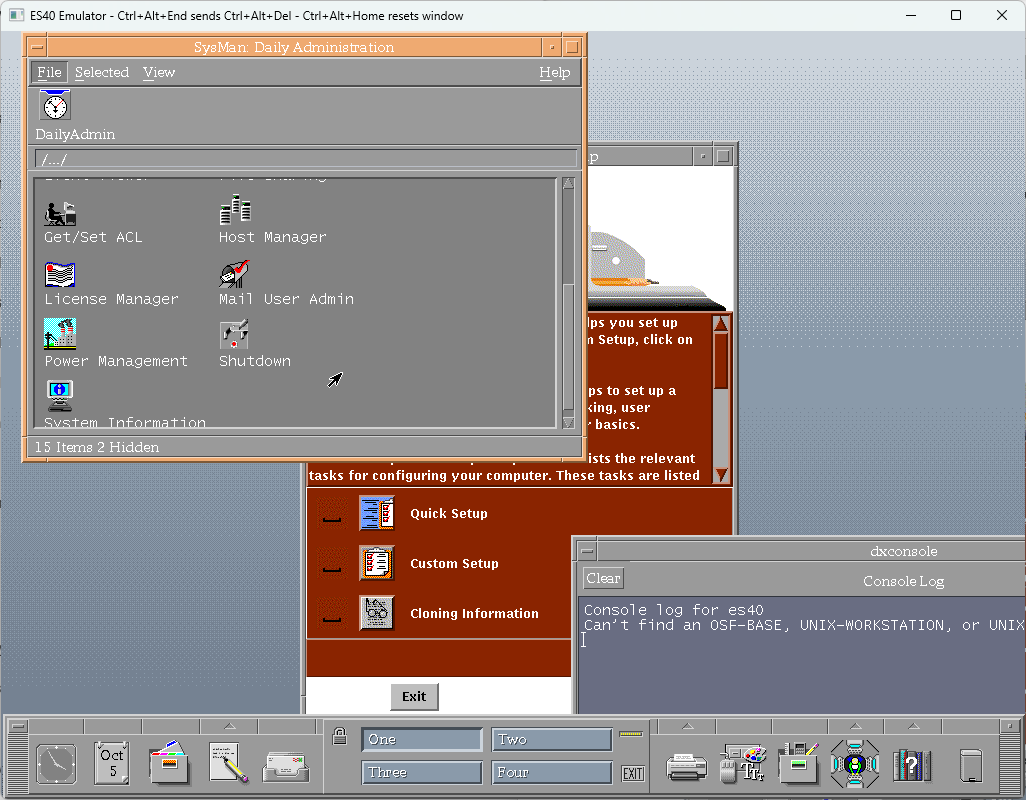
Shutting Down
When you're done messing around with Tru64, you can shutdown the system
by clicking the up arrow above the four computers icon in the bottom
right of the screen, and choosing the Daily Administration
option from the menu that appears.
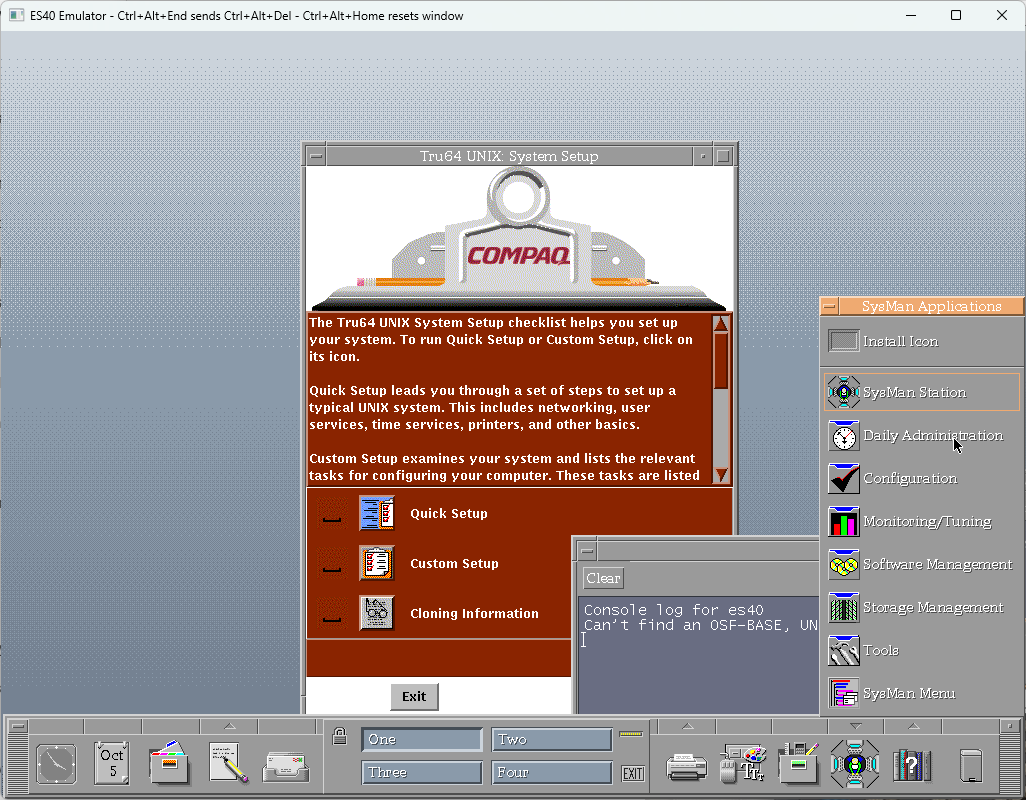
A window will appear. Scroll down and double-click on the Shutdown icon,
and then click the shutdown button on the dialog that appears after
adjusting any options you want to change.